Home → 360 → Printer Friendly Version
360
- 1. Release Notes
- 2. Getting Started
- 2.1. How to Log into Aristotle 360
- 2.2. VIDEO: Aristotle 360 Training Modules
- 2.3. Create Disbursements From File Menu
- 2.4. Ask a Question
- 2.5. Quick Search (Auto-Suggest)
- 2.6. Quick Search
- 2.7. Quick Search- Using Wildcard Character % to find Records
- 2.8. Selecting Filing Committee
- 2.9. 360 Hotkeys
- 2.10. Aristotle Technical Support
- 2.11. Getting Started Guide
- 2.12. Online Knowledge-Base
- 2.13. Definition of a Record
- 2.14. Deleting a Record
- 2.15. Saving a Record
- 2.16. User Permissions - Lowest Possible
- 3. Walkthrough
- 3.1. Walkthrough: Filing the FEC Form 6 (48-hour Notice of Contributions/Loans Received)
- 3.2. Walkthrough: Uploading Data from a Spreadsheet using Import Manager
- 3.3. Walkthrough: List Processing
- 3.4. Walkthrough: Manually Filing an FEC Report
- 3.5. Walkthrough: Accessing MDB/Microsoft Access Files
- 3.6. Walkthrough: Using the State Conduit Management tool
- 3.7. Walkthrough: I don't see the Election Period needed for my transactions
- 3.8. Walkthrough: I have multiple profiles for the same record - can they be merged?
- 3.9. Walkthrough: I don't see a record profile for a committee - how do I add one?
- 3.10. Walkthrough: How Do I Open a Full Database Export in Excel?
- 4. Action Center 3.1
- 5. Advocacy 3.1 - Regulatory Advocacy Administration
- 6. Homepage / Dashboard
- 7. Quick Entry
- 7.1. Create Disbursements From File Menu
- 7.2. Quick Entry
- 7.3. Quick Entry Hotkey
- 7.4. Steps to Enter Disbursements From Quick Entry
- 7.5. Steps to Enter Receipts From Quick Entry
- 7.6. Steps to Add an Entity to a Group in Quick Entry
- 7.7. Session Statistics
- 7.8. South Dakota - Entering Expenditure Transactions
- 8. Searching
- 8.1. Advanced Search
- 8.2. Advanced Search on Multiple Values (Cities, Counties, etc.)
- 8.3. Query Builder
- 8.4. Basic Search
- 8.5. Disbursement Search
- 8.6. Exporting a Saved List
- 8.7. List Manager
- 8.8. List Processing
- 8.9. Using List Manager to export Lists
- 8.10. Receipt Search
- 8.11. Current Selection
- 8.12. Steps to Use Quick Search to Create a List
- 8.13. Steps to Use Advanced Search to Create a List
- 8.14. Merging Two Records
- 8.15. VIDEO: Searching Your Database
- 8.16. Receipt Search by Deposited Date
- 8.17. FAQ: How to Export a List of "First Time" Donors Who Haven't Donated Before This Year
- 8.18. Current Selection - Selection Statistics
- 9. Searching - Quick Selections
- 10. Entities / Master Records
- 11. Entities / Master Records - Individuals
- 12. Entities / Master Records - Individuals - Householding
- 13. Entities / Master Records - Organizations
- 14. Entities / Master Records - Legislators
- 15. Entities / Master Records - Committees
- 15.1. Creating a New Committee Record
- 15.2. Adding a New Committee Record using the COSMOS Database
- 15.3. Creating a New Filing Committee
- 15.4. How to Add a Committee ID Number to a Record
- 15.5. Selecting Filing Committee
- 15.6. About Filing Committees
- 15.7. Filing Committee Basic Information
- 15.8. When Adding a RegID
- 15.9. Committee Staff
- 15.10. Linking a Legislator to Their Committee
- 15.11. Adding a Legislator to a Committee
- 16. Activity Management
- 17. Activity Management - Phone Call
- 18. Activity Management - Email
- 18.1. Mass Email Wizard, Brief Overview and Step 1
- 18.2. Mass Email Wizard, Step 2
- 18.3. Mass Email Wizard, Step 3
- 18.4. Mass Email Wizard, Step 4
- 18.5. Mass Email Wizard, Step 5
- 18.6. Mass Email Wizard, Step 6
- 18.7. FAQ: SPF Records for Mass Email
- 18.8. About Email
- 18.9. Sending Email
- 18.10. Tracking Email
- 18.11. Composing Email
- 18.12. Adding Images to Emails
- 18.13. How to Change Email Disclaimer
- 18.14. Email Statuses
- 18.15. Email Template Editor
- 18.16. Email Subscription Manager
- 18.17. HTML Editor
- 18.18. Finding Bounced Emails
- 18.19. Mass Email and Spam
- 19. Activity Management - Direct Mail
- 20. Activity Management - Fax
- 21. Activity Management - Task
- 22. Activity Management - Appointment
- 23. Activity Management - Mass Activity Wizard
- 24. Financial Transactions
- 24.1. Why Can I Not Add a Transaction To a Batch I Created?
- 24.2. "Force Itemize"
- 24.3. Creating a New Filing Committee
- 24.4. Creating Custom Election Cycles
- 24.5. Linking Two or More Transactions Together
- 24.6. Linking a Committee's Disbursement to a Legislator
- 24.7. FEC Form 3 Types and Subtypes Chart
- 24.8. FEC Form 3X Receipt Types and Sub-Types
- 24.9. FEC Form 3X Disbursement Types and Sub-Types
- 24.10. Reporting In-State Activity Only on a State Report
- 24.11. Entering Earmarked Contributions
- 24.12. TYPE: "Earmarked" vs. TYPE: "Earmarked (Conduit)"
- 24.13. South Dakota - Entering Expenditure Transactions
- 24.14. Adding an Unpaid Bill
- 24.15. Adding a Subvendor to an Expense
- 24.16. Refunding a Contribution
- 24.17. Voiding a Check/Disbursement
- 25. Financial Transactions - Receipts
- 26. Financial Transactions - Disbursements
- 27. Campaigns / Activity Campaigns
- 28. Events
- 29. Reporting
- 30. Reporting - E-Filing
- 31. Reporting - System Reports
- 31.1. Briefing Book Report
- 31.2. Disbursement Transaction List Report
- 31.3. Individual Details Report
- 31.4. Receipt Transaction List Report
- 31.5. Transaction Report
- 31.6. Contribution Analysis Report
- 31.7. Check Request Report
- 31.8. Total Receipts Per Election Period Report
- 31.9. Error Running System Event Contribution Report
- 32. Reporting - Compliance Reports
- 33. Lobby Disclosure Reports
- 34. FEC Compliance FAQs
- 34.1. How To Enter a Refund of a Disbursement
- 34.2. How To Adding a Joint Fundraising Committee (JFC) so that it appears on FEC Form 1 and Form 2 correctly
- 34.3. How To Enter a Reattribution vs. Redesignation
- 34.4. How To Enter a Redesignation
- 34.5. 35.2. Adding a Joint Fundraising Committee
- 34.6. How to Enter an Earmarked Contribution and the Accompanying Fee Disbursement
- 34.7. How To Mark A Compliance Report As Filed
- 35. Reporting - FEC - Filing Committees
- 36. FEC Form 1 Compliance
- 37. FEC Form 2 Compliance
- 38. FEC Form 3 Compliance
- 38.1. Form 3
- 38.2. Proper Data Entry for Reattribution of Contributions on FEC Form 3 or 3X
- 38.3. Proper Data Entry to Forgive a Loan Made By the Candidate
- 38.4. Proper Data Entry to Record/Reimburse Campaign Expenditures Made by the Candidate as an In-Kind Contribution
- 38.5. FEC Form 3 Types and Subtypes Chart
- 38.6. Getting "Personal Funds" to Pull to Schedule C When the Loan Is From the Candidate (Form 3)
- 38.7. Calculating Election Cycle to Date and out of Period Transactions
- 38.8. FAQ: Why is my "Election Cycle To Date" amount zero for my earmarked memo entries?
- 38.9. FAQ: Why is "Candidate Name" pulling in the Campaign Name Field on my report?
- 38.10. FAQ: Why are my Earmarks Itemizing in two separate Periods?
- 38.11. FAQ: How to get memo entries when you receive multiple earmarked contributions through the same conduit on the same date
- 39. FEC Form 3P Compliance
- 40. FEC Form 3X FAQs
- 40.1. How Do I Enter An H2 Fundraising Allocation And Then Utilize That On An H4 Allocable Disbursement?
- 40.2. Why Are the Wrong Dates Loading on the Parameter Screen When I Select the Report Schedule?
- 40.3. I'm Seeing a Discrepancy in My Report's Year-To-Date Column - What Are Some Possible Causes?
- 41. FEC Form 3X Compliance
- 41.1. FEC Form 3X Parameter Screen
- 41.2. FEC Form 3X History Screen
- 41.3. FEC Form 3X Receipt Types and Sub-Types
- 41.4. FEC Form 3X Disbursement Types and Sub-Types
- 41.5. How to Generate and File an Amendment
- 41.6. Proper Data Entry for Reattribution of Contributions on FEC Form 3 or 3X
- 41.7. Pulling a Subordinate Committee to the Schedule F on the Form 3X
- 41.8. Data Entry for Independent Expenditures Disseminated in a Prior Period
- 41.9. Data Entry for Schedule H2
- 41.10. Data Entry for Form 3X, Schedule H3
- 41.11. FEC Form 3x - Line 30b
- 41.12. Entering Coordinated Expenditures as Debt Repayment
- 41.13. Schedule H(4) - Data Entry for Transactions to Pull With Previous Years Allocation Ratio
- 41.14. Schedule F: How to Show that Your Committee has been Designated to Make Coordinated Expenditures
- 41.15. FAQ: Why does my PDF only include the summary pages?
- 41.16. FAQ: How to Link Credit Card Memos to Outstanding Debts for Repayment
- 41.17. FAQ: Why don't my Debt Repayment memos show on Schedule D along with my Debt Transactions?
- 41.18. How to add a Presidential District
- 41.19. How do I enter an allocated transfer of in-kind contributions?
- 42. FEC Form 3L Compliance
- 43. FEC Form 5 Compliance
- 44. FEC Form 6 Compliance
- 45. FEC Form 24 Compliance
- 46. FEC Form 99 Compliance
- 47. FEC Report Troubleshooting and FAQs
- 48. Alabama Compliance Reporting
- 49. Alaska Compliance Reporting
- 50. Arkansas Compliance Reporting
- 51. Arizona Compliance Reporting
- 52. California Compliance Reporting (Legacy)
- 53. Colorado Compliance Reporting
- 54. Connecticut State Report
- 54.1. Schedule A - Itemized Contributions from Individuals
- 54.2. Schedule C1 - Contributions from Other Committees
- 54.3. Schedule C2 - Reimbursements or Surplus Distributions from other Committees
- 54.4. Schedule D - Loans Received This Period
- 54.5. Schedule K - Miscellaneous Monetary Receipts not Considered Contributions
- 54.6. Schedule L1 - Fundraising Event Information
- 54.7. Schedule L3 - Purchases of Advertising in a Program Book or on a Sign (Municipal Candidate and Town Committees ONLY)
- 54.8. Schedule M - In-Kind Contributions
- 54.9. Schedule P - Expenses Paid by Committee
- 54.10. Schedule S - Expenses Incurred by Committee but Not Paid During this Period
- 54.11. Schedule T - Itemization of Reimbursements and Secondary Payees
- 55. Connecticut Compliance Reporting
- 56. Florida Compliance Reporting
- 57. Georgia Compliance Reporting
- 58. Indiana Compliance Reporting
- 59. Iowa Compliance Reporting
- 60. Kansas Compliance Reporting
- 61. Maine Compliance Reporting
- 62. Massachusetts Compliance Reporting
- 63. Michigan Compliance Reporting
- 64. Minnesota Compliance Reporting
- 65. Mississippi Compliance Reporting
- 66. Montana Compliance Reporting
- 67. New Jersey R1 Report
- 68. New Mexico Compliance Reporting
- 69. New York Compliance Reporting
- 70. North Carolina State Report
- 70.1. Aggregated Contributions from Individuals (CRO-1205)
- 70.2. Contributions from Individuals (CRO-1210)
- 70.3. Contributions from Political Party Committees (CRO-1220)
- 70.4. Contributions from Other Political Committees (CRO-1230)
- 70.5. Refunds/Reimbursements to the Committee (CRO-1240)
- 70.6. Disbursements (CRO-1310)
- 70.7. Aggregated Non-Media Expenditures (CRO-1315)
- 71. Ohio Compliance Reporting
- 72. Oklahoma Compliance Reporting
- 73. South Dakota Compliance Reporting
- 74. Texas State Report
- 75. Texas Compliance Reporting
- 76. Utah Compliance Reporting
- 77. Virginia Compliance Reporting
- 78. Wisconsin Compliance Reporting
- 79. Reporting - Custom/QRT Reports
- 80. Bank Accounts / Accounting
- 80.1. Creating a Batch
- 80.2. Creating a New Filing Committee
- 80.3. Creating a Bank Account
- 80.4. Selecting Filing Committee
- 80.5. About Filing Committees
- 80.6. Filing Committee Basic Information
- 80.7. Bank Accounts
- 80.8. Types of Bank Accounts
- 80.9. Bank Account Reports
- 80.10. Reconciliation Report
- 80.11. Outstanding Checks Report
- 80.12. Disbursements Report
- 80.13. Outstanding Receipts Report
- 80.14. Saving Committee Staff and Relationship Links
- 80.15. Viewing Committee Staff and Relationship Links
- 80.16. Using the Disbursement Budgeting Feature
- 80.17. Creating a New Disbursement Budget
- 80.18. Viewing Budgeting Disbursements
- 80.19. Exporting Disbursement Budgeting Data
- 80.20. Printing Checks
- 80.21. Bank Reconciliation Guide
- 81. Bank Accounts / Accounting - Checks
- 82. Administration
- 82.1. Creating a New Filing Committee
- 82.2. Selecting Filing Committee
- 82.3. Account Settings
- 82.4. My User Settings
- 82.5. Add/Edit Users
- 82.6. User Permissions
- 82.7. Edit Record Groups
- 82.8. Edit Election Periods
- 82.9. Edit Transaction Limits
- 82.10. Global Transaction Defaults
- 82.11. Edit Receipt Sources
- 82.12. User-Defined / Custom Fields
- 82.13. About Filing Committees
- 82.14. Disbursement Budgeting
- 82.15. Check Status Settings
- 82.16. Email Template Editor
- 82.17. Email Subscription Manager
- 83. Groups
- 84. Fundraising/Advocate Administration
- 85. Fundraiser/Bundler Management
- 86. Super Voter
- 87. Fat Cats
- 88. Importing Data
- 89. Batches
- 90. Notes
- 91. Release Notes
- 91.1. Aristotle 360 Release Notes - June 2012
- 91.2. Aristotle 360 Release Notes - May 2012
- 91.3. Aristotle 360 Release Notes - March 2012
- 91.4. Aristotle 360 Release Notes - February 2012
- 91.5. Aristotle 360 Release Notes - November 2011
- 91.6. Aristotle 360 Release Notes - September 2011
- 91.7. Aristotle 360 Release Notes - August 2011
- 91.8. Aristotle 360 Release Notes - June 2011
- 91.9. Aristotle 360 Release Notes - May 2011
- 92. Compliance Q&A
- 93. Aristotle 360 API
- 93.1. User Permissions/Setup Required for API Usage
- 93.2. Getting Started with the Aristotle 360 API
- 93.3. Creating Entities and Transactions Using the API
- 93.4. Example Web Application Using the 360 API
- 93.5. Creating New Individual With Email Information (Sample)
- 93.6. getList() Method
- 93.7. API XML String Return Value
- 93.8. Add/Update Individual Employer
- 93.9. Adding Individual to a Group
- 93.10. Add Individual to a Group by Specifying Group and Category Names
- 93.11. Add Individual and Receipt Info
- 94. Aristotle 360 API - Fields/Field Mapping
- 95. Webform Builder
- 96. Bills and Votes
- 97. Fly-In
- 98. Sharepoint Sites
- 99. Release Notes Links
- 99.1. 360 Release Notes - January 2017
- 99.2. 360 Release Notes - February 2017
- 99.3. 360 Release Notes - March 2017
- 99.4. 360 Release Notes - April 2017
- 99.5. 360 Release Notes - May 2017
- 99.6. 360 Release Notes - June 2017
- 99.7. 360 Release Notes - July 2017
- 99.8. 360 Release Notes - August 2017
- 99.9. 360 Release Notes - September/October 2017
- 99.10. 360 Release Notes - November 2017
1. Release Notes
1.1. 360 Release Notes 2017
In Production Now!
1.2. 360 Release Notes 2016
1.3. 360 Release Notes 2015
1.4. 360 Release Notes 2014
2014 Election Data: Transitional Contact Data for 2014 General Election Winners
1.5. 360 Release Notes 2013
1.6. 360 Release Notes 2012
Aristotle 360 Release Notes - June 2012
Aristotle 360 Release Notes - May 2012
1.7. 360 Release Notes 2011
2. Getting Started
2.1. How to Log into Aristotle 360
- Browse to https://ai360.aristotle.com/
- Type in your Username
- Type in your Password
- Click Login

* Be sure that your pop-up blocker is disabled for the Aristotle 360 website.
2.2. VIDEO: Aristotle 360 Training Modules
These recordings walk you through the common features used in Aristotle 360. They are between 6 and 18 minutes long. To view these recordings you will need to download a .zip file containing the recordings and also containing the recording player software, which will need to be installed on your Windows computer.
To download the file containing the recordings and player:
- Click this link: http://webdownload.aristotle.com/360trainingmodules.zip
- Enter the username: webget
- Enter the password: $uppli54
After downloading and extracting the file the folder contains the following recordings:
- Logging on and User Setup - 6 Minutes
- 360 Layout and the 4 Record Types - 18 Minutes
- Groups and Notes - 9 Minutes
- Filing Committee and Accounts Pages - 10 Minutes
- Batches, Transactions, and Periods - 17 Minutes
- Import Manager - 10 Minutes
- Using Search and Lists - 12 Minutes
- Exporting Data and Running Reports - 10 Minutes
You will be able to double click these files to play them after installing the atrecply.msi file on your Windows computer.
2.3. Create Disbursements From File Menu
This method of data entry allows you to create a Disbursement without having to access the entitiy record or load quick entry. This is useful for entering one Disbursement.
One way to enter a new Disbursement is to go to File > New Disbursement. This will cause the Disbursement Edit pop out window to appear. Once the Disbursement Edit window appears you will be able to enter the information for the Disbursement. After entering in all the information for the Disbursement select Save and Close. This will save the Disbursement to the record that you selected and close the Disbursement Edit window.
2.4. Ask a Question
By going to Help > Ask A Question. you are given the opportunity to fill out a short form and submit it to Aristotle Technical Support. This feature is useful if you don't have immediate access to your e-mail client.
2.5. Quick Search (Auto-Suggest)
In the upper left-hand corner of the Home Page you will see the Quick Search. Here you have the ability to search for a particular record in your dataset.
To do this, enter in the full name or partial name of the record. Records that match the criteria you input will automatically show up below the input field. Continue to enter as much of the record's Full Name as possible. Once a record of interest appears, select the record by clicking it once or moving your keyboard arrow keys until your record is highlighted and pushing ENTER. Aristotle 360 will navigate you directly to that record's "Detail" page.
Please note that the Quick Search automatically searches across all four entity types at once; Individual, Organization, Committee, and Legislator reords. The icon that appears to the left of the entry designates the type of record you are viewing. Move your mouse arrow above an entry for a tooltip hint on the type of record you are looking at.
The Quick Search is located on the upper left-hand corner of almost every page you go to, not just the home page.
* If you wish to use the legacy Quick Search module instead of the Auto-suggest quick search, please contact Aristotle Support for a change in your dataset's configuration settings.
2.6. Quick Search
In the upper left-hand corner of the Home Page you will see the Quick Search. Here you have the ability to search for a particular record in your dataset.
To do this enter in the full name or partial name of the record and select what kind of record it is (Individual, Organization, Committee, or Legislator). Then click the Quick Search button. This will cause a fly out window to appear with possible matches for the record name you entered. Once you find the name of the record you want in the list that appears, click on it to view the record.
Tip: If you have trouble finding a record, try broadening your search by only typing in the first name or only the last name, you can also type in the partial first or partial last name if you are unsure of the spelling.
The Quick Search is also located in the upper left-hand corner of almost every page you go to, not just the home page.
2.7. Quick Search- Using Wildcard Character % to find Records
Donor name formats vary to include initials and middle names at times, for example a donor whose provided formal name is "J. Thomas Smith" might introduce himself informally as "Thomas" making it difficult to locate his donor record. This is a situation where the wildcard % will come in handy.
By default, Quick Search uses a starts like command to search records, so "J. Smith" and "Thomas Smith" will get you different results. Using % in place of unknown parts of a name will return additional records that contain part of what you're searching. So for the example above if I type "%Thomas Smith" into quick search I will find the J. Thomas Smith record.
2.8. Selecting Filing Committee
You can have one or more filing committees in a dataset. You set up the info for the filing committee on the Filing Committees page by going to Settings > Filing Committees. Select the filing committee you wish to review or edit by clicking on the magnifying glass next to the name of the filing committee.
2.9. 360 Hotkeys
By clicking on the Hot Keys Guide from the 360 menu bar under Help, list of available hot keys are presented in a legend.
In order to activate these hotkeys, press and hold down the Control Key, the Alternate Key and the corresponding letter key at the same time and in that order.
GLOBAL HOTKEYS
Cntl+Alt+H --> Go to the Homepage
Cntl+Alt+A --> Go to the My Open Activities View
Cntl+Alt+I --> New Individual
Cntl+Alt+O --> New Organization
Cntl+Alt+L --> New Legislator
Cntl+Alt+M --> New Committee
Cntl+Alt+Q --> Open Quick Entry
Cntl+Alt+P --> Help Manual
Cntl+Alt+S --> Individual Basic Search
Cntl+Alt+Y --> Organization Basic Search
Cntl+Alt+E --> Legislator Basic Search
Cntl+Alt+C --> Committee Basic Search
Cntl+Alt+R --> Create New Receipt
Cntl+Alt+D --> Create New Disbursement
Cntl+Alt+X --> Logout and Close Session
Record-Specific Hotkeys *
Cntl+Alt+R --> Create New Receipt
Cntl+Alt+D --> Create New Disbursement
Cntl+Alt+N --> Create New Note
* Must have a specific record open for hotkey to execute
2.10. Aristotle Technical Support
By clicking on Aristotle Support Hompage from the 360 menu bar, you are redirected to the Aristotle corporate website (http://www.aristotle.com/content/view/76/103/).
Aristotle Technical Support is available 24/7 throughout the year. The two best methods for contacting a technical support representative are:
1. Send an e-mail to support@aristotle.com with your dataset name and a detailed description of your issue.
2. Call 888 217-9600
3. Ask a question here: http://support.aristotle.com/kb/contact/
In order to receive prompt and courteous service, please use the two methods above. Please have your customer identification number and dataset number handy when you contact Aristotle Technical Support.
2.11. Getting Started Guide
By clicking on the Getting Started Guide from the Help menu, you are redirected to Aristotle 360 Knowledge Base. Here you can browse for an article or subject area you need help with.
2.12. Online Knowledge-Base
By clicking on the Online Knowledge-Base from the Help menu, you are redirected to Aristotle 360 Knowledge Base. Here you can browse for an article or subject area you need help with.
2.13. Definition of a Record
In a database, a record is a collection of specific, uniform information related to, or clearly defining, a single item or entity. In Aristotle 360, there are four types of Records: Individuals, Organizations, Legislators, and Committees.
Types of Records
- Individuals: This type contains information about specific people, such as contributors, staff members, volunteers, and constituents.
- Organizations: This type typically contains information about all of the organized groups you work with except those that qualify as Committees (below). Examples of your Organizations may include your vendors, employers, businesses that contribute, and banks.
- Legislators: This type contains information about elected officials at all levels, for example U.S. Senators and Representatives, Governors, members of State Legislatures, County Commissioners, and local elected officials. This record type is populated and updated by Aristotle resources.
- Committees: This type typically includes those organized groups whose primary function is to influence, or participate in the political process. Examples of Committees include Political Action Committees, Political Party Committees, State Party Committees, Campaign Committees, and other types of political committees.
2.14. Deleting a Record
If your administrator has set permissions for your dataset, you may not be able to delete records. In this case, the Delete option will be grayed-out and you cannot select it. When you need to delete a record from your database, first search for and select the record you want to delete, then click the Delete option on the Options Bar. A dialog box appears asking you to confirm that you want to delete the record, and you must click OK to complete the process.
2.15. Saving a Record
When you finish entering and proof-reading data, click the Save Changes option (or Save and Close) on the Options Bar to make your changes permanent. You can click Save at anytime while entering information, but always be sure to save when you finish entering data. Each time you save an Individual record, you'll see a confirmation. Note: if you are inside the Address Information box or any one of the panes below (Receipts, Disbursements etc), you must click the save button within that pane in order for the information to save. If you enter in an address and click save at the top of the page, the address will not save.
2.16. User Permissions - Lowest Possible
The Lowest possible user permission allowed is that of a User with a new group that you create. Once you assign this new user to the new group, do not give them any permissions. One thing they will be able to access is add and delete records with non-financial information. The new users would also be able to access Webform Builder. Other than that, a user with no permissions cannot do anything to any financial records. They would basically be able to "Read-Only" when given no permissions.
3. Walkthrough
3.1. Walkthrough: Filing the FEC Form 6 (48-hour Notice of Contributions/Loans Received)
Filing the FEC Form 6 (48-Hour Notice of Contributions/Loans Received)
For information about who must file a Form 6, and when it must be filed, please see the FEC website: http://www.fec.gov/pdf/forms/fecfrm6i.pdf
When filing a Form 6 using Aristotle 360, you will use the manual uploader to file the report, instead of filing it directly through the system. This help file will walk you through this process.
Generating your Form 6
1. To generate your Form 6, mouse over the Reporting tab and choose "Compliance Reports." For Filing Authority, choose "FEC," then click the "FEC Form 6"
.jpg)
***Please note: if you do not see this option, and you need to file a Form 6, please contact Support for assistance.***
.jpg)
2. Fill out the three tabs and click "Generate:"
a. Accounts: Choose the correct filing committee and bank account(s).
b. Form Information: Enter the date range for your report
c. Settings: Additional options for the report
Downloading your Report and the Vendor Tools
1. When the report has finished generating, you will see a pop-up with four choices:
.jpg)
a. To download a viewable version of your FEC file (PDF): Click the Print button. This will bring up your document in a viewable format.
b. To download your FEC file: click on the first link (Click on ____ to download your FEC file) to download and save your FEC file (e.g. "Sample Form 6"). Be sure to save it somewhere you can locate again (such as "My Documents" or the Desktop).
c. To view your validation file: click on the second link to download your validation file (Click on _____ to download the report generated by the FEC). This will inform you of any warnings or errors with your report.
d. To download the Vendor Tools: click the third link (Click here to download Aristotle Vendor Tools): you will need to do this only once. After clicking on the Vendor Tools link, save the file to your computer:


e. Locate the saved file. Right click on the file, and choose "Extract All," "Unzip," or similar.

Filing Your Form 6
1. Once it has extracted, open the unzipped file you just created (it should now have a normal folder icon, not a zipped one). You will now see a series of folders and files.

2. Open the FECload folder, then double-click the FECload icon to open the program.
3. Click File > Upload. Locate your FEC file ("Sample Form 6").

4. You will now need to enter your e-filing information.
a. ID: Enter your FEC Filing ID it should be formatted like this: C12345678
b. Fax: typically not necessary
c. Password / Confirm: type your e-filing password. Please note, if you do not know your FEC e-filing password, you will need to contact the FEC we do not have this information.
d. Email 1 / Confirm: the email address where you would like to receive the receipt confirmation.
e. Email 2 / Confirm: a second email for the confirmation (if desired)
5. Choose "TCP/IP" as the filing method.
.jpg)
6. Click the Configure tab at the top. **Note: you will not be able to click Configure until you have entered the information above.** Enter the following information:
a. TCP/IP hostname: disclose.nictusa.com
b. Agency ID: FEC
.jpg)
7. Confirm that your information is correct, and click OK. The upload process will begin immediately. Please DO NOT close the FECload program until:
a. You receive an email confirmation from the FEC, letting you know that they have received your file, and/or:
b. You receive a pop-up notification in the FEC uploader with a "Success!" message.
Please note: if you are unsure of whether or not your report was successfully uploaded, you can always check its status on the FEC website using your committee name and/or committee ID to search: http://fec.gov/finance/disclosure/efile_search.shtml
Please check the FEC website *before* attempting to file again.
3.2. Walkthrough: Uploading Data from a Spreadsheet using Import Manager
The Import Manager allows you to import a group of records and/or transactions into your database in a single operation. By mapping the columns of your import, you have great flexibility with the format of your import file, and you can save your import settings for use again and again. If you plan to import files using the same format and structure then it is to your advantage to save your settings so that you will not be required to go through the entire wizard with each import.
Starting the Import Wizard
To find the tool, head over to the Tools tab on the navigation bar. If you are using the old 360 layout, you can find the tool under the File menu.
From there, click on the green Start New Import button.
Step 1: Select Your Data File
Click Browse to search your device for the data file you want to use for the import.
Once you have selected your import file, choose the following:
- Import Type (what record type will be created for your import file)
- Import Title
- Description
Note the check box: be sure to un-select this if your first row contains data rather than column headers.
Step 2: Confirm Your File
This step displays information about your import file, including some sample data from the first few rows of the spreadsheet. Review this to make sure you have chosen the correct import file and settings.
The File Options selection will allow you to begin on a line other than the first line if desired.
Step 3: Map your Datapoints
In this step, you will select which fields you want to import and where that data should be imported.
- Source Column will display your column headers (if you indicated that your file contained column headers).
- Source Preview will show you sample data. You can choose the blue arrow at the top to select a different data line to view.
- Field Data Type will allow you to choose the type of data you are importing for each field. Your choice here will affect what shows up in the Destination Field drop-down.
- Destination Field will let you select exactly where the data should be mapped.
Step 3.1: Assign Default Values (Organizations)
If you are importing organizations, you will see a screen for step 3.1, where you will need to select a default organization type. The type is required for organization data entry, and the selection you make here will apply to all records from your spreadsheet. Alternatively, if you don't want a single organization type to be applied to your entire import, you can include it as a column on your spreadsheet, which will be mapped out on the initial phase of step 3, seen above.
Step 4: Assign Default Values
Step 4 will change depending on what type of information you have mapped for your import. In this step, you will determine what the system will fill in for any missing information.
For example, when importing receipt information, you must set some receipt-specific defaults if you have not already mapped these fields in your import.
You can also add these receipts to an existing batch or create a new batch for the import. Please be aware that a batch must still be an open batch (i.e. not have a closed date saved to it) in order for it to appear as an option here.
We recommend always using a batch when importing transactions; performing tasks such as mass editing or mass deleting transactions from an import is much easier when they are in a batch together.
Once you have set all the defaults you need, click Next.
Step 4A: Assign to Groups / Step 4B: Assign to List
You will also have the option to import all records into a Group. If you check the "Import Groups" check-box, you can select a group by first choosing a Category, then selecting the correct Group.
If you need to add a Category or Group, you can also do so from this screen.
In addition, you can assign all records to a list by using the field and button in this section to create a new list.
Step 4C: Assign to UDF
On this step, you have the option to assign records to UDFs. Please note that the UDF options will only appear once the Import UDFs box is checked.
Please note that steps 4A through 4C are all optional, and can be skipped if desired.
Step 5: Record Matching
In this step, you will select how Aristotle 360 will match your imported records to your pre-existing records. You will also determine what Aristotle 360 will do with matching and non-matching records.
Adding New: choose what you would like the system to do with records for which it cannot find a match the screen-shot shown is for an import of individuals.
- "Create Non-Existing Individuals" this will create new records for those that do not match others in the database.
- "Ignore Non-Existing Individuals" this will skip over all records that do not match other records in the database they will not be imported.
Updating Existing: choose what you would like the system to do with records that it is able to match.
- "Update Individual Info" this will insert your newly imported information into matching pre-existing records.
- "Do Not Update Individual Info" this will ignore all of your newly imported information for individuals who already exist in the database.
Matching Criteria: The options on this list will change based on what information you are importing and mapped back in Step 3. For example, since we imported First Name, Last Name, and Address Line 1, the second option is available. Because we did not import a Voter ID, we cannot choose to match by Voter ID.
Final Step
Save Settings: This will allow you to save your import settings to use later. This is very helpful if you will be importing the exact same file structure repeatedly. If saving your import setting to use at a later date, be sure to click Save Settings before finishing your import otherwise your import settings will not be saved.
Email Notification: Enter your email address. The Import Wizard will send you an email when the import is complete.
Click Finish to complete your import.
After Completing the Import Manager Wizard
You should receive a confirmation email letting you know the results of your import. Please be aware that there may be some delay, depending on the size of your import.
Congratulations! You have successfully completed your import. We recommend that you spot check some of your imported records to make sure that all of your fields were mapped correctly. If you have any questions, or if you need any assistance, please contact Support.
If you saved your settings during the final step of the wizard, you'll find those settings when you navigate back to the Import Manager page.
Keep in mind that if you plan to use these same import setting again, you will click on the format name instead of the green Start New Import to begin your import. When using saved settings, remember that your new import file must be in the same format as your original import, i.e. the file must have the same number of columns as the original, and they must all be in the same order as well. If the new file has the same columns, but in a different order, then certain datapoints may get imported into the wrong field.
3.3. Walkthrough: List Processing
List Processing can be a very helpful tool when attempting to combine various kinds of information to create new lists. This tool gives you the ability to expand or narrow any list by including or excluding certain information using other lists that you have created in your database.
Creating your Lists
1. To use List Processing, you will need to create two or more lists that you will manipulate to achieve a unique list. You can also use any existing list that you have previously saved in your database. A list can be created whenever you have a selection of records usually created by using the Search tab.

You can use any of these search options to find a list of records.
2. Once you have entered your search parameters and searched the database for records that match your criteria, you will have a list of records, with a "List Functions" box on the right-hand side.

3. Under List Functions, click Save Results as New List and enter a name for your list. Follow the same steps to create your second list, and any other lists you might be manipulating. Once you have created all of your lists, you are ready to use List Processing.
List Processing
1. Mouse over Search and choose List Processing. You will see a screen with a Venn diagram, and a number of options. These options will allow you to combine your lists in any way.

2. Click on the text box under List A to select your first list by searching for the name. Do the same for List B. Please note that for the "Difference" option, the order of your lists will matter, while the order for the "Join" and "Intersection" will not - this will be explained further.
For example, let's assume that List A is all donors in your database ("All Donors"), and that List B is all individuals with a home address in Oregon ("All Oregon Residents").
a. Join: selecting "Join" will create a list that contains all records from both lists. In our example, this would give you a list of all donors and all Oregon residents.

Please note: a record can only appear on a list one time. This means that if a record belongs to both List A and List B, it will still appear only once on your newly created list.
b. Difference: selecting "Difference" will create a list that contains all records in List A that are not in List B. All members of List A that also belong to List B would be removed. In our example, this would give you a list of all donors except those that live in Oregon.

Please note: as mentioned before, the order of your lists for Difference is very important reversing the two lists would give you a different result.

In this example, you would create a list of all Oregonians who did not donate, whereas in the first list you created a list of all donors except Oregonians.
c. Intersection: selecting "Intersection" will create a list of only those individuals who belong to both lists. In our example, this would give you a list of all donors in (and only in) Oregon.

3. Once you have made your selection and named your new list, click Process and Create New List. You will now have a new list saved in your List Manager (also under the Search tab) both of your original lists will be retained.
3.4. Walkthrough: Manually Filing an FEC Report
Manually Filing an FEC Report Using FECload.
There may be a time when you will need to file your FEC report outside of the 360 software, such as when using a back-door password to change a report type or date range. The steps below will guide you through using the FEC's Upload tool. To manually upload your report, you will need the upload software provided by the FEC. It can be found here: http://www.fec.gov/elecfil/vendors.shtml
If you already have the FEC software downloaded, please skip to step II.
I. Downloading and Unzipping the FEC Vendor Tools.
When downloading, choose "Save" to save the files to your computer. Locate the file where you downloaded it you will see a zipped folder icon. Right-click, and choose "Extract All."
.png)
Once the file has been unzipped, you will see three folders. We recommend that you do not save any files to, nor remove any files from this folder, as it can disrupt functionality.

You are now ready to file your report.
II. Filing Your Report
- Open the "FECload" folder, then double-click "FECload" to open the program.

1. Click File > Upload. Locate your FEC file ("Sample FEC Form").

2. You will now need to enter your e-filing information.
a. ID: Enter your FEC Filing ID it should be formatted like this: C12345678
b. Fax: If you would like a faxed confirmation, enter your fax number here. This is not necessary.
c. Password / Confirm: type your e-filing password. Please note, if you do not know your FEC e-filing password, you will need to contact the FEC we do not have this information.
d. Email 1 / Confirm: the email address where you would like to receive the receipt confirmation.
e. Email 2 / Confirm: a second email for the confirmation (if desired)
f. This filing amends: If your file is an amendment, enter the Filing ID of the original report. This must be in the format FEC-123456, and it must be the filing ID of the original report. For example, if you are filing a second amendment, enter the original report ID, not the report ID of your first amendment.

3. You have two options for e-filing your report: TCP/IP and SSL. Each of these will need specific information added to the "Configure" tab please note, this tab will not be available until you have entered all of the information in Step 2.
Please note: the two possible filing methods are equivilent, the choice of one over the other has only to do with your network settings. Normally TCP/IP is sufficient. If you receive a message on-screen stating that TCP/IP was unable to connect then you may wish to try SSL. Please note that your local network administrator may need to configure you network security to allow connections. The configuration tab should contain all of the information your network administrator will need.
a. For TCP/IP, enter the following information:
i. TCP/IP hostname: disclose.nictusa.com
ii. Agency ID: FEC

b. For SSL, enter the following information
i. Port: 80
ii. HTTP(s): https://webforms.nictusa.com/cgi-bin/disclose_ssl/upload
iii. Agency ID: FEC

4. Confirm that your information is correct, and click "OK." The upload process will begin immediately. Please DO NOT close the FECload program until either:
a. You receive an email confirmation from the FEC
b. You receive a pop-up notification in the FEC uploader with a "Success!" message.
Please note: if you are unsure of whether or not your report was successfully uploaded, you can always check its status on the FEC website using your committee name and/or committee ID to search: http://fec.gov/finance/disclosure/efile_search.shtml
Please check the FEC website before attempting to file again.
3.5. Walkthrough: Accessing MDB/Microsoft Access Files
Below is an introduction to using Microsoft Access to search an .mdb export. First, a word about the file's export structure: Each separate entity (receipts, disbursements, individuals, etc.) has a unique string that "names" it. This string is called a GUID. This string is used to link each table, so 360 (or Microsoft Access) can tell which receipts belong to which individuals.
For example, the "Individuals" table has a column named "ind_GUID." This column holds the GUIDs for each individual. The "Receipt" table has a column named "entity_GUID." This column holds the GUID for each receipt's contributor. If the value in a cell in the "entity_GUID" column matches a value in a cell in the "ind_GUID" column, then that receipt is from that individual.
Microsoft Access is able to link tables together to make this information usable via a feature called Query Design. Here are the steps to use this feature:
1. Click on the "Create" tab, then click "Query Design." In the resulting pop-up window, select the tables you want to pull information from.
2. Link the tables by clicking the GUID field in one table and dragging it onto the matching GUID field in another table. A line will appear connecting the two fields. Below the tables, you can select the fields you want to appear in your output by selecting the table name and field name for each column. (The order you use to connect the fields doesn't matter; all that matters is which fields you connect and which you choose to use as output fields.)
3. Once you've made your selections, click the "Run" button at the top of the screen.
4. You can sort or filter your results just as you would in Excel.
5. To export your data to Excel, select the "External Date" tab, then click the "Excel" button in the "Export" section. Then follow the steps provided.
3.6. Walkthrough: Using the State Conduit Management tool
This tool is used to streamline the data entry process for committees that serve as conduits. The tool can be found under the File menu; if you don't see it there, it likely has not been enabled for your account. If you are interested in using the tool, please reach out to your Sales Rep and/or Account Manager for more info.
How to use the Tool
- Before starting, you'll need to make sure that you already have receipt entries created for the individuals that made contributions to your conduit committee for the purpose of being disbursed. Those receipt entries will add to each individual's balance. For this walkthrough, we'll be using the three examples below:
- Once you have receipts to be disbursed, go to File > Conduit Management Tool. From here, you'll be able to search for an existing disbursement, or create a new one. We'll go ahead and create a new one using the option on the right.
- Enter all of the details for the disbursement. This entry will represent the funds going from your conduit committee to the recipient committee.
- The next step will be to select all of the individual receipts that will be included in this disbursement. Start by checking off the appropriate records and then hitting the Select Individuals button.
- From there, choose how much of each individuals' balance to attribute to this disbursement. Note that the available amount reflects the records' total balance, based on all of the contributions they have made; you can attribute all of the available amount, or just a portion of it.
- Also, note that when the attributed total does not equal the amount we indicated on the previous screen, you'll only have the option to Save Selected Transactions. This option will not allow for the disbursement entry to be created within your 360 database.
- When your total attributed amount does equal the amount you indicated for the disbursement on the previous screen, then you'll have the option to create the disbursement entry and link all of the individual transactions to it.
- Once the disbursement has been created, the tool will create a disbursement that has all of the options you entered back on step 3. In addition, the system will also create and link the necessary conduit memos on the individuals' records. The amount of these memos (i.e. the amount attributed within the tool) will reduce each record's total available balance, so you won't be able to attribute those same funds for future disbursements. Once that disbursement is created, you should be finished! The disbursement should now be ready for your compliance report.
Additional Notes
- If you delete that disbursement, note that it only deletes that specific entry - the conduit memos created by the tool that are saved the individuals will still exist. If you need to delete that disbursement, you should go back into the tool, use the searching fields on the left to find the disbursement, and then use the delete option.
3.7. Walkthrough: I don't see the Election Period needed for my transactions
When a new election cycle or new calendar year begins, you may see that the election period needed for that cycle/year does not appear as an option when you create transaction entries. This is simply because one has not been created yet - the ones you see are likely the default periods that were created when your database was first set up, or were created by a previous user.
Creating New Election Periods
New periods can be created at any time by taking the following steps:
1. Go to Settings > Add/Edit Election Periods
(Settings will be on the navigation bar if you are using the old layout)
2. Click the Add new period button at the bottom of the page.
3. Fill in the Text and Date fields.
- Text: This should be the type of election. The most common choices would be General, Primary, or Other, but the text can be tailored to your specific needs.
- Date: This should be the year of the election cycle/calendar year.
4. Click Insert. This button will save the period, and you can begin selecting it in your transaction data entry.
Optional Steps
5. Default Check box: checking off this box for a particular period will make it so that period is pre-selected whenever you create new transaction entries. If you expect most of your transactions will go to a specific election for the foreseeable future, you can mark this box.
For example, if you know most of your transactions for the next year or so will be for the Primary election, you can mark that one as the default so you won't need to select it every time.
6. Edit Period Limits: You can click here to adjust the amount that your committee can receive or disburse to a record. These limits are based on the type of record.
For example, if you can only receive $10,000 worth of any type of receipt from an individual in a single election period, you can set the receipt limit to that amount. If an individual has $10,000 worth of receipts already saved to their record for that period, and you attempt to add another, then the system will give you a limit warning, and you won't be able to save that transaction unless you return to the Periods page and raise that limit. This can be done for disbursements as well; if your committee can only donate up to a certain amount to another committee per period, then you can set that limit as well.
These limits allow you to more easily keep track of how much your committee has received or given for compliance purposes.
3.8. Walkthrough: I have multiple profiles for the same record - can they be merged?
When you find that you have duplicate record profiles, they can be merged into a single profile. Just follow these steps:
Merging Record Profiles
1. Run a search (using any method) that includes both records in its results.
2. Once you are on the results page, check the box next to the records to be merged. You can merge multiple records at a time, so if you ever find that you have 3 or more records for the same entity, you can merge them all at once.
3. Click the Merge Selected Records option on the right side of the page.
4. That will open up the merge window. From here, select the record that you want to designate as the primary record.
- The way that merging works is that the primary record will be retained, and any data, like contact info or transactions, from the other record(s) will be transferred to the primary. Once that data has been transferred over, the other record(s) will be deleted.
5. Click the Merge button.
Additional Merging Info
Be absolutely sure that records are duplicates for the same entity before merging, as a merge cannot be undone. Some situations where records can appear to be duplicates, but are not, include:
- A father and son have the same name, but their profiles may or may not have the proper suffixes (Jr./Sr.) selected.
- Two individuals may share a common first and last name
- Some organizations may have facilities in multiple locations that operate independently of each other.
If a merge is performed erroneously, the only way to return the records to their original state would be to create a new record for the one that was not marked as primary, and then copy data from the primary to the newly created record. If there were any transaction entries, you'll need to open those, and reassign them to the new record as well.
3.9. Walkthrough: I don't see a record profile for a committee - how do I add one?
If you don't see a record for the committee, you'll have to go ahead and create one. There are two ways to do so:
Method A: The easiest way method of creating a new record would be to go to Quick Add (new layout) or File (old layout) and select the Committee option. That will open up a new profile, where you can enter the committee's info. Once you save the record, you'll be able to add transactions to it.
Method B: The second method involves a few more steps, but can take less time overall. This method only possible for federal committees; if you need a profile for a state or locally registered committee, you'll need to use the first option.
- Go to Search > Committee Search > Basic Search. From here, enter the committee's name, and then run the search. Since there is no profile for the committee, you'll likely have no results.
- Right below the "Selection Results", you'll see another section called "Possible Committee Matches from COSMOS Database". The COSMOS database is an external data source that houses info for committees that are registered with the FEC, and you can load info from that database into your Aristotle database. At this point, you should see the committee you searched for in that section.
- Click on the name of the committee, and a new window will pop up. From there, you'll see more of the committee's info, as well as a few buttons. The first two will allow you to immediately create a profile for that committee. Go ahead and click one of those options, and you should now have a profile for the committee, and can begin entering transactions.
3.10. Walkthrough: How Do I Open a Full Database Export in Excel?
Full database exports are provided in as a Microsoft Access database (.accdb) file. These types of files can still be opened within Excel by following these steps:
- Click on the Data tab and then click on Get Data

- Click From Database and click From Microsoft Access Database
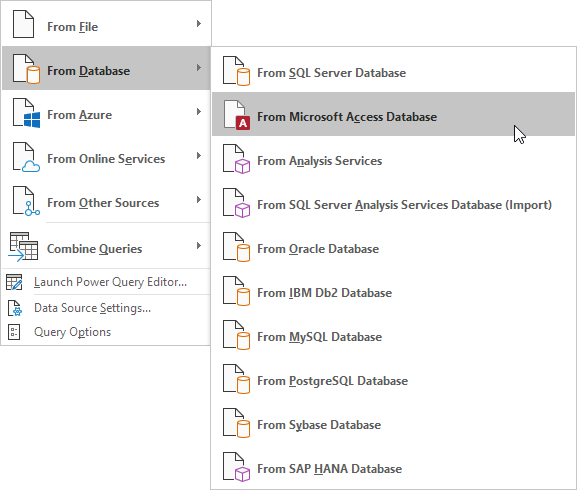
- Navigate to and select your file.
- Click Import.
- You'll see a list of all of the tables within that database file along the left side. Tables can include items such as individual records, receipt entries, etc. Select the one you are interested in opening, and click Load.
From there, you should be able to view your data or save it as a different file type, such as .XLSX or .CSV.
- The contents of that table will then load into the current sheet.
4. Action Center 3.1
4.1. Action Center 3.1 User Experience
Action 3.1 Advocate Experience
Action Center 3.1 simplifies the workflow for the advocate when participating in an action alert. After logging or registering the advocate will select the method they wish to take action either Electronic (Email/Webform are now unified), Fax or by Phone. Once selected, they will use that specific workflow in the alert. This eliminates the multiple decision points the advocate must make and permits them to quickly execute the intended action.
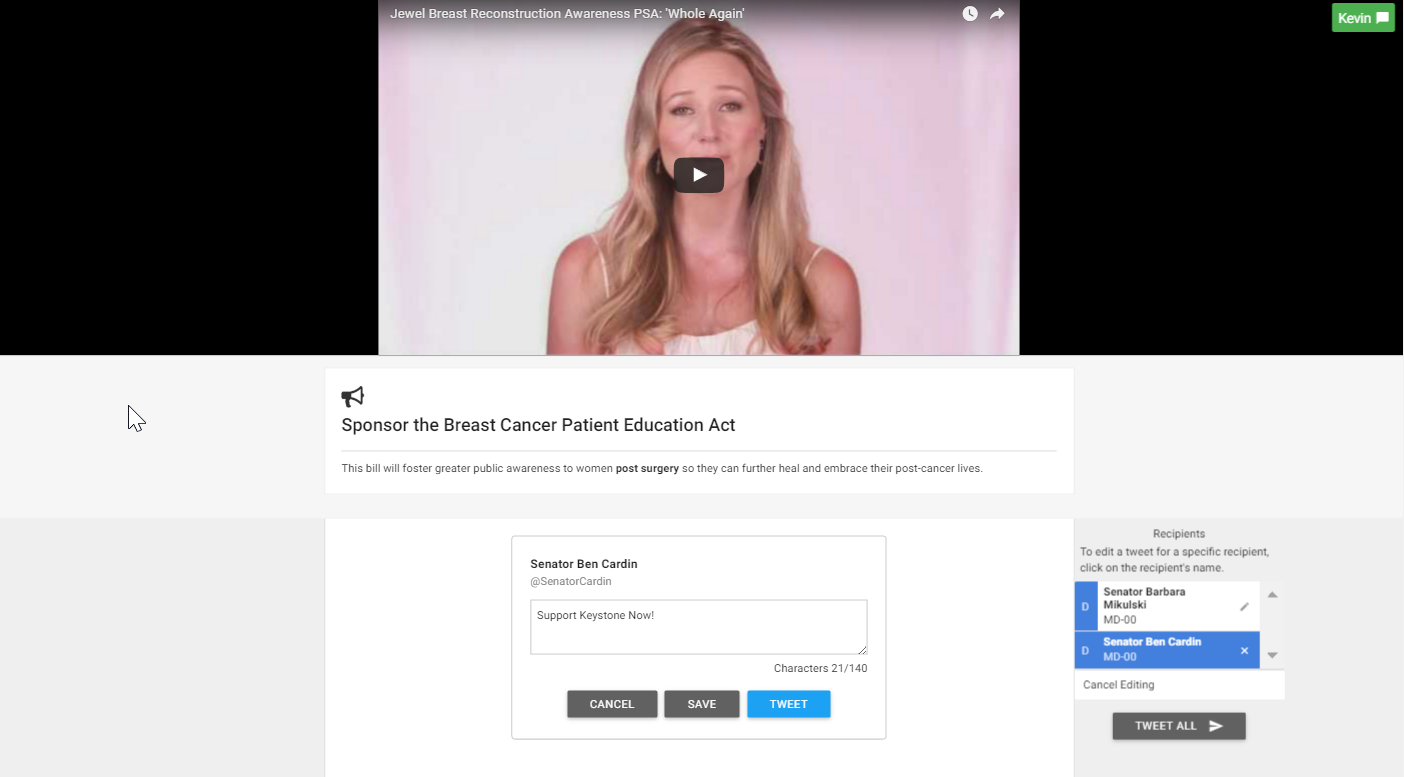
Taking Action - There are three distinct workflows for taking action Electronic (Email/Webform & Fax), Twitter and Phone. The user will select their preferred delivery method to expose the sample message that will be sent to the Legislator/Recipient(s). User may also edit one or more areas within the message based on the edit setting established by the Admin.
Messages sent via Email/Webform & Fax These messages types look and perform exactly the same. A sample message is displayed and user may modify if permitted by administrator.
The user may select Send All and all legislative targets will be sent message that was configured by Admin.
To edit a suggested message, the user will click on the recipient name or edit all recipients maintaining the same office type (House or Senate). When Editing All Legislators messages, message will be applied across all Advocacy Messages sharing the same chamber. Thank You messages will not respect user inputs and is set by administrator.
Twitter Advocacy A new feature in for Aristotle Advocacy is the ability to send an Advocacy message to a legislator's twitter handle. All rules associated with Twitter's character count will apply.
Process:
- The user will select the Twitter Icon from the available options to initiate Twitter advocacy workflow.
- Alert will display the following:
- Video/Graphic if present
- Title of the Alert
- Description introducing advocate to the advocacy topic
- Twitter Message created by Admin that may be sent immediately or edited.
- Alert will display the following:
- Action Options
- Tweet All Will send the sample Tweet that is displayed
- Twitter Authorization Screen displayed notifying user that the Aristotle Advocacy apps wishes to send Tweet on their behalf
- Authorize App is selected and Tweets are Sent
- Advocate See Confirmation Screen
- Receives Confirmation Message
- Tweet All Will send the sample Tweet that is displayed
Edit and Tweet- User wishes to modify Tweet for one or more Recipients
- User selects a Recipient Target to edit Tweet for selected target
- Sample Tweet is opened for editing
- User enters their content which may be Canceled, Saved or sent "Tweeted"
- User may select another target to edit
- Send Tweet
- Twitter Authorization Screen displayed notifying user that the Aristotle Advocacy apps wishes to send Tweet on their behalf
- Authorize App is selected and Tweets are Sent
- Advocate See Confirmation Screen
- Confirmation Page is Displayed Noting the following:
- Custom text provided by Admin thanking advocate for their participation
- Roster of legislators contacted
- Social Media Sharing Options is displayed
- Advocate Receives Confirmation Email
Phone Advocacy Phone advocacy is contained on a single page where the user will see Talking Points and Note capture.
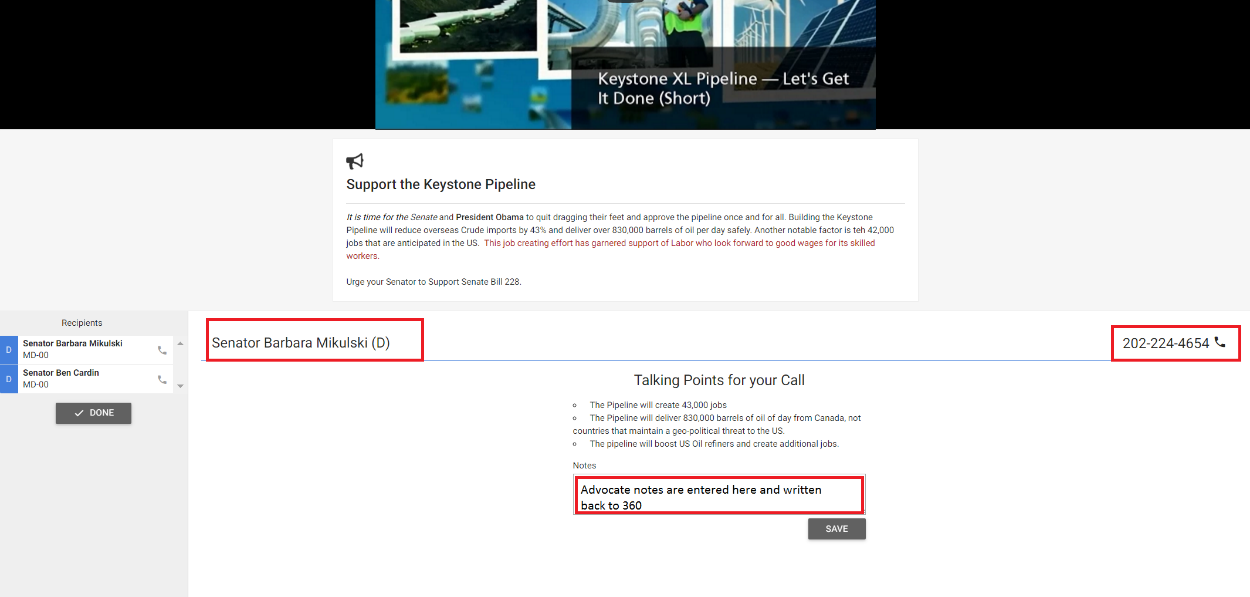
Note: This solution is not VOIP based but will leverage SKYPE or Native Mobile dialer if available on device.
Process:
- The user will select Phone Icon from advocate contact options to initiate phone advocacy workflow.
- Alert will display the following:
- Title
- Video if present
- Talking Points
- List of Legislative targets/recipients
- Alert will display the following:
- User Clicks Legislator Name and Dials Number
- Note Capture is presented
- User Enter Calls Notes and selects Save
- Confirmation Message is displayed
- User Selects Done (Notes are written back to 360 in the both the individual and legislator record).
- Confirmation Page is Displayed Noting the following:
- Custom text provided by Admin thanking advocate for their participation
- Roster of legislators contacted
- Social Media Sharing Options
- Confirmation Page is Displayed Noting the following:
4.2. Action Center 3.1 User Guide
Action Center 3.1: Reference Guide for Creating Action Alert
Revised: 10/20/2016 to include new functionality
Action Center 3.1 builds upon our version 3.0 deployment when we simplified the overall advocate user experience, regardless of form-factor (Web, Phone or Tablet) so advocates may take action quickly and efficiently.
The Action 3.1 product provides a variety of User Interface improvements, better mobile experience and support for Twitter Advocacy. These improvements are based on inputs from a variety of stakeholders (internal and external), features desired by product management and additional refinements suggested by the development team.
4.3. Franchise Advocacy
Franchise Advocacy
Franchise Advocacy A new concept introduced by Aristotle is Franchise Advocacy. This permits the targeting of legislators based on the relationship between an individual and his/her linked organization for legislator matching purposes. Standard advocacy is dependent on the individuals home or work address that is matched to the legislator.
To enable Franchise Advocacy it is necessary to setup your data in 360 to establish a Franchise Relationship between your individuals to organizations. Once set, you simply need to set your alert to "Franchise" within Advocacy Model within the Action Alert Wizard.This will set your alert to recognize the Legislators linked to an individual's organization record as targets.All other targeting setup in the Alert Wizard will be enforced including Jurisdiction, State and Chamber.
Setting up your Data:
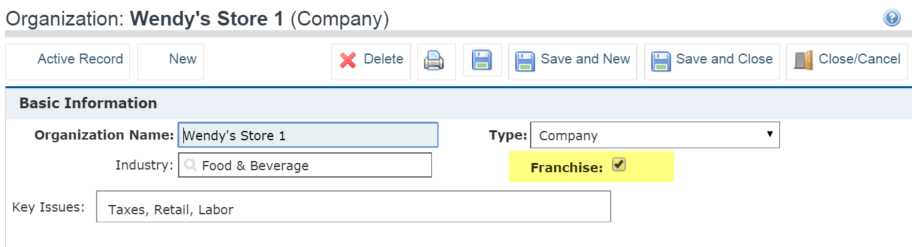
Franchise Advocacy is dependent on structuring your data in two areas:
- Organization The organization must be marked as a Franchise in the check box. This can be done via manual entry, standard import or through a tech services request.
- Individual Record The individual must be linked to organization(s). You may link an individual to multiple organization to reflect the business interests. Multiple individuals may also be linked to multiple organizations. Process to set Franchisor (individual) to Franchise (Organization) Relationship
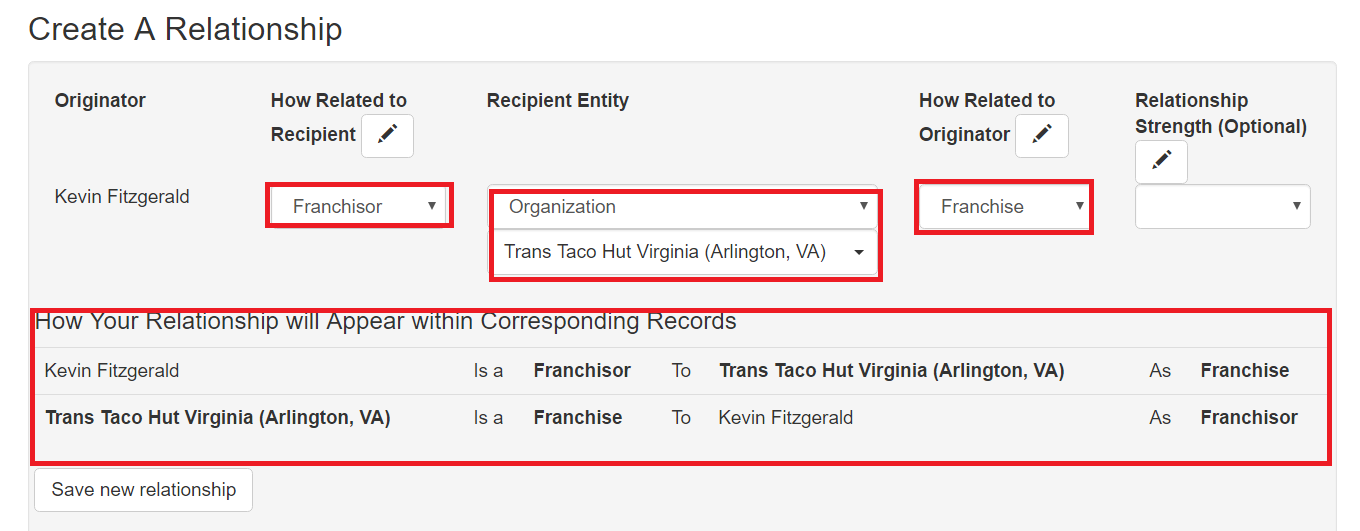
- From Individual Record open District Information, Relationships & Voting History Panel
- Select Add/Edit Relationship(s) next to Legislator & Other Relationships
- Set Individual IS A: "Franchisor"
- Organization
- After TO: Click Magnifying Glass
- Type: = Organization
- Find: = Organization Name
- Select Magnifying Glass to search
- Select Organization Name
- After TO: Click Magnifying Glass
- Related As: = Franchise
- Select ADD RELATIONSHIP BUTTON Please wait until you see the new relationship displayed in box
- Select Save and Close
To Enable a Franchise Advocacy Alert in Action Alert Wizard The alert is setup as a standard action alert with the one exception of Franchise (or Mixed) being detailed within Advocacy Model

Steps to Enable
- Select Advocacy From Main Menu Bar
- Add Action Alert
- Admin Info.
- Select Advocacy Model
- Set To Franchise
- Will target Legislator(s) associated to individual's linked organization's address
- Address Preference will be disabled as Individual's address will not be factored when fetching legislator targets
- Publish Scope should be set to Members Only
- Will target Legislator(s) associated to individual's linked organization's address
- If "Mixed" Is Selected Both Standard and Franchise Model will be used.
- Will target Legislator(s) associated to individual's linked organization's address
- Will also target using standard methodology based on Individual's linked home or business address
- Set To Franchise
- Select Advocacy Model
- All other aspects of Action Alert creation remain the same as Standard Model.
5. Advocacy 3.1 - Regulatory Advocacy Administration
5.1. Overview
Setting up Regulatory Alert follows a similar method used to create a legislative alert. A notable difference is the requirement to setup a target Regulation first, so the proper regulatory target may be called into the Regulatory Comment Wizard.
The Regulation setup is a simple search calling www.regulations.gov to call your regulation into Aristotle 360. After setting up the regulation the Administrator selects add regulation and adds a minimal number of mandatory fields, (Internal & External) Alert Name, Description, start date, Regulation, suggested Content and Thank You content, and you are ready to publish.
Aristotle Advocacy will capture advocate submission and write back to the individual, Agency and Regulation. The advocate Receipt ID will be capture and written to the Individual's action so you can verify the submission on the Regulations.gov website using their basic search. An integrated Metrics report will detail all online actions associated to Regulatory Alert.
Please note: Aristotle Advocacy does support submission of both a standard text comment as well as uploading attachments for those advocates wishing to submit more detailed responses.
Button Behavior Action Center 3.1 incorporates commands at the top of the page that are dependent on the state of certain entries and will change based on the status of your Regulatory Alert. For Example: Save and Save & Close Buttons will not be available unless you have entered the minimal amount of data. (Titles, Message and Targeted Regulation) to save.
Unpublished View Button State:
Published View Button State:
Minimum Data to Save
- Title to Display to Advocates
- Internal Regulatory Comment Alert name
- Message to Display to your Advocates
- Targeted Regulation
Minimum Data to Publish
- Title to Display to Advocates
- Internal Regulatory Comment Alert Name
- Message to Display to your Advocates
- Target Regulation
- Comment
- Thank You Fields
5.2. Creating a Regulatory Alert, Step 1 - Create Regulation in Aristotle 360
Create a Regulation
Creating a Regulatory Alert, to capture advocate comments related to a regulation, is a two-step process. The first step is the creation of the Regulation. The second step is setting up the Regulatory Alert.
Step 1: Setup a target Regulation
Step 2: Setup the Regulatory Alert
Users may add one or many Regulations based on their search. These Regulations are used within the Regulatory Alert setup. When a Regulation is added it automatically builds Agency and contacts pages based on their association to the Regulation.
- Select Regulatory Menu Item
- Select Add Regulations
- Add Regulations Page Provides a search+ mechanism where users may call in one or more Regulations to be stored within Aristotle 360 and referenced by the Regulatory Alert.
- Keyword Search (Required) Users can enter a Keyword or Docket ID Number
i. Keyword
ii. Docket ID
- By Agency Acronym (Optional Filter)
- By Document Type You can search and add based on the following Document Types
i. Notice
ii. Proposed Rule
iii. Rule
- Open For Comment Filter to include only Regulations that are able to be used in Regulatory Alerts
Once search criteria is entered users select search and a list is displayed
User selects "Add Selected Regulations". Notification message appears confirming the Regulation addition or Notifying user that Regulation has been previously added.
The Regulation is now ready to be targeted for a Regulatory Alert!
Search for a Regulation
Aristotle 360 will store Regulation information as well associated activities.
To search for a Regulation previously stored in Aristotle 360 do the Following:
- Select Regulatory Menu
- Select Regulations
- Search Regulations A page will display list all regulations as well as search functionality
- Search By Field Supports a variety of searches within the dropdown box
i. Regulation Title
ii. Agency Acronym
iii. RIN
iv. Docket ID
2. Search (Required) Enter value associated to the Search By criteria selected
To view Regulation simply click on Regulation Title
5.3. Creating a Regulatory Alert, Step 2 - Setting Up the Alert
Setup the Regulatory Alert
As noted earlier, creating a Regulatory Alert, to capture advocate comments related to a regulation, is a two-step process. The first step was the creation of the Regulation. The second step is setting up the Regulatory Alert.
Step 1: Setup a target Regulation
Step 2: Setup the Regulatory Alert
Regulatory Alert Wizard
The Regulatory Alert Wizard is a Five Step process. The default page is an introduction giving you some quick insight on items that you may wish to prepare prior to setting up your Regulatory Alert.
Admin & Targeting This page supports naming the alert, message to display to YOUR advocates (not message being sent to Agency), Regulation to be targeted, start date and Publish Scope.
- Title to Display to Advocates This is the title of the alert displayed on the Regulatory Alert List Page and Regulatory Action Page. Typically this name is designed with the Advocate in mind and serves as a simplified call to action
- Internal Regulatory Comment Alert - This is the name that your office would traditionally refer to the Alert or Effort. It is not exposed to the Advocate. Typically this name is used for "In House" reference.
- Message to Be displayed to your Advocates This is a sentence or paragraph that serves as your call to action to your advocates! Typically they are designed as simplified overview of the Regulation with a strong call to action.
o Message is viewable by Advocates on the Regulatory List page
o Message is viewable by Advocates on Regulatory Alert Page
- Targeted Regulation The Regulation has been setup previously in the Add Regulation workflow. This is the regulation that your advocates will comment on.
o As you type the regulation(s) will appear. Click to select Regulation.
o Due Date: Is automatically set by the Regulation. Agency sets Due Date when they close the comment period. This is automatically enforced
- Publish Scope Restrict who may access and Act on the Regulatory Alert
o All Alert may be acted upon by any website visitor who enters registration information or is logged in.
o Internal Alert is accessible only via a link sent to users who are authenticated
- Address Preference Controls which address will be used to pass information to the regulations.gov webform when required by a particular webform. You may select Home or Business
- Show Button to Return to Alert List The show button controls a link that permits/denies your advocates to navigate to the Regulatory/Legislative Alert List Page (Action Center)
o Enabled: When enabled a link to return to Aristotle Action Center Alert List.
o Disabled: When disabled, users may only act on Regulation Alert displayed and may not navigate to other Alerts.
Comment Setup This page provides the Sample or Suggested Alert Comment that may be submitted to an Agency regarding a specific Regulation.
- Suggested Comment - The Suggested Comment is viewable by the Advocate and may be submitted to the Agency.
o Characters Remaining: Set at 5,000 characters by regulations.gov. Will count down as characters are added.
o Editable: The Suggested Comment may be edited by your users on the Regulatory Alert page. They may also elect to upload document(s) on the Alert page User Interface.
o Suggested Comment may be submitted directly
Advanced The Advanced settings provides the ability to manage instructional text and a variety of automated messages.
- Instructions This is free text where Admin may provide some instructions to Advocates on how to take action on a specific alert. Typically Instructions text focuses on submitting, ability to edit or upload a file.
o Viewable to Advocate
- Expired Message If your Advocates hits a Regulatory Alert that has been expired this message will notify them the Comment Period has ended
- Thank You Subject An automated email is sent thanking your users for taking action.
- Thank You Content This is the content thanking them for taking action
- Enable Confirmation Email A Confirmation Email is sent after the Advocate has submitted their Comment or upload the document
o Enabled Expands work flow to create Confirmation Email. Publish is not available until Confirmation Email workflow has been addressed
o Disabled Confirmation workflow is hidden and Administrator is able to Publish
- Sender's Email Address Enter email to appear as sender
- Sender's Name Common Name to display
- Reply To Designated email address for responses. Typically Administrator has a dedicated email box to capture these response apart from their normal email box
- Advocate Email Type Determine which email box you wish to send Confirmation Email to
o Default
o Personal
o Business
Video & Images This optional section permits you choose custom icons for the Regulatory Alert as well as embedded your YouTube video.
- Choose an Icon for the Regulatory Comment 200KB limit. You may upload or choose from existing icons stored within Aristotle 360. Place icon on Regulatory Alert list
- Embed a Video Show a YouTube video on the Regulatory Alert page
o Integrated for Twitter Sharing Video will be picked up when Alert is shared via Twitter
- Choose an image for Regulatory Alert Page Currently this place an icon on the Alert Page. This functionality will change in the future to support Infographics showing in place of the Video.
Social Media After your advocates have submitted comment they may share, when enabled, the Regulatory Alert via Facebook and/or Twitter. When enabled a bitly link will provide the ability for their social networks click and access your Regulatory Alert.
- Facebook - When Enabled the Regulatory Alert will be shareable on Facebook. User may setup Title and Post Description.
o Include Bitly link to Regulatory Alert
o Includes YouTube video if alert is configured
- Twitter When enabled the Regulatory Alert will be shareable on Twitter. User may add custom Tweet message. Please note that 140 character limits apply!
5.4. Regulation View
The Regulation view provides the Administrator with Regulation details that have been automatically added to Aristotle 360. Associated Alert and online Activities are added when a Regulatory Alert has been created and online actions taken using the Aristotle Advocacy Site.
5.5. Regulatory Metrics Report
Regulation Metrics Report will provide details relating to participation on a specific Regulatory Alert.
The Regulatory Metrics report will detail activity on your report that may be controlled by date range to drill down on specific dates ranges. The report will detail the following:
- External Title Alert Title exposed to your advocates
- Internal Title Internal Reference Title
- From & To Date Automatically defaults to the set values for the alert but can be modified by administrative users to drill down into the report
- Participating Advocates Number of advocates participating in alert Drill down will open universal list showing participating advocates
- Comments Delivered Number of comments submitted. Will open up list of Activities submitted
- New Advocates Number of new advocates that have not previously participated in an action alert. Drill down will open universal list of Advocates
- Activity over Time Chart showing Comment Submissions.
- Webform Submission via regulations.gov
- Email if webform is down our fallback delivery mechanism is using Regulation Contact email. Typically no email will be shown
8. Geographic Submission Chart Will break out advocates by their Home and Work Addresses to illustrate geographic dispersion of participants. Columns will not likely equal as some advocates may not have valid entries in either column. Some advocates may participate multiple times.
5.6. Regulatory Advocacy User Experience
Overview
Aristotle Advocacy Center now support Regulatory Advocacy. Your advocate may not participate in the regulatory process using dedicated functionality that automatically submits their comments, either text or via file upload, on a specific regulatory item.
The user may access the Regulatory Alert either from the Regulatory Comments List Page or a link embedded within an email. From the list page they would simply click the Take Action Button.
Regulatory Alert Page
- Video if enabled will appear explaining to advocate your position
- External Title of Alert
- Alert Introduction Text created by Administrator explaining the Regulation and position of the organization
- Instructions This is custom text applied by the Administrator during the setup process to guide users in submission of their comment
- Category Agencies may include different Required Categories. Aristotle Advocacy will automatically pick up these elements and apply to the form to insure your submission is received
- Comment The comment is what will be submitted to the Agency on the specific Regulation. The admin will create sample comment text that may be edited by your advocate.
- Attach Files Some advocates may wish to upload documents and Aristotle Advocacy supports this ability. Regulations.gov requires a specific naming convention as detailed on the page. To upload a document users will acknowledge formatting guidelines and Choose Files button will be activated
- Advocates May upload one or more documents at a time
- Aristotle Advocacy supports multiple formats
- Users may delete one or more documents as required
- Recipient Details name of Agency
- Submit Comment Advocate presses Submit Comment button to send comment/documents to Agency
Upon Submission a Confirmation Notice will be displayed and Confirmation Email will be sent. The Advocate may share the alert link to their social networks via Facebook and/or Twitter by clicking the social media icon at the bottom of the confirmation page.
Activity is recorded within Aristotle 360
By Clicking the users comment the Regulatory Comment will open displaying details about the comment or uploaded documents.
The Receipt ID may be entered on Regulations.gov to easily locate the submitted comment.
Example of submitted Comment on regulations.gov. Enter Receipt ID and submitted will bring up a submitted record.
6. Homepage / Dashboard
6.1. Dashboard
The Aristotle 360 Dashboard is one of two landing pages when users log in. To change your landing page, go to SETTINGS on the menu bar and click MY USER SETTINGS. Here users can toggle their landing page to either the Dashboard or the Homepage.
The Dashboard layout is divided into three main panels. The panel on the left includes Quick Search, Quick Entry, Upcoming Reporting Deadlines and Recently Modified Records. The panel in the middle includes, Total Receipts, Additional Financial Activity and General Statistics. The panel on the right includes, Quick Start, Current and Upcoming Events and Indvidual Groups.
- Quick Search - The Quick Search box is located below the Menu Bar in the left navigation panel. Simply type a word or words (first name, last name, first name [space] last name, organization name, or Source ID) in the box labeled Keyword; select the record type from the Look In: field drop-down list, and then click the Search button. You are presented with a list of records meeting your search criteria. Like the Menu Bar, Quick Search is accessible on all pages of the program.
- Quick Entry - The Quick Entry button is located below the Quick Search box. Clicking this button accesses the Quick Entry page, where you can perform batch operations such as entering receipts, disbursements, and groups. Like the Menu Bar and Quick Search, you'll see the Quick Entry button on all pages of the program.
- Upcoming Reporting Deadlines - This are lists your significant FEC reporting deadlines that are occurring within two weeks of today.
- Recently Modified Records - This displays the last five records modified in the dataset.
- Total Receipts - This area displays your total receipt amounts, per month, in a bar chart. Note, clicking on the CHANGE HERE TO CHANGE CHART DATA RANGE allows users to customize the number of months displayed in the chart. This only applies at the dataset user level and not a global level. Also, clicking on any one of the columns will bring up a list of all transactions for that month.
- Additional Financial Activity - This area displays two graphs. The Disbursements by type, last six months displays your disbursement totals by type in a pie chart. The more types you have, the more slices your pie chart contains. Note, right clicking on the pie-chart users can enable the rotation function. This allows users to rotate the chart for betting viewing. The Contributions vs. Disbursements, last six months displays your receipt and disbursement totals per month on a line graph.
- General Statistics - This area displays two charts. The Records chart shows the total number of records my record type, and the total disbursements amount. The Receipts chart displays receipt totals by period. Note, users can modify the election cycle for the Receipts by clicking on the link THIS ELECTION CYCLE.
- Quick Start - This area contains links that help you to quickly perform the following tasks: Create New Individual, Create New Organization, Create New Committee and Create New Event
- Current and Upcoming Events - This area lists any Events you scheduled in the current month.
- Individual Groups - This area lists the names of all of the groups that you have defined in the system. You can access the members of a particular group directly from this area by expanding the Group Category and then clicking on the group's name. Note, by default the group counts are turned off. Users can enable group counts by contacting Aristotle Technical Support (support@aristotle.com or 800-243-4401 ext 1).
6.2. Quick Selections on the Home Page
In the right-hand side of the Home Page you will see the Quick Selections. There are several different quick selections located here. The different quick selections include, but not limited to, All Individuals, All Organizations, All Committees, All Legislators, Recent Contributions, Recent Receiptents, Recently Added Individuals and Recently Updated Individuals. To select one of them, click on the name of the Quick Selection you would like to view and this will take you to a page that will list the records associated with that Quick Selection. From the list you will be able to add other columns to the list and export the list into an Excel Spreadsheet or a CSV file.
6.3. Records Per Code on the Dashboard
When using the Records per Code on the Dashboard, it will only show you the top 20 records by count. If you do not have universal quick codes selected, it will not pull codes for "Records per all quick codes."
7. Quick Entry
7.1. Create Disbursements From File Menu
This method of data entry allows you to create a Disbursement without having to access the entitiy record or load quick entry. This is useful for entering one Disbursement.
One way to enter a new Disbursement is to go to File > New Disbursement. This will cause the Disbursement Edit pop out window to appear. Once the Disbursement Edit window appears you will be able to enter the information for the Disbursement. After entering in all the information for the Disbursement select Save and Close. This will save the Disbursement to the record that you selected and close the Disbursement Edit window.
7.2. Quick Entry
Use Quick entry to quickly create new individuals and to quickly add transactions or groups to individuals, committees, or organizations.
On the left side of the home page you will see Quick Entry. If you select this button it will take you to the Quick Entry Page. Here you will be able to enter in transactions and groups into any record in you data set. You will also be able to add new record from here if they are not already in the dataset.
You can also access Quick entry by going to File > Quick Entry or by click on Data Entry on the Home Page. The Quick Entry button will be located on the left side of almost every page in 360.
7.3. Quick Entry Hotkey
Using the Ctrl+Alt+Q hotkey to open Quick Entry will open Quick Entry in a new window, which allows you to navigate in the main browser window while doing your quick entry transactions.
The benefit is that your Quick Entry transaction log will maintain a running activity history while you are working in the main session.
7.4. Steps to Enter Disbursements From Quick Entry
In the Quick Entry window, search for and select the Individual, Organization or Committee for which to apply the disbursement.
1. In the middle area of the Quick Entry window, select the Disbursements tab if it is not already selected.
2. The date defaults to today's date. Change the date as necessary by clicking the Calendar icon and selecting the correct date to identify when the check was received.
3. Type the amount of the disbursement in the Amount: field. The format should be a number with or without a decimal point.
4. Enter the check number you are printing to in the Check No.: field.
5. Click the drop-down arrow on the Batch: field and select the batch to apply to this disbursement. Remember that the batch must be in an open status in order to apply to that batch.
6. Click the drop-down arrow on the Type: field and select the nature of the disbursement.
7. Click the drop-down arrow on the Subtype: field and select the payment type of disbursement.
8. Click the drop-down arrow on the Account: field and select the account from which this disbursement is being withdrawn.
9. Click the drop-down arrow of the Period: field to select the election period associated with this disbursement.
10. Click the drop-down arrow of the Check Status: field to select the status of the payment. For disbursements, the status is usually Outstanding when the disbursement is entered, and Cleared when the disbursement has been cleared the bank and is reconciled.
11. The Posted field will be filled in automatically when the account is reconciled and the status is changed to Cleared.
12. You can enter text to be used as an identifier for this disbursement in the Purpose: field. Here you can note a special event or specific frequency. This field is also pulled onto compliance reports, so refer to your compliance reference material for proper entries for this field.
13. Use the Note: field to enter text that can describe special circumstances. For example, you can enter Resend after initial check number 999 was not received.
14. Review the information you entered in the disbursement fields, and then click the Submit button located at the bottom of the task area.
15. The disbursement is recorded in the system, and the statistics in the bottom panel are updated accordingly.
7.5. Steps to Enter Receipts From Quick Entry
1. In the Quick Entry window, search for and select the Individual, Organization or Committee for which to apply the receipt.
2. In the middle area of the Quick Entry window, select the Receipts tab if it is not already selected.
3. The date defaults to today's date. Change the date as necessary by clicking the Calendar icon and selecting the correct date.
4. Type the amount of the receipt in the Amount: field. The format should be a number with or without a decimal point.
5. Enter the check number of the receipt in the Check No.: field.
6. Click the drop-down arrow on the Batch: field and select the batch to apply to this receipt. Remember that the batch must be in an open status in order to apply receipts.
7. Click the drop-down arrow on the Type: field and select the nature of the receipt.
8. Click the drop-down arrow on the Subtype: field and select the payment type of receipt.
9. Click the drop-down arrow on the Account: field and select the account to which this receipt is being deposited.
10. Click the drop-down arrow of the Period: field to select the election period associated with this receipt.
11. Click the drop-down arrow of the Check Status: field to select the status of receipt. For receipts, this statuses used are usually Deposited when the receipt is entered, and Cleared when the receipt has been cleared by the bank. Note: Performing the bank reconciliation through Batch Processing automatically changes the Check Status: field.
12. Click the drop-down arrow on the Source: field to indicate the source of the receipt. This is usually associated with an Event, and selecting a source will assist you in reporting and filing this receipt. You can also add a new source by clicking the New button next to this field.
13. You can enter text to be used as an identifier for this receipt in the Purpose: field. Here you can note a special event or specific frequency.
14. Click the drop-down arrow on the Campaign: field to associate a campaign to this receipt.
15. Review the information you entered in the receipt fields, and then click the Submit button located at the bottom of the task area.
16. The receipt is recorded in the system, and the statistics in the bottom panel are updated accordingly.
7.6. Steps to Add an Entity to a Group in Quick Entry
Adding a member to a group is as easy as selecting the record, clicking on the Groups tab, and then using the drop-down menus to select the appropriate Category and Group. If you need to add a new Category or Group, you can do this as well by clicking the New button next to the appropriate field.
1. In the Quick Entry window, search for and select the Individual, Organization or Committee for which you want to add to a Group.
2. In the middle area, select the Groups tab.
3. For the Category, do one of the following:
a. Select the drop-down arrow of the Category: field to select an existing group category.
b. Click New and enter a name of a new category.
4. For the Group, do one of the following:
a. Select the drop-down arrow of the Group: field to select an existing group.
b. Click New and enter a name of a new group.
5. Click the Add to Group button at the bottom of the area.
6. You will receive a message Your record has been added, and the search area redisplays a blank search form. Search for your next entity to add to the same Category and Group.
7. The entity appears in the top search area. Simply click Add to Group to add this entity to the same Category and Group.
8. Repeat these steps until all entities have been added to the Category and Group.
7.7. Session Statistics
Whether you're doing batch operations with one type of transaction, or a variety of data input tasks at once, Aristotle 360 keeps a running total of the number, type and dollar value of your transactions in the Statistics panel at the bottom of the Quick Entry form.
When you begin a Quick Entry session, the Statistics panel is blank. As you save transactions, or new records or new group members, not only are the underlying records updated, but the statistics panel is updated as well.
The upper part of the panel provides a summary of actions taken, including number of new Individual records created, and the number and total of disbursements and receipts. The lower section of the panel provides the details of each action taken thus
far.
7.8. South Dakota - Entering Expenditure Transactions
Please keep the following things in mind regarding expenditures:
1) This is a list of type/subtypes that pull to the report. If the transaction is not one of these type/subtype combinations, the transaction will not appear on the report:
a. Type: Contribution To Committee
Subtypes: Federal, State/Local, Memo, In-Kind Federal, In-Kind State/Local
b. Type: Other Disbursement
Subtypes: Contribution, Payment
c. Type: Refund
Subtype: Contribution
d. Type: Independent Expenditure
Subtypes: Payment, Memo
e. Type: Operating Expenditure
Subtypes: Payment, Credit Card Payment, Reimbursement
f. Type: Transfer to Affil/Auth
Subtype: Transfer of Funds
2) To get transactions to group as one of the expense types (Advertising, Consulting, Interest, Postage, Printing, Rent, Salaries, Telephone, Travel, Utilities), you must use reporting codes. Once you add & save a transaction, open the full transaction details again, and at the very bottom, you will see "Expenditure Codes". Select state "South Dakota", and then select the appropriate expense type.
8. Searching
8.1. Advanced Search
The Advanced Search can be found by going to Search > Advanced Search. The Advanced Search is the most robust search that we have in 360. From here you can search on almost every field in a record. After entering in your criteria select Search. This will populate your list into the Results page. From here you will be able to save your list or save your criteria.
8.2. Advanced Search on Multiple Values (Cities, Counties, etc.)
To search on multiple Cities, Counties, ect. type in the first city and then type "or" and then the next city. Repeat untill you have entered all the cities you would like to search on. For example if I wanted to search for individuals who live in both Arlington and Alexandria, I would type "Arlington or Alexandria."
8.3. Query Builder
If you want to build a search that is more complex than the other, more basic search options, you can build a query. The Query Builder allows for you to select a group of search clauses that will work together to target any record or transaction that matches with the criteria you specify.
You can find the Query Builder under the Search menu on both the old and new layouts. From there, follow these steps to build your search query.
Building a Search Query
1. Specify a main search record: For this step, you will need to click on the drop-down, and select which type of record you want your search results to include. There are many different options available, but the most commonly used are the various entity types, such as Individuals or Committees, and the two transaction types - receipts and disbursements.
Example: 2020 donors
- If you want a list of every individual that made a contribution to your committee in 2020, you'll need to select the Individual option. Even if a donor gave multiple times, their name would only appear in the list once, since the query is targeting individuals.
- If you want a list of every single contribution your committee received in 2020, you'll need to select the Receipt option. If you had a donor that gave twice, you would see them appear in the list twice, once for each contribution entry.
2. Begin adding search clauses: Once you select a main search record, you can begin specifying your search clauses. You'll see three options for each clause: a first field, an operator, and then a second field.
Example: Searching for a list of disbursements dated in 2020
- First Field: This option allows you to select certain data points, and is kind of like the broader category you want to base your search on. For this example, you'll want to select Disbursement Date.
- Operator: This option sort of functions like a connector between the two fields. For this example, we'll select On or After. This option will include the date that we select in the next step.
- Second Field: Here, you'll need to select/enter what you are basing your search off of. Since we want our search to include disbursements dated on 1/1/2020, you'll need to enter that date. If you had select the After option for the operator, then the search results would only include disbursements dated on 1/2/2020 and beyond.
If we left this query as is and ran the search, it would essentially target all disbursements dated on or after 1/1/2020.
3. Adding more search clauses: After setting up one search clause, you have the option of adding as many more as you would like. On the right side of the screen, you'll see the New Clause Type drop-down. Once you make a selection from that menu, you'll have the option of specifying another search clause.
Example: Searching for a list of disbursements dated in 2020, continuing the one above
- And: This option will allow you to link the new clause to the previous one, so that the query builder takes both into account when searching. This is the option you'll want to use for this search; you'll be able to create a second Disbursement Date clause to effectively create a date range:
Using the and type here will search for any disbursements that are dated on or after 1/1/2020 and on or before 12/31/2020. This will result in a list of disbursements that only include those that are dated in 2020. - Or: This option allows query builder to consider the previous clause or the new one, but not both. If we used the Or option for our example, the search would include all disbursements dated on or before 1/1/2020, OR on or before 12/31/2020, which is essentially looking for all disbursements in the system. This is why selecting the correct new clause type is essential.
- ANDREL/ORREL: Short for "And Related"/"Or Related", these options function just like the ones above, but allow you to add a search clause for a data point that does not exist for your select main record. For our example, since we are searching for disbursements, are previous search clauses are only data points that exist specifically for disbursements (i.e. disbursement date). If we wanted to add a search clause based on a different data point that does not exist for disbursements, such as something like Employer, then you'll need to use on of these options.
For our example, let's say we want a list of 2020 disbursements made to individuals employed by a hypothetical "ABC Corporation". We'll need to set the disbursement date clauses as mentioned above, and then select ANDREL so we can specify the employer we want to target:
The ANDREL option will allow us to specify the employer even though that field doesn't exist for our main search record of disbursements.
4. View Results: Clicking this button will run the search with all of the clauses that have been selected. From here, you'll land on the same results page as any other search, and you'll be able to add extra fields or export the results from the options on the right side of the page.
Again, you can add as many clauses as you want to make the search as specific as needed, but keep in mind that the more complex the search is, the more difficult it will be to build it. Also keep in mind that the complexity of queries can also affect how long the system takes to run the search; it can sometimes be more time efficient to build a simpler query that targets more data than you need, and then simply export the data and delete anything that isn't necessary.
Other Options on the Query Builder Page
Edit Result Columns: This option will allow you to select the data points that will be included once you run the query. This can also be done after running the search (from the Add/Edit Fields and Calculations option on the results page), but you can so from here before running the search.
Also, if you choose to save your query for future use, additional columns selected here will be saved as well. If you have a query that you intend to run on a regular basis, you can pre-save any extra columns you want, so they don't need to be added to your search results every time.
Save/Save As: This will allow you to save your query for future use.
Quick Selection Management: And previously saved query will appear here. You can load a saved query into the query builder by clicking the Load icon on the left side of the query's name.
8.4. Basic Search
The Basic Searches can be found under the Search tab on the tool bar. The Basic Searches are split up into several categories and subcategories. The Categories are Individual Search, Organization Search, Legislator Search, Committee Search, Receipt Search, Disbursement Search, Activity Search and Pledge Search. When doing your search you will want to select the category and subcategory that best fits what you are trying to search for. Once you do your search, the results will appear in the Universal List Page. From here you will be able to name and save the list, add new columns to the list, and export the list into excel.
8.5. Disbursement Search
To search for a Disbursement, go to Search > Disbursement Search from the menu bar. Here you are presented with a few options to search one or more disbursements by. You can search using Basic Search, By Individuals, By Organizations, By Committees, By Legislators, By Events and By Campaigns. In most cases, you will use the Basic Search option since this will give the most flexibility by allowing criteria for a range of dates, a range of amounts, types, sub-types for example. The other "By" options are specific to the entity type or record.
8.6. Exporting a Saved List
Lists generated through searches can be exported to various file formats for further analysis, etc. Aristotle offers the ability for the user to select the appropriate fields to be exported. To export a list:
- Go to Search > List Manager.
- Locate the desired list and click the "View" button on the far left.
- Select which entity type you need exported (individual, committee, organization)
- In the List Functions box, select "Add/Edit Fields and Calculations".
- From the box on the left, select the desired fields you'd like exported and move them into the box on the right with the arrow buttons. Click the apply button when finished.
- In the List Functions box, click "Export Results". Select the desired file type and then click the "Export Records" button.
You will have the option to Open or Save the exported file.
8.7. List Manager
From the List Manager you can open, edit, and delete lists.
Open in Universal List - Click on this icon to open a popup menu which gives you the option to open All, Individuals, Committees, Organizations or Legislators which populate the relevant list. Please see the instructions for Universal List for a more detailed explanation of how this feature works.
Pop-up List - Click on this icon to open up popup menu which gives you the option to open Individuals, Committees, Organizations, or Legislators which populate the relevant list. Please see the instructions for Pop-Up List for a more detailed explanation of how this feature works.
8.8. List Processing
List Processing
List A
Click in the box and search for the first list you would like to manipulate.
List B Click in the box and search for the second list you would like to manipulate.
Results
Join Select this option to combine the two lists. Note that if a record is in both lists it will not be duplicated.
Difference Select this option to leave only records from List A which are not in List B.
Intersection Select this option to leave only the records which are both in List A and List B.
List Name You must enter a name in this field. This is what the list will be referred to as throughout the rest of the system.
Date Enter a date in this field. Most people enter the date the list was created, but you can use any date you like.
Description Enter a short description of the list. This might include the parameters or steps used to generate it.
Create New List Once you have all of the settings set as desired, click on "Create New List". Once this is done, the list will be able to be processed. You can even select the list as a new List A or List B, thus refining your lists to as specific a level as you need.
You can also use the Search and List Processing features when creating a donor prospect list.
8.9. Using List Manager to export Lists
To export a saved list using List Manager, please use the following steps:
1) Select List Manager from the Search menu. Once in the List Manager window, click the lightning bolt icon next to the saved list you wish to export. You should see a dropdown menu appear that looks like the following:
From the drop down list, select the type of records you would like to load (selecting All will load all the records on your list, Individuals will load only the Individuals on your list, etc.).
2) In the Current Selection window, select Export Results in the List Functions box on the right side of your screen. If the list is larger than 500 records, click the link in the green banner that appears on the top of your screen to export the entire list:
3) In the Export Records window, select your desired export fields and add them to the Selected Fields using the blue arrow. Please note that the available export fields will be limited depending on what type of records you have in your list. Enter the email address where you would like to receive a link to download your final export file and then click the green Export Records button:
8.10. Receipt Search
In the Reciept Search you are able to search all of you receipts in you dataset based on various criteria. The search result populate on a list, but you will not be able to export or save the list. If you need to do this please use the Basic Search or Advance Search Functions.
You can also use the Search and List Processing features when creating a donor prospect list.
8.11. Current Selection
Add/Edit Fields and Calculations Click on the link to add additional fields to be viewed in the Universal List view. Note that you can use this feature if you select individual, committee, organization, or legislator when you open the list. A list of fields which can be added is below, along with a description of each field for which merits one.
Available Fields
(need to get these field lists from Brian / Jason)
Related Fields
(need to get these field lists from Brian / Jason)
Calculated Fields (Receipt) Note that if you would like to search on all transactions on that record you can leave the Start Date and End Date fields empty. If you would like to specify a date range restriction on the information that is calculated, you will set that limit in these boxes. Additionally, if your calculated field relates to election cycles you will need to select those periods by clicking on "Edit Periods".
- Average Receipt The average value of all receipts within the given date range.
- Earliest Receipt The date of the earliest receipt within the given date range.
- Election Cycle Receipt Total The total amount of all receipts within the given election periods.
- Latest Receipt The date of the most recent receipt within the given date range.
- Maximum Receipt The largest receipt within the given date range.
- Minimum Receipt The smallest receipt within the given date range.
- Number of Receipts The number of receipts within the given date range.
- Total Receipts the total amount for receipts within the given date range.
- Calculated Fields (Disbursement)
- Average Disbursement The average value of all disbursements within the given date range.
- Earliest Disbursement The date of the earliest disbursement within the given date range.
- Election Cycle Disbursement Total The total amount of all receipts within the given election periods.
- Latest Disbursement The date of the most recent disbursement within the given date range.
- Maximum Disbursement The largest disbursement within the given date range.
- Minimum Disbursement The smallest disbursement within the given date range.
- Number of Disbursements The number of disbursements within the given date range.
- Total Disbursement The total amount for disbursements within the given date range.
- Removed Fields these are the fields which have been previously added, but then removed.
- Save Results as New List - Click on this link to save the items which are selected in the current list to a new list. You will be prompted to give this new list a name.
- Add Results as New List - Click on this link to save the items which are selected in the current list to an existing list. You will be prompted to select which existing list you want to add these items to.
- Add Results to Existing Group - Click on this link to save the items which are selected in the current list to an existing group. You will be prompted to select which existing category and group you want to add these items to.
- Export Results Click on this link to export your list to either a Microsoft Excel file or a Comma Separate File. When you are exporting a list in this way, you can select which fields to export. Please note that if you wish to export any calculated fields, you first add those fields to the list itself in the previous section. Once you have the fields you would like, click on "Export Records" and this will trigger a popup which will give you the option to "Open", "Save", or "Cancel". Please make sure to click on "Save" and save the file to a location you will be able to remember. If you click on "Open" you will not have the option to save the file once it is open.
Results
- Select / Deselect All - Click on the box next to"Name" to select or deselect all records in the list.
- Home - Click on the"|<" button to skip to the beginning of the list.
- End - Click on the">|" button to skip to the end of the list.
- Back - Click on the"<" button to move back one page.
- Forward - Click on the">" button to move forward one page.
- Individuals - Click on the name or Individual icon to open that particular record.
8.12. Steps to Use Quick Search to Create a List
The Quick Search box is always available on the left side of all pages in Aristotle 360, so you can create and save a list anytime you need to do so. Note, however, that you are limited to results that include either similar names or source IDs.
1. Beginning in any page of Aristotle 360, enter a keyword to search for in the Keyword(s) field of the Quick Search area. For this example, enter parsons.
2. Click the Quick Search button.
3. Individual Search Results window appears. By default, all records in the search results will be "selected", which means you see a check in the checkbox next to the record. If you want only some of the results, click the Uncheck All button at left and then select to check the checkboxes for the specific records that you want to include. For this example, leave all of the Parsons records selected to make a list of these 16 individuals.
4. Click the Save List option from the left panel.
5. The Save List panel displays. Enter a name for your list in the List name: field. For this example, enter Parsons Family Members.
6. Enter a description for the list in the Description: text entry box. For this example, leave this blank since the name provides adequate identification.
7. Click the Save List button.
8. The Individual Search Results window redisplays with a message indicating the List was saved.
9 Close the Individual Search Results window by clicking the Close Window button in the upper right corner of the window. Navigate to the List Manager, and notice your newly created List is displayed.
8.13. Steps to Use Advanced Search to Create a List
The second method for creating a list is to save the results generated by an Advanced Search. This is a more practical way of creating your lists, since you have the ability to be more specific on the criteria you are searching on, thus producing more robust
search results.
1. Go to Search > Advanced Search.
2. The Advanced Search page appears. The buttons on the left criteria panel open specific search pages tailored to that record type. See the Using Advanced Search section for more information on using this feature. For this example, you will perform a search for individual receipts received last year for amounts between $50 and $100. Click the Receipts button on the criteria panel.
3. The Receipts Criteria page displays. Select Individual in the Select entity listbox.
4. Scroll down to view the Amount Between fields. Enter 50 and 100.
5. Scroll down to view the Date between fields. Click the icon and then doubleclick to select the Last Year option.
6. The dates of last year (going back from today's date) are populated into the Date between fields. Scroll to the top of the page.
7. Click the Submit button to begin the search.
8. The Advanced Search page redisplays with records that match your search criteria. Scroll down to the List Name: field. For this example, we are happy the results, so we enter Last Years running receipts $50 to $100 in the List Name: field (you will not see the whole description displayed in the field).
9. Enter a description for the list in the List Description: field. For this example, we enter Last Years running receipts for individuals for the amounts $50 to $100 (again, you will not see the whole description displayed in the field).
10. Click the Save List button.
11. The Advance Search page refreshes. Navigate to SEARCH > List Manager.
12. The List Manager page appears. Notice your newly created List is displayed.
8.14. Merging Two Records
Merging Records
Every now and then, you'll come across a duplicate record in your database and, as we all know, dealing with duplicates is unpleasant. First you have to laboriously copy data from the duplicate record to the desired record, and then carefully review all of your work to make sure everything is correct, and finally you have to delete the duplicate record. Fortunately, Aristotle 360 makes it quick and far easier to combine data from two records into a single record, thus eliminating the duplicate.
All you need to do is take the following steps:
- Search for the records to be merged. One of the easiest ways to do so would be to use the Quick Search on the left, and then click the option See full search results. This is the easiest way to target records to merge when you are already aware that duplicates exist, but really any search can be used, as long as your search results include two or more records that you would like to merge. So even if you are running a broader search, such as all committees records, then any of those results can be merged as well.
- Once you are on the search results page, check off the records you want to merge using the boxes along the left side.
- Click the Merge Selected Records option on the right side of the page. This will open a new window.
- Select the Primary record (see below for more details), and then click Merge. Once you confirm the merge, the selected records will all be merged into the record that was set as the primary.
Primary Records
Often, you'll first notice a duplicate record while doing a Quick Search. You can also run the Query report Individual Duplicate Check periodically to locate duplicate records in your dataset. First determine which record is the Primary record (the one you want to keep) and which one is the duplicate. Even if both records have some information worth keeping, it's usually easy to determine which one you want to save.
Identifying a primary record is crucial because it is the basis for determining how the merge will proceed. No information in the Primary record will be overwritten. If the two records have different information in a given field (an address, for example) the merge will keep only the information in the Primary record. However, the merge will keep all receipts, disbursements, notes, etc. from both records, but move them to the Primary record. Pictures and marital status data are not merged.
8.15. VIDEO: Searching Your Database
This video covers the usage of search tools in Aristotle 360.
//VIDEO MISSING//
8.16. Receipt Search by Deposited Date
There are two simple ways to search your data for Receipts by a given Deposited date or date range.
The first option:
1. Go to Search > Receipt Search > Basic Search
2. Enter a given Deposited date or range in the DEPOSITED (RANGE) field
3. Click SEARCH
The second option:
1. Got to SEARCH ADVANCED SEARCH
2. Under Search Entities on the left, click RECEIPTS (you will see both the Individuals and Receipts highlighted)
3. Enter a given Deposited date or range in the DEPOSITED DATE BETWEEN field
4. Click SEARCH
8.17. FAQ: How to Export a List of "First Time" Donors Who Haven't Donated Before This Year
1) Go to Search > Individual Search > By Receipts
2) Set the "Start Date" to 1/1/16
3) Click "Search"
This will take you to the current selection screen where your search results will be shown.
4) In the "List Functions" section on the right, click "Export Results"
5) On the next screen, scroll through the list of "Available Fields" and move over all the fields you need into the "Selected Fields" list.
6) Scroll to the bottom, click the "Earliest Receipt" field and move that into the "Selected Fields"
7) A new section will open on the right where you need to enter the date range for your calculated field. Set this to a range that is sure to encompass the entire history of your campaign (1/1/1900 to present, for example)
8) Click "Export Records" and 360 will email you a link to your file
9) After you have downloaded and opened the Excel file, use the Excel filter function by the "Earliest Receipt" column to delete everyone whose earliest receipt date is PRIOR TO this year
8.18. Current Selection - Selection Statistics
To get a simple dollar count of Receipts or Disbursements:
1. Go to Search > Receipt Search > Basic Search
2. Enter a given Receipt date or range in the RECEIPT (RANGE) field
3. Click SEARCH
When the Current Selection results displays, there is a Selection Statistics box to the right of the screen. This box will display the Total, Average Amount, Maximum Amount and Minimum Amount. Note, the Selection Statistics box will also display when Disbursements are searched through Basic Search.
9. Searching - Quick Selections
9.1. About Quick Selections
A Quick Selection is a saved criteria or query that you can reference in your searches, mass activities, and activity campaigns.
9.2. Quick Selections on the Home Page
In the right-hand side of the Home Page you will see the Quick Selections. There are several different quick selections located here. The different quick selections include, but not limited to, All Individuals, All Organizations, All Committees, All Legislators, Recent Contributions, Recent Receiptents, Recently Added Individuals and Recently Updated Individuals. To select one of them, click on the name of the Quick Selection you would like to view and this will take you to a page that will list the records associated with that Quick Selection. From the list you will be able to add other columns to the list and export the list into an Excel Spreadsheet or a CSV file.
9.3. View Quick Selections
To view you Quick Selections go to Search>Quick Selections and select from the list which Quick Selection you would like to view. The different Quick Selections are All Individuals, All Committees, All Organizations, All Legislators, Recent Conributors, Recent Recieptents, Recently Add Individuals, Recently Updated Individuals, Outstanding Pledges and All Pledges. Each of these list will open into the Universal List Page where you can edit and add columns to the view, save as a list and export the results.
10. Entities / Master Records
10.1. Components Common to All Records Pages
1. Menu Bar: The Menu Bar appears at the top of all pages to facilitate quick transitions from one task to the next.
2. Options Bar: All records have an Options Bar just above the record form; however, the available options differ from one type of record to the next. The buttons on this bar allow you to, at the least, save or delete the record (if you have those permissions, as well as specific record operations.
3. Blank Record Form: The central feature on each page is a blank form that corresponds to the specific type of record you have chosen. The example above displays the blank form used to enter data about an Individual.
4. Panel Panes: The panel panes are located below the blank Record form. By clicking on this bar, you can open or close one or more additional panels that display detailed information related to the open Record. For example, when working with an Individual's record, clicking the Receipts Panel Pane will open a panel that displays detailed information about receipts entered into Aristotle 360 for that individual. Also, a panel pane that you open in one record type remains open when you switch to another record type.
5. Record Functions: This area lists functions that you can perform for this record type. Some functions are common among record types, while others are specific to the current record type. Click the function name to begin that task.
6. Quick Search & Quick Entry: You have access to these two important tools on all pages located on the left side navigation panel.
10.2. Exporting a List
List View provides a way to export a list or group to another file format. You may want to use this data for printed lists, mail merges, or for import into other programs.
1. To export records to a file, first select to check all those records you want assigned in the List View window.
2. Next, click the Export button.
3. The Export panel appears under the list of records. Enter a name for the exported file in the List name: field. Do not use spaces in the name of the export.
4. Select to check the file type or types you want to export to in the Export Format: field.
5. Click the Export button.
6. The system creates the export files, which may take a while depending on how many formats you chose and the number of records in the list. When complete, the Export panel redisplays with links to download the export files you created. Click the file name link (for example, May_Event.xls) of the file you want to download.
7. The File Download window appears. Click Save to save the file to a folder on your computer.
8. The Save As window appears. Choose the folder location for the file, and click Save.
9. The file proceeds to save, and then the Download complete window appears. You can click Close to close this window and continue to download the other files (if you selected multiple formats) or you can click Open to view this file.
10. When you have finished downloading all of your files, open the list file you created and review the data and remove any unwanted data. You can now use this data for printed lists, mail merges, or for import into other programs.
10.3. How to Enter Oklahoma (OK) Contributor/Vendor IDs in 360
- Login to the state server at https://www.ok.gov/ethics/crs/login.php
- Manually add new contributor and vendor records.
- In the Committee Administration section, download a csv of all current contributor and vendor ID #'s.
- Send the csv and your request to Tech Services.
- On the record page of the organization/committee/individual in question, go to the "Custom Fields" tab.
- Under Group, choose "Compliance Fields"
- Under Fields, choose "OK contributor ID"
- Click edit and add the appropriate ID.
11. Entities / Master Records - Individuals
11.1. Creating a New Individual Record
Creating a New Individual Record If an Individual does not exist in your dataset, you will need to create the individual. Please follow the below instructions to create a new individual:
- Go to File > New Individual or Ctrl+Alt+I.
- Enter the Basic information for the individual and select Save or Save and Close.
- After saving the record you will have the ability to enter in additional information into the individual's subfiles.
After adding the individual you should now be able to search for it using any of the search functions in 360. You will also be able to add additional information, edit existing information or delete the individual's record.
11.2. Adding a Picture to an Individual Record
One of the many unique features of Aristotle 360 is the ability to add a picture to an Individual Record. Keep in mind that the area available for the photo is small, and that full-face photos will better serve your purpose.
Also, try to keep file size to a minimum. To maintain high resolution, digital cameras typically create photo files that are very large. Aristotle 360 will resize the photo during upload; however the process is quicker and easier if you create a smaller file before you upload it.
Finally, Aristotle 360 is designed to work best with two of the most common types of files: JPG files or GIF files. You add pictures to Aristotle 360 record by uploading them from your computer. The easiest places to retrieve photo files from your computer typically are you're My Documents or My Pictures folders.
11.3. Creating a New Individual
There are multiple places to create new individuals. These include Quick Entry, Individual Page, File Menu, and Hotkeys.
To create a new Individual, go to File > New Individual or select Ctrl+Alt+I, if you have hot keys turned on. This will open up into a New Individual Page. From here you will be able to enter in the Basic Information for a new individual. After you have entered the Basic Information select Save or Save and Close. If you select Save it will reload the individual's record page and allow you to enter in additional information in the the individual's subfile. If you select Save and Close then it will save the information and close the record bringing you back to the Home Page.
11.4. How to Add Employer Information
To add employer information you will want to follow the following steps.
1. Expand the Additional Details tab of the individual record.
2. Click on the magnifying glass to the right of the Employer field.
3. Click on the Add Emplyer button.
4. Type the exact name of the employer in the Search field and then click on search.
5. If it returns the employer you are looking for you will click on that search result, select the approrpiate Role and click Add New.
6. If it did not return the result being searched for, select the appropriate role and then click Add New.
7. Click on the Save button at the top of the record.
11.5. Adding a Zip Code to an Individual
Within the Individual record Address Information section:
1. Enter in the address in Line 1 (or go directly to the Zip Code field).
2. Tab through to the Zip Code field and enter in the Zip Code.
3. Tab once more and the rest of the address with automatically populate (called Address Validation).
4. Click the save button just below the address fields.
But what if the Zip Code changes to something other than what was typed in, how can this be corrected?
1. Click in the Zip Code field and enter in the preferred Zip Code (do not tab after entering).
2. Check the box called 'Do not validate address on save'.
3. Click the save button just below the address fields.
4. Once the Zip Code is saved, go back through the rest of the address and fill in the information but make sure the box from step 2 is still checked.
5. Click the save button just below the address fields after the rest of the address information is entered.
11.6. Adding the Advocate Function Panel
To add the Advocate Functions panel, you must first select an individual you wish to make an advocate and navigate to their record.Once there, click the Enable Advocate button on the right hand side of the screen:
Once you have done this, the record should display with the Advocate panel on the right hand side:
This panel will allow you to access Advocate functions within an individual record. You may also access Advocate functions by going to Settings>Advocate Administration. There you will see a panel listing your currently enabled Advocates and allowing you to change their settings.
12. Entities / Master Records - Individuals - Householding
12.1. Creating a Household
- To create an Aristotle 360 Household, first select an Individual record of one member of the household.
- The Household Search box appears. The first step is to search to see if any households exist.
- Click Search Button
- Click Create
- The Household Edit window appears. Aristotle 360 creates a household named "whatever you designated" and adds the current individual.By default the HOH (Head of Household) checkbox is selected since this is the first person added to the Household.
- Click the save button to finish.
12.2. Removing a Household From an Individual Record
If a household link exists for an individual and you want to remove that link to the household, click the Remove Household button from the individual's record page.
12.3. Edit Household Member Information
The household screen makes it easy to edit member information, add a salutations for the family, record pertinent notes in the Remarks panel, change an individual's role using the drop-down menu, open an individual's record by clicking View, or add a new member to the household by linking their existing record. Perhaps the most convenient feature is the ability to create as many new records as you need, on-the-fly, and add them to the household without leaving this page.
12.4. Relationships Between Individuals - Householding
The only way relationships can be established between invidividuals is by householding.
Individuals can be linked to Poltical committees or organizations as committee staff(for PAC's) and employees/members for Organizations.
13. Entities / Master Records - Organizations
13.1. Creating a New Organization Record
If an organization does not exist in your dataset, you will need to create the organization. Organizations are any entity that is not an individual, Political Party Committee, Political Action Committee or PAC, or a Campaign Committee. Please follow the below instructions to create a new organization:
- Select File > New Organization or Ctrl+Alt+O.
- Enter the Basic information for the organization and select Save or Save and Close.
- After saving the record you will have the ability to enter in additional information into the organization's subfiles.
After adding the organization you should now be able to search for it using any of the search functions in 360. You will also be able to add additional information, edit existing information or delete the organizaiton's record.
13.2. Creating a New Organization
To create a New Organization go to File > New Organization or Ctrl+Alt+O if you have the hotkeys turn on. This will bring you to the New Organization Page. Here you will be able to enter the basic information for the Organization. After you have completed this select either Save or Save and Close. If you select Save it will reload the page and allow you to enter in additional information in the subfiles of the Organization. If you select Save and Close it will save the record and close it bringing you back to the Home Page.
13.3. Definition of Organizations
Organizations have a couple of unique qualifications, which can be important when filing compliance reports. First, take time to use the Type drop-down menu to record the appropriate description for the organization. Some Organizations in your database will be contributors, some vendors, and others are companies that employ the Individuals in your database. Often, an organization will be more than one of these. Choose the best description for your purposes.
13.4. Deleting an Organization Record
To delete an organization from the dataset, simply click the Delete option on the Options Bar. Be sure you have the correct record in front of you before clicking the Delete button. You will receive a warning dialog box: Click OK. After the record is deleted, you'll see this confirmation appear on the Record Edit page: Navigate to the Home page to continue working.
14. Entities / Master Records - Legislators
14.1. Creating a New Legislator Record
Creating a New Legislator Record
Federal legislator records are updated automatically on a semi-monthly basis by Aristotle. The instructions below are for adding a single legislator that has either not yet been populated or is a state/local legislator that you need to add one-off. If you require entire state/local legislator loads in your database, please contact technical support.
- Go to Quick Add > Legislators (File > New Legislator if you are using the old layout). This will bring you to the New Legislator Page where you can enter in the Basic Information for the Legislator you are trying to add. After entering the Basic Information select Save.
- Next, you will need to create the district information for the legislator added. To do this, click the Add District button. A pop-up will open.
- In the pop-up window, select the appropriate Type, Code, State and District If you do not see the appropriate district information, contact Technical Support.
- Click Add when you have completed the district info.
- Click the Save icon at the top of the screen to commit all changes.
- If this is a Federal Candidate enter the Candidates FEC ID number in the ID field. This number starts with either a S, H, or P.
- To save the ID select "Update" Under next to the District Information, then select to save the record
- Enter any other information you wish into the Legislator's record and save the record.
14.2. Adding a Legislator to a Committee
Assigning a Legislator to a committee
Please follow the below instructions on how to do this.
1. Open the Committee Record for a Candidate, for example "Washington for President"
2. Open the "Committee Staff" subfile
3. Select "Add New Staff"
4. Search for the Legislator and select the appropriate one in the search results (If the Legislator does not exist in you data set, please refer to the below instructions on how to add the Legislator)
5. Enter a Date appointed (This will not be reflected on you FEC report)
6. Change the Contact type to "Candidate"
If the Legislator does not already exist in the data set, please follow the below instructions on how to create a new Legislator
1. Select File > New Legislator
2. Enter the Legislator's Name
3. Select Add District
4. Select the appropriate selections in the drop-down boxes that appear
5. Save the record.
6. If this is a Federal Candidate enter the Candidates FEC ID number in the ID field. This number starts with either a S, H, or P.
7. To save the ID select "Update" Under next to the District Information, then select to save the record.
8. Enter any other information you wish into the Legislator's record and save the record.
9. Once the record has been saved, you'll want to expand the District Information section, and then enter the legislator's district info using the Add District button. Once that has been added, go ahead and give the entire record a save.
10. Make sure to mark the default indicator on the district. As legislators may have represented multiple different districts in the past, so it's important that the default indicator option gets marked so the information pulls to the FEC report properly.
If all of this data entry is done correctly, you should see the candidate with the office sought information fill in for the transaction.
15. Entities / Master Records - Committees
15.1. Creating a New Committee Record
If a committee does not exist in your dataset, you will need to create the committee. Committees are Political Party Committees, Political Action Committes or PACs, and Political Campaign Committees. Please follow the below instructions to create a new committee:
- Go to File > New Committee or Ctrl+Alt+M
- Enter the Basic information for the committee and select Save or Save and Close.
- After saving the record you will have the ability to enter in additional information into the committee's subfiles.
After adding the committee you should now be able to search for it using any of the search functions in 360. You will also be able to add additional information, edit existing information or delete the committee record.
15.2. Adding a New Committee Record using the COSMOS Database
Adding new records for federally registered committees can be done easily by utilizing the COSMOS Database feature. The COSMOS Database is an external data source for federally registered committees, and can be used to quickly add committee info to your database. You can do so by following the steps below:
- Go to Search > Committee Search > Basic Search
- Type in the name of the committee you want to add into the name field, and click Search. Since the committee doesn't exist in your database, the results should show No Results Found.
- However, scroll down, and you'll see the Possible Committee Matches from COSMOS Database section. In that section, located the committee you want to add, and click anywhere in its row.
- Once you click on it, a new window will open, giving you the option to add the committee to your database. Doing so will create the record and include data such as address, registration ID, etc. Click on one of the two Add buttons at the top of this window, and the record will be created.
Note: the first Add button will just create the record, while the Add and Open button will do the same, but will also re-direct you to that record as well. - Once you've done that, you're done! You'll be able to navigate to the committee's profile to view its info, save transactions to it, etc.
Important: The COSMOS Database can only be used to add federally registered committees. If you need to add state or local level committees, you'll need to do so by using other means (manual data entry, importing, etc.).
15.3. Creating a New Filing Committee
To create a filing committee, Go to Settings > Filing Committees. Click on the Add New Filing Committee link on the right-hand side of the page.
15.4. How to Add a Committee ID Number to a Record
Adding Committee ID numbers
Committee ID numbers are important when filing compliance reports for committees that have transactions associated to the committee.
- Go to Search > Committee Search > Basic Search.
- Search for the Committee in the database and select it.
- In the Basic Information area, click New next to Registration ID.

- Select the Authority ID.
- For example, if this is a committee ID number from the Federal Election Commission, the Authority will be FEC.
- Type the Committee ID number in the Reg ID field.

- Click Save and Close at the top.
When the Committee Record refreshes, you should see your committee ID number has been added to the record.
15.5. Selecting Filing Committee
You can have one or more filing committees in a dataset. You set up the info for the filing committee on the Filing Committees page by going to Settings > Filing Committees. Select the filing committee you wish to reveiw or edit by clicking on the magnifying glass next to the name of the filing committee.
15.6. About Filing Committees
A Filing Committee is just a Committee record with a special designation. You can even view the same record on the committee page that you see on the filing committee page. You will not have as many options, and things like bank accounts, bank reports, and linked orgs are not available on the basic committee page.
15.7. Filing Committee Basic Information
You will fill in the Basic Information with the same type of info that appears on your compliance report's cover page. Select the committee type, add a reg ID, and fill in the contact information. When done you need to click save at the top of the page to commit the information you have entered.
15.8. When Adding a RegID
The contact information displayed on the Reg ID edit/new dialog is meant to be the contact information for the Filing Authority ID you choose. For example, if FEC is the chosen Authority ID you will see the FEC's contact information populate the fields below.
If the fields are blank when you select the Filing Authority ID, simply fill the information in about the Filing Authority and the next time you select it, you will see the information populated.
15.9. Committee Staff
The Committee Staff Panel is where you will link the people that are associated with the campaign. Some of these people are required to be linked here to show up on the report. For instance, the Treasurer's information will pull based on the link created here between an Individual Record and the filing committee.
To Link a record, click add staff button and then search for an individual or legislator record that already exists in the dataset. Choose the role and give an appointed date, if you desire.
After selecting the record you wish to link, you must save the filing committee record by choosing the save button at the top of the filing committee page.
15.10. Linking a Legislator to Their Committee
Linking a legislator record to their campaign committee's record is often required for compliance reports. To create a link between those two records, follow these steps:
- Navigate to the committee record.
- On that record page, expand the Committee Staff section and click the Add New Staff button.
- Search for the legislator record and then click the Select button.
- On the following window, enter a start date. This can be any date, as it doesn't pull to any compliance reports. Either the date an incumbent took office, or the date a candidate announced their candidacy are typically used here.
- Note that entering an end date is optional.
- Select Candidate from the Contact type drop-down.
- Click Add.
15.11. Adding a Legislator to a Committee
Assigning a Legislator to a committee
Please follow the below instructions on how to do this.
1. Open the Committee Record for a Candidate, for example "Washington for President"
2. Open the "Committee Staff" subfile
3. Select "Add New Staff"
4. Search for the Legislator and select the appropriate one in the search results (If the Legislator does not exist in you data set, please refer to the below instructions on how to add the Legislator)
5. Enter a Date appointed (This will not be reflected on you FEC report)
6. Change the Contact type to "Candidate"
If the Legislator does not already exist in the data set, please follow the below instructions on how to create a new Legislator
1. Select File > New Legislator
2. Enter the Legislator's Name
3. Select Add District
4. Select the appropriate selections in the drop-down boxes that appear
5. Save the Record
6. If this is a Federal Candidate enter the Candidates FEC ID number in the ID field. This number starts with either a S, H, or P.
7. To save the ID select "Update" Under next to the District Information, then select to save the record
8. Enter any other information you wish into the Legislator's record and save the record.
16. Activity Management
16.1. About Activities
Aristotle 360 Activities allow users to track activity performed on records (entities) in the system, assign ownership of each activity, and manage the state/status of each of the records. In its most basic usage, Activities will let you use Aristotle 360 as a a full fledged contact history and task management tool. For Aristotle 360 power users, the Political Activity Management addition will allow political organizations to plan, develop, execute, and assess each of their operations with their audience.
16.2. Activity Types
There are currently six types of activities, five of which can be created individually:
- Phone Call
- Direct Mail
- Task
- Appointment
- Fax (cannot be created individually)
16.3. Completing Activities
Activities have two general statuses: open and closed. Activities typically start as open and switch to closed upon completion. For example, a phone call can have the open status of "Call Back", which can switch to the closed status of "Left Message." In the Activities panel on your homepage, open activities are displayed separately from closed activities.
16.4. Assigning Activities
Each activity has at least one sender and receiver. The activity will show up in the activity panel of both the sender and the receiver.
16.5. Searching Activities
You can try to find an activity by going to the Search option on the main menu, and then mousing over the submenu: Activity Search. There are various kinds of activity searches, each tailored to search for a certain attribute in an activity.
16.6. Exporting Activities
You must first have the results of an activity search (See Searching Activities). On the page of results, there will be a link to "Export Results", where you can choose the fields to export, and the format of the export (Microsoft Excel or Comma Separated Values).
17. Activity Management - Phone Call
17.1. About Phone Call
An example Phone Call activity:

The required fields in a phone call are "Sender", "Receiver", "Subject", and "Activity Status".
- Sender: the person making the call
- Receiver: the person being called
- Subject: the title of the activity that will show up in an activities panel
- Activity Status: the current state of the phone call
17.2. Phone Call Statuses
The Phone Call activity has two activity states (Open and Closed) and nine related statuses. Setting the status will automatically set the activity to the related activity state it is grouped under (for example: Setting an Activity to "Left Message" would automatically put the activity into a "Closed" state.
The following statuses are available for the Phone Call activity:
- Open (To Be Completed)
- Call Back: The sender was told to call back by the receiver after a call.
- Open: The sender has not called the receiver yet.
- Scheduled: The call has been schedule for a time, but not yet made.
- Closed (Completed or Canceled)
- Busy Signal: The sender got a busy signal when calling the number.
- Canceled: The phone call was canceled for some reason.
- Completed: The phone call went well.
- Left Message: The sender reached the receiver's answering machine and left a message.
- No Answer: No one picked up and there was no answering machine when the sender called.
- Wrong Number: The phone number turned out to be incorrect after calling.
Additional Note: Activity states and statuses are not customizable.
18. Activity Management - Email
18.1. Mass Email Wizard, Brief Overview and Step 1
The 360 Mass Email wizard allows you to send an email to multiple recipients at once and can be used for event invitations, campaign notices, fundraiser announcements, calls to action, etc.
You can access the wizard by going to Activities > New Mass Activity > Mass Email Wizard. A pop-up window will appear where you'll need to move through six steps.
The first step of the mass email wizard provides you with a brief introduction to the process of sending out your email blasts. You'll just need to click 'Next' to move to step 2.
18.2. Mass Email Wizard, Step 2
On the Basic Info step of the email blast creation, provide summary information about your email.
Mass Activity Title: This field allows you to apply a title to your mass email activity. This title is then listed on the Mass Activity Manager screen when you go to Activities > View/Search Mass Activities. The recipient of the email will not see this title.
Description: This is where you can add/save a description about the email blast (e.g. a dinner event invite, a scheduled fundraiser, etc.). The recipient of the email will not see this description.
Activity Campaign: This is where you can (optionally) link this Mass Email to any existing Activity Campaign in your database. Linking the Mass Email to an activity campaign allows the email recipient to unsubscribe from any email blasts tied to that specific activity campaign. The email recipients also have the option to unsubscribe from all emails.
18.3. Mass Email Wizard, Step 3
On the Create Content step of the email blast creation, insert all of the content elements of the email blast.
There are three different methods by which Mass Email content can be created:
- Type straight into the editor and compose your mass email in full here. The editor allows you to format the font and size of your text, and you can also use the Insert/Edit Image button to insert images into your content. The images, however, must be hosted on a server.
- Click the Source button in the upper left to switch the editor to HTML mode. Doing so will allow you to type the content of your mass email with HTML formatting.
- Click the Email Template button to use an existing template for the content of your mass email.
1. In the Text to display field, enter the text that you wish to appear in the email as the hyperlinked text.
2. In the Link To field, enter the URL to which you wish to send the email recipient when they click the hyperlink
18.4. Mass Email Wizard, Step 4
On the Destination Settings step of the email blast creation, indicate who will be identified as the sender of the email.
18.5. Mass Email Wizard, Step 5
On the Recipients step of the email creation, identify the recpients of the mass email.
18.6. Mass Email Wizard, Step 6
On the Distribute step of the email blast creation, confirm the email blast settings, set the delivery date and time, send test emails, and launch the mass email.
To ensure that no email address receives the email in duplicate, click avoid duplicate emails.
If you would like to send a test email to yourself or to any of your colleagues, click the Test Email button, enter the email address, and then click send test emails.
Click View Counts to view a breakdown of the number of emails that will be sent, the number of targeted email addresses that are unsubscribed, the number of email addresses that are linked to legislators or legislative staff, the number of duplicate emails included in the target list, and the number of invalid email addresses.
If everything is set up the way you want it then you can click the 'Finish' button to send it out per the delivery options.
18.7. FAQ: SPF Records for Mass Email
What is an SPF record?
SPF (Sender Policy Framework) record is a type of DNS (Domain Name Service) record that identifies which mail servers are authorized to send email on behalf of your domain. In essence it's a way of announcing to other mail servers that the entity sending email on your behalf is trusted.
Why is it important that I create an SPF entry for Aristotle and my Domain?
If you specify a 'sent from' email address from an external mail server without a proper SPF record the likelyhood of the recipient's mail server flaging or rejecting the message as spam is increased.
How can I check my SPF records?
You can use the following tool which is provided by Microsoft to check your SPF record: http://www.microsoft.com/mscorp/safety/content/technologies/senderid/wizard/ http://www.mxtoolbox.com/spf.aspx
Simply enter your domain name in the field provided (Your domain name is the text that occurs after the @ in your email address.)
If your setup is correct it should show 'include:aristotle.com' in it somewhere when tested with the tool above.
Who can edit my SPF entry?
In order to change your SPF record you will need access to the account that you registered your domain with. For example, if you registered your domain with GoDaddy then you will need to log into your GoDaddy account to manage your SPF records.
What do I need to enter?
The steps to reach the administration area for your SPF records will vary depending on your domain registrar. Consult your registrar directly for step by step instructions.
The SPF record type should be : TXT
The entry that you need ot add is: include:spf.aristotle.com
This will allow Aristotle's mail servers to send email on behalf of your domain name without being flagged as suspicious.
What if my email address ends in @yahoo.com, @gmail.com, or some other common free email domain?
Modifying the SPF records for free email accounts such as Yahoo or Google is not possible since these domains are shares by many thousands or sometimes millions of users.
I'm sending email on behalf of a group that uses one of the above services. If I can't set an SPF record what can I do?
You can use any email address in the 'reply to' area of your email, only the 'sender' line needs to use an email address from a domain with the correct SPF record to avoid being marked as spam.
Links to instructions on setting SPF records for the most common domain providers:
1. GoDaddy: http://www.mail-tester.com/spf/godaddy
2. Google Apps: https://support.google.com/a/answer/33786?hl=en
3. YahooDomains: https://help.yahoo.com/kb/index?page=content&id=SLN22170
4. Tell us who you use for your domain and we'll do our best to include instructions here.
18.8. About Email
An example Email activity:

The required fields for an e-mail are "From", "From Email Address", "To", "To Email Address", "Subject", and "Status".
- From: the person sending the email
- From Email Address: the email address of the sender
- To: the person receiving the email
- To Email Address: the email address of the receiver
- Status: the current state of the email
******PLEASE NOTE: Message size limit is 50 KB.********************
18.9. Sending Email
Once you have finished composing an email, it will not be sent until you select the "Save and Send Email" option.
18.10. Tracking Email
If you wish to track the statuses of an email, the email should be created as an "Email Component for a Campaign". Go to the campaign page of your Campaign, and then click the Campaign Components Panel Pane. Then click the Add Component button, and create and send your email. Once the email is sent, you can track the status by clicking on the Reports panel.
18.11. Composing Email
Once you have created an email activity, you enter the subject of the email in the subject field, and the main message in the Message Body field.
18.12. Adding Images to Emails
This can be accomplished very easily by uploading the image to the "Repository" feature in 360! Here are the steps required to add an image to your email blast:
1) Go to File > Repository
2) Click the "Add File" button at the top and you can add the image to any folder in the repository.
3) Then when you're in step 3 of the mass email wizard you just need to click the "Add Image" button and click "Browse Server". This will open the file repository and you can grab the image you uploaded and use it in the email.
18.13. How to Change Email Disclaimer
1) From the main screen in 360, select Settings > Unsubscribe Manager
2) Expand the Email Information section and then scroll down to the HTML Disclaimer to edit the disclaimer. You can either completely remove the text, or change the text to reflect your campaign name.
3) When finished, select the blue Save Changes button at the bottom of the screen.
18.14. Email Statuses
The Email activity has two activity states (Open and Closed) and nine related statuses. Setting the status will automatically set the activity to the related activity state it is grouped under (for example: Setting an email to "Draft" would automatically put the email into an "Open" state.
The following statuses are available for the Email activity:
- Open (To Be Completed)
- Draft: The current body text is a draft and needs further work before it can be sent.
- To Be Sent: The email is complete and just needs to be sent.
- Closed (Completed or Canceled)
- BounceBack: Sending the email returned an error from the server.
- Canceled: The email was canceled for some reason.
- Clicked: (to be used for future click tracking)
- Failed: An error occurred with the sending of the email.
- Forwarded: The email was forwarded properly.
- Opened: The receiver opened the email.
- Sent: The email was successfully sent.
Additional Note: Activity states and statuses are not customizable.
18.15. Email Template Editor
When you use the Mass Email Wizard, you have the option of importing a template when creating the content of your email. If you just want to edit templates without sending an e-mail, go to the main menu bar, go to Settings > Template Editor. You can either click on an existing template or "Add New Template" button to bring up the Template Editor.
The specific help for the editor is available here: http://docs.fckeditor.net/FCKeditor_2.x/Users_Guide.
18.16. Email Subscription Manager
Many times while sending out mass e-mails, a few of the recipients will wish to stop receiving further e-mails. By default, e-mails sent with the Mass Email Wizard have a link at the bottom, which the recipient can click to unsubscribe from further mailings. The link will direct them to another web page. The message on the web page will be what is under your Settings / Account Settings / Email Information / Unsubscribe Message box.
You can see a list of the unsubscribed people by going to Settings > Unsubscribe Manager. The unsubscribed e-mails will be listed, along with the day the email was unsubscribed.
If someone was unsubscribed accidentally, or someone wishes to resubscribe to the emailing list, you can resubscribe them by going to the Unsubscribe Manager and clicking in the subscribe column for that e-mail address. You will be prompted to send a resubscription e-mail with a special link, so do not change the existing text in blue. Once the recipient clicks on the link, they'll be linked to another web page. The message on the web page will be what is under your Settings > Account Settings / Email Information / Re-Subscribe Message box.
18.17. HTML Editor
A few pages in Aristotle 360 have a toolbar that looks like this:
.jpeg)
When you see such a toolbar, you are being asked to edit HTML content. The HTML editor that is part of this toolbar is called FCKeditor, and more information about its usage can be found here: http://docs.fckeditor.net/FCKeditor_2.x/Users_Guide.
18.18. Finding Bounced Emails
If you go to Activities > View/Search Mass Activities and choose the mass email you sent, you'll see a report of emails that were sent, bounced, etc.
Alternatively, you can view bounced emails by going to Search>Query Builder, setting the Main Search Record to "Activity Email", and adding any of the following fields:
18.19. Mass Email and Spam
Is your Mass Email being marked as spam by the recipient server? If so, taking the following steps will help minimize the potential spam impact.
MSN, Yahoo and similar email hosts use the "spam score" to determine whether an email can be received from us. If you are having problems with emails not being received, add the TXT
DNS record for the SPF. This may improve the rate of delivery.
If you do not manage your DNS through us, follow these steps to setup the following DNS record for SPF:
mydomain.com TXT v=spf1 mx include:completecampaigns.com
include:aristotle.com +all
for the BIND DNS server the appropriate line in the zone file would be:
mydomain.com. IN TXT "v=spf1 mx include:completecampaigns.com
include:aristotle.com +all"
Once this is setup, you can check that it is correct by going to:
http://www.microsoft.com/mscorp/safety/content/technologies/senderid/wizard/
and typing in the domain and clicking start. For an example, completgov.com. On the next page it reads:
One or more functional SPF record(s) have been found for the domain
completegov.com
The full text of the domain's SPF record is as follows.
Any other response indicates that the TXT record was incorrectly setup.
19. Activity Management - Direct Mail
19.1. About Direct Mail
An example Direct Mail activity:

The required fields are "Sender", "Receiver", "Address 1", "City", "State", and "Subject".
- Sender: the person sending the mail
- Receiver: the person receiving the mail
- Address 1: the first line of the address of the Receiver
- City: City of the residence
- State: State of the residence
- Subject: the title that shows up in the activities panel
19.2. Direct Mail Statuses
The Direct Mail activity has two activity states (Open and Closed) and five related statuses. Setting the status will automatically set the activity to the related activity state it is grouped under (for example: Setting a Direct Mail to "Draft" would automatically put the Direct Mail into an "Open" state.
The following statuses are available for the Direct Mail activity:
- Open (To Be Completed)
- Draft: The message is incomplete and needs further work before it can be sent.
- Open: The message is complete and just needs to be mailed.
- Closed (Completed or Canceled)
- Canceled: The Direct Mail was canceled for some reason.
- Returned to Sender: The Direct Mail was returned for some reason.
- Sent: The DIrect Mail was successfully sent.
Additional Note: Activity states and statuses are not customizable.
20. Activity Management - Fax
21. Activity Management - Task
21.1. About Task
An example Task activity:

The required fields are "Sender", "Receiver", "Subject", and "Activity Status".
- Sender: The person performing the task.
- Receiver: The person receiving the effects of the task.
- Subject: The title of the task that will appear in the activities panel
- Activity Status: The current state of the task.
21.2. Task Statuses
The Task activity has two activity states (Open and Closed) and three related statuses. Setting the status will automatically set the activity to the related activity state it is grouped under (for example: Setting a Task to "Canceled" would automatically put the Task into a "Closed" state.
The following statuses are available for the Task activity:
- Open (To Be Completed)
- Open: The sender has not called the receiver yet
- Closed (Completed or Canceled)
- Canceled: The task has been canceled for some reason.
- Completed: The task has been finished.
Additional Note: Activity states and statuses are not customizable.
22. Activity Management - Appointment
22.1. About Appointment
An example Appointment activity:

The required fields are "Sender", "Receiver", and "Status".
- Sender: The person scheduling the appontment.
- Receiver: The person who is being asked to attend the appointment.
- Status: The status of the receiver regarding the appoint, e.g. confirmed attendance.
22.2. Appointment Statuses
The Appointment activity has two activity states (Open and Closed) and five related statuses. Setting the status will automatically set the activity to the related activity state it is grouped under (for example: Setting an Appointment to "Left Message" would automatically put the Appointment into a "Closed" state.
The following statuses are available for the Appointment activity:
- Open (To Be Completed)
- Confirmed: The receiver has agreed to attend the appointment.
- Invited: The receiver has been invited to attend the appointment.
- Closed (Completed or Canceled)
- Attended: The receiver attended the appointment.
- Canceled: The appointment was canceled for some reason.
- Declined: The receover declined to attend the appointment.
Additional Note: Activity states and statuses are not customizable.
23. Activity Management - Mass Activity Wizard
23.1. VIDEO: Mass Activity Wizards
This video covers the usage of mass activity wizards.
23.2. About Mass Activity Wizards
Mass Activity Wizards allow you to create many tasks simultaneously, instead of one by one. In general, a mass activity wizard lets you pick a list of receivers, whether it be a stored list, a quick selection, etc. Then you can choose multiple senders among which to divide the activities. For example, if you have 20 receivers and 4 senders, each sender will be assigned 5 new activities.
23.3. Using Mass Email Wizard for Blast Fundraising Emails
Mass email has the option of directly sending the email to all targeted individuals, instead of making campaign member send the emails manually.
To send a blast fundraising email in 360, go to Activities > New Mass Activity > Mass Email Wizard. This can be used in conjunction with the Web Form builder for a one stop fundraising email solicitation by simply adding the URL for a webform in the body of your blast email.
23.4. Merge Fields
Merge fields allow you to insert user-specific information in an individual activity, while using a mass activity wizard. For example, if you use the Mass Email Wizard, you could make the first line of the email be "Dear #FIRSTNAME#". If the receiver of the email was John, the actual email that John received would read, "Dear John". Other commonly used merge fields include #LAST NAME#, #PREFIX#, #SUFFIX#, and #REQUESTAMOUNT#. All the possible merge fields are listed under the "Insert Merge Fields" option in the Activity Wizards.
Note: Merge Fields are currently only available for the Mass Email Wizard.
23.5. Email Template Editor
When you use the Mass Email Wizard, you have the option of importing a template when creating the content of your email. If you just want to edit templates without sending an e-mail, go to the main menu bar, go to Settings > Template Editor. You can either click on an existing template or "Add New Template" button to bring up the Template Editor.
The specific help for the editor is available here: http://docs.fckeditor.net/FCKeditor_2.x/Users_Guide.
23.6. Email Subscription Manager
Many times while sending out mass e-mails, a few of the recipients will wish to stop receiving further e-mails. By default, e-mails sent with the Mass Email Wizard have a link at the bottom, which the recipient can click to unsubscribe from further mailings. The link will direct them to another web page. The message on the web page will be what is under your Settings / Account Settings / Email Information / Unsubscribe Message box.
You can see a list of the unsubscribed people by going to Settings > Unsubscribe Manager. The unsubscribed e-mails will be listed, along with the day the email was unsubscribed.
If someone was unsubscribed accidentally, or someone wishes to resubscribe to the emailing list, you can resubscribe them by going to the Unsubscribe Manager and clicking in the subscribe column for that e-mail address. You will be prompted to send a resubscription e-mail with a special link, so do not change the existing text in blue. Once the recipient clicks on the link, they'll be linked to another web page. The message on the web page will be what is under your Settings > Account Settings / Email Information / Re-Subscribe Message box.
23.7. HTML Editor
A few pages in Aristotle 360 have a toolbar that looks like this:
When you see such a toolbar, you are being asked to edit HTML content. The HTML editor that is part of this toolbar is called FCKeditor, and more information about its usage can be found here: http://docs.fckeditor.net/FCKeditor_2.x/Users_Guide.
24. Financial Transactions
24.1. Why Can I Not Add a Transaction To a Batch I Created?
A common mistake when creating a batch is to put in a close date in before you are ready to close the batch. If you put a close date into a batch then you will not be able to add any transactions to the batch because by puting a close date in you have effectively "Closed" the batch. Do not put in a close date even if it is a date in the future untill you have entered in all of the transactions into the batch. Once you have entered all the transactions into a batch you may review the information checking that you projected totals and actual totals match. After you verify this you may then put in a close date and "Close" the batch.
24.2. "Force Itemize"
"Force Itemize" DOES NOT MEAN "Force Pull To the Report". This is only to pull a transaction that would normally pull to the report, but is below the threshold.
For instance, the normal threshold for FEC reports is $200. If you have an Operating Expenditure that meets the criteria for pulling to the report, but is only for $175, you could use "Force Itemize" in this instance.
However, if you have a transaction that is associated with an account that is not selected for a report, using "Force Itemized" WILL NOT get the transaction to pull to the report.
24.3. Creating a New Filing Committee
To create a filing committee, Go to Settings > Filing Committees. Click on the Add New Filing Committee link on the right-hand side of the page.
24.4. Creating Custom Election Cycles
Determining the Election Cycle Date Range
Problem: The Calculated Field "Election Cycle Receipt Total" is not calculating the entire date range within the election cycle.
Election Cycle Receipt Total is a calculated field determined by the configured election cycle. To correct the current election cycle date range:
- Go to the Dashboard and let the results populate.
- Click the This Election Cycle link found in the Receipts table at the bottom-right side of the dashboard.
- From the Select Date Range dropdown box, select Custom Cycle.
- Input the dates when their cycle began and ended.
With this set, the results should calculate correctly according to the dates they set.
24.5. Linking Two or More Transactions Together
Linking Transactions
Anytime you need for transactions to be able to reference each other, such as a refund and the original transaction that it is meant to refund, then that can be achieved by linking them. To do so, just follow these steps:
- Open up one of the transaction entries that needs to be part of the linking. If you have two transactions that need to be linked, then you can open up either one.
- Scroll down to the Add Transaction Links section and expand it.
- Select the type of transaction you want to link this entry to (receipt or disbursement), and then use the fields below it to search for that specific entry. One you have the search parameters set as desired, click the Search button.
- When the search results load, click on the Link button on the left next to the entry you want to link.
- At this point, the transaction window should refresh and show the linked transaction. If you have more transactions you want to link to this one, repeat steps 2 through 4.
- Once you have all the transactions linked, go ahead and save the entire entry (at the top of the window), and you're all set!
When Is Linking Necessary?
Whenever you have a transaction that is in some way associated with another, that doesn't necessarily mean that they need to be linked together. The necessity of linking mostly depends on whether or not a specific compliance report requires it; data entry steps for some reports require that associated entries be linked, but data entry steps for others may not.
If you are unsure if linking is required for your needs, please see our help files associated with your compliance report, or reach out to Support.
24.6. Linking a Committee's Disbursement to a Legislator
The preferred method to link a committee's disbursement to a Legislator is to add the Legislator as "Candidate" in the "Committee Staff" section of the committee's record.
When a candidate is linked to a committee record, a memo transaction will automatically be generated.
The following method exists because at one point there was no way to link staff to committees on 360. The solution remains in the FEC code just to make sure it is backwards compatible.
1. Open the Disbursement
2. Scroll to the bottom and select the Candidate Information Tab
3. Enter the Legislator's name or FEC ID and select Search
4. Select "Link" to link this disbursement with the correct Legislator. If the Legislator does not exist in you dataset you will need to add the Legislator first by going to File > New Legislator
24.7. FEC Form 3 Types and Subtypes Chart
|
Form 3 Types and Subtypes Chart
Schedule A (Contributions)
Schedule B (Disbursements)
Schedule C: Contributions:
Disbursements:
Schedule D:
|
24.8. FEC Form 3X Receipt Types and Sub-Types
|
24.9. FEC Form 3X Disbursement Types and Sub-Types
Entity: Line # Disbursement Type Sub-Type
ALL 21(a)/H4 Joint Activity Administrative
Direct Candidate Support
Exempt
Fundraising
Memo
Public Communication by PAC
Voter Drive
DCS 100% Federal
DCS 100% Non-Federal
Fundraising 100% Federal
Fundraising 100% Non-Federal
Administrative 100% Federal
Administrative 100% Non-Federal
Exempt 100% Federal
Exempt 100% Non-Federal
Public Comm. 100% Federal
Public Comm. 100% Non-Federal
Voter Drive 100% Federal
Voter Drive 100% Non-Federal
Entity:
ALL 21(b)/B Operating Expenditure Payment
Memo
Exempt Legal/Accounting (Memo)
Credit Card Payment
Reimbursement
Entity:
Committee 22/B Transfer to Affil/Auth. Transfer of Funds
Memo
Entity:
ALL Types 23/B Contribution To Committee Federal
Memo
In-Kind Federal
Earmark Directed
Non-directed
Entity:
All Types 24/E Independent Expenditure Payment, Memo
All Types 25/F Coordinated Expenditure Payment, Memo, Designated (Memo), Subordinate (Memo), Memo
Individual 26/B and C Loan Repayment
Entity:
All Types 27/B and C Loan Made to Other
Entity:
Individual 28(a)/B Refund Contribution, Memo
Entity:
Political Party 28(b)/B Refund Contribution, Memo
Committee
Entity:
28c/B Refund Contribution, Memo
Entity:
ALL 29/B Other Disbursement Contribution
Payment
Contribution To Committee State/Local
In-Kind State/Local
Entity:
All 30(a)/H6 FEA Allocated Voter Registration
Voter ID
GOTV
Generic Campaign Activity
Memo
Direct Candidate Support
All 30(b)/B FEA Debt Payment, Payment Memo
Memo
Entity:
ALL D/Line 10 Debt Owed By the Committee, Repayment, 3rd Party Repayment, Forgiveness
Line 21b, 21(a),
30(a) and
Sch D/Line 10
D/Line 10
C/Line 10 Loan Forgiveness
Entity:
Committee L-B/4a Levin Voter Registration
L-B/4b Voter ID
L-B/4c GOTV
L-B/4d Generic Campaign Activity
All L-B/5 Levin Payment, Memo
24.10. Reporting In-State Activity Only on a State Report
Reporting In-State Activity Only on a State Report
Some state reports only require that you report transactions that were collected either within the state or for in-state campaigns. For further information on which states require this type of reporting, and what kind of transactions should be disclosed, please consult your local state analyst.
Selecting on state-specific transactions for a report is done from the report generation screen of your state report. The Arizona state report is shown as an example - please be aware that your report generation screen may look slightly different.

There are two options for generating a state report with in-state activity only.
The first option is to select "By Address." This will select which transactions to pull based on the state listed in the Primary Address for the entity. This requires no additional data entry.
The second option is to select "By Transaction State." This will select only transactions where the transaction's State field has been set to the state for which this report is being run (e.g. Arizona).
Please note: this option requires specific data entry within the transaction itself:![]()
Only transactions where the State has been set will be pulled to your report. By default, the State field in a transaction is blank, so it must be selected when doing data entry.
24.11. Entering Earmarked Contributions
If you are the conduit, choose Receipt TYPE: Earmarked (Conduit); SUBTYPE: {as appropriate}.
**Please note, SUBTYPE: Directed, Non-Deposited; Non-Directed, Non-Deposited and Memo will pull to the report as a memo transaction.**
If you are the end recipient, choose Receipt TYPE: Earmarked; SUBTYPE: {as appropriate}.
24.12. TYPE: "Earmarked" vs. TYPE: "Earmarked (Conduit)"
Here is the difference between "Earmarked" and "Earmarked (Conduit)":
1) "Earmarked (Conduit)"
a. All transactions are itemized regardless of threshold
b. SUBTYPE: Directed, Deposited and Non-Directed, Deposited will pull to the report as a cash-impact transaction
c. SUBTYPE: Directed, Non-Deposited; Non-Directed, Non-Deposited and Memo will pull to the report as a memo transaction
d. An individual's Election-To-Date total is NOT reported
2) "Earmarked"
a. Standard Threshold Rules apply for individuals; however, if the Committee receives a "bundled" contribution made up of multiple unitemized contributions, the "bundled" contribution must be itemized.
b. Deposited & Non-Deposited Contributions are itemized as cash-impact transactions (again, standard threshold rules apply)
c. An individual's Election-To-Date total is reported.
24.13. South Dakota - Entering Expenditure Transactions
Please keep the following things in mind regarding expenditures:
1) This is a list of type/subtypes that pull to the report. If the transaction is not one of these type/subtype combinations, the transaction will not appear on the report:
a. Type: Contribution To Committee
Subtypes: Federal, State/Local, Memo, In-Kind Federal, In-Kind State/Local
b. Type: Other Disbursement
Subtypes: Contribution, Payment
c. Type: Refund
Subtype: Contribution
d. Type: Independent Expenditure
Subtypes: Payment, Memo
e. Type: Operating Expenditure
Subtypes: Payment, Credit Card Payment, Reimbursement
f. Type: Transfer to Affil/Auth
Subtype: Transfer of Funds
2) To get transactions to group as one of the expense types (Advertising, Consulting, Interest, Postage, Printing, Rent, Salaries, Telephone, Travel, Utilities), you must use reporting codes. Once you add & save a transaction, open the full transaction details again, and at the very bottom, you will see "Expenditure Codes". Select state "South Dakota", and then select the appropriate expense type.
24.14. Adding an Unpaid Bill
Adding an Unpaid Bill
To add an unpaid bill, you will add a disbursement with the type of Debt and Subtype of Owed by the Committee.
24.15. Adding a Subvendor to an Expense
Adding a Subvendor to an Expense
To add a subvendor to an expense, make sure you add your main transaction as a disbursement and then when you add your subvendor transactions you will select the subtype of "Memo" and save it. Click modify and then click the button that says, "Additional Details." In that screen you will see an area to "Add Transaction Links." In this area you want to search for the main transaction and link it.
24.16. Refunding a Contribution
In order to refund a contribution, follow these steps:
1) Create a new disbursement in the amount that you would like to refund by going into the individual record, expanding Disbursements, and then clicking Add Disbursement:
2) Click on the Additional Details button and that should give you a pop up window.In the pop up window, enter in your desired refund amount, date the refund was issued, and then set the Type to Refund and Subtype to Contribution. Enter any other information you would like and then click the diskette icon near the top of the screen to save:
3) Once you have saved, scroll down and expand the section named "Add Transaction Links". Enter in the search information for the original contribution that you wish to refund. When finished click the blue Search button and that should give you some results. Click on the link icon to left of the transaction that you wish to link:
Your refund should now be linked to the original contribution and pull properly to your report. For instance, on the Form 3:
24.17. Voiding a Check/Disbursement
You can create a void by opening up the disbursement entry that represents the original disbursement. Once you have that open, click the Reverse button. That will create a new disbursement that is mostly the same as the original, but with three key differences:
- The amount will be negative.
- The purpose field will be filled in with the word VOID.
- The date will default to the day that the entry is created. This date can always be changed to whatever date is more accurate.
From there, you can then make any edits if needed.
Also, please note that proper data entry steps for creating void entries can vary based on which compliance report your entry needs to pull to. This help file covers the most common way to create a void entry.
25. Financial Transactions - Receipts
25.1. Credit Card Processing
First you must set up your account for credit card processing. To do this, navigate through the menu bar to Settings-> Credit Card Processing.

On the Credit-Card Processing Settings page, enter your Account Login ID and password for your CampaignContribution.com account. Click the "Save Account Information" to commit this entry.

Now that your account information is set up you can process credit cards during the data entry of receipts. To do this you will need to create a receipt using the menu option File->New Receipt or the "Add Receipt" link in the record functions box of an Entity's Page.
| You will not be able to process credit cards for already existing receipts or receipts created using the receipt panel of the individual page or Quick Entr |
Once the new receipt window has popped up, enter the Amount of the receipt, and then click the "Credit Card Processing" link in the upper left corner of the popup.
.jpg)
Billing information in the details of the credit card transaction will be automatically populated based on the information in the contributor's record. You may change this information to the billing information supplied by the contributor if it is different than the default address and phone number. Click "Process Transaction" when you have completed the form to complete the transaction and get authorization from the credit card agency. If your transaction is successful you will be returned to the Receipt Details Panel, if it is denied you will be given a notice that the transaction could not be processed.
|
Due to the nature of political contributions, the transaction will be DENIED if you fail to enter any of the requested billing information, including phone number, or there is a discrepancy between the information entered and the information on file with the credit card agency. Additonally, the billing information must match exactly to the information on file with the credit card agency. |
25.2. Create Receipts From File Menu
This method of data entry allows you to create a receipt without having to access the entitiy record or load quick entry. This is useful for entering one Receipt.
One way to enter a new Receipt is to go to File > New Receipt. This will cause the Receipt Edit fly out window to appear. Once the Receipt Edit window appears you will be able to enter the information for the Reciept. After entering in all the information for the Reciept select Save Receipt. This will save the Receipt to the record that you selected and close the Receipt Edit window.
25.3. Troubleshooting: Partnership Memos not Displaying
Partnership memos not displaying
If you create a Partnership - "Memo" and link it to each individual, you may wonder why it won't print out on a report. The reason is:
The Organization Type "Partnership/LLC" and "Association" are not supported by the Federal Reports. You must change the Organization Type to "Partnership" by opening the Organization record, choosing the new type, and clicking save.
25.4. Proper Data Entry for Reattribution of Contributions on FEC Form 3, 3P, or 3X
The following is an example of a contribution that was reported in Q1, but then was partially reattributed to a spouse/other person during Q2. This involves 3 transactions in total:
1) The original contribution
Example:
Entity: Ellen Nye
TYPE: Contribution
SUBTYPE: Check
Date: 03/13/2010
Amount: $4800
2) Create "Reattribution FROM" contribution. This transaction will -MOST LIKELY- be a negative amount, and will be dated within the reporting period. Link to original Contribution.
Entity: Ellen Nye
TYPE: Contribution
SUBTYPE: Reattribution from Memo
Date: 06/01/2010
Amount: $-2400
3) Create "Reattribution TO" contribution. This transaction will -MOST LIKELY- be a positive amount, to a different entity and will be dated within the reporting period. Link to original Contribution.
Entity: Bill Nye
TYPE: Contribution
SUBTYPE: Reattribution to Memo
Date: 06/01/2010
Amount: $2400
FINAL STEP:
The last step is to scroll to the bottom of any of the receipts, find the "Add Transaction Links" section, search/find each of the three of the receipts and click the icon to link them together. If done correctly, the following transactions should appear linked within Receipt Details under Add Transaction Links:
The original parent transaction will pull to the report as a memo.
The example transaction from above will show up on the Form 3 as follows:
26. Financial Transactions - Disbursements
26.1. Entering Independent Expenditure Transactions
Steps to Enter Independent Expenditure Transactions
- Open the legislator record of the candidate you are creating an independent expenditure for. Make sure that you open the legislator record and not a candidate campaign record. Note: The purpose of this step is to ensure you identify the correct legislator to link with disbursements. If you are certain about the legislator identity you may skip this step.
- If the candidate has a legislator record make sure that the District Information field is correct for the election that they are currently running for. There may be a situation where a sitting Representative in the House is running for Senate. The legislator record will likely contain their current position and not the position they are campaigning for. To update the District Information simply select Update. Note: If no legislator record exists for the candidate you will have to create one, click here for more information on how to create a new legislator record.
- Next, open the record for the organization you are paying (or create a new record if necessary).
- Once within the Organization's record click the Add Disbursement button on the right side of the window to open a new disbursement transaction. This will open a Disbursement Details pop-up window.
- Enter the date. Note: The date of the transaction should not be the date you are paying the vendor. The date for the transaction should be the date of the dissemination of this disbursement to the public. For instance, if you are purchasing Radio ads for a candidate that will be run on July 8, 2010 that is the date that should be entered in the disbursement screen.
- Enter the amount in the Amount field.
- Select the appropriate Committee and Account from the drop down menus.
- Under the Type field select "Independent Expenditure"
- For Sub-Type select "Payment"
- Select the correct Period. The Period field is VERY important. Because these reports are calculated by the election-cycle-to-date, and NOT per vendor it is important that you know which election (primary, general, run-off) you are attempting to affect.
- In the Purpose field enter a description of what you are paying for (For example: radio (TV) airtime; video production; printing; postage.)
- Click the Save and Close button at the top of the disbursement
- Once the disbursement transdaction has saved, click the Disbursements sub-file and open the exact same disbursement again. This will re-open the transaction and allow us to add more transaction information than was previously available.
- Scroll to the bottom of the disbursement screen and find the Oppose and Support box.
- Click the checkbox to indicate whether the disbursement you are paying for is to Support or Oppose the candidate.
- In the same Disbursement Details window, find the the Candidate Information sub-file. Click on the sub-file to open the Candidate Information drop-down menu.
- Using the Last Name field, search for the candidate you are supporting or opposing with this transaction.
- The candidate should appear below the search button. On the left side is a tiny link button next to the corresponding Candidate. Click this.
- A pop-up window will appear telling you to "click save to finish linking the legislator." Click the OK button.
- Scroll to the top of the Disbursement Details window and click Save and Close.
- A new pop-up window will appear telling you that the records have successfully linked. Click the OK button.
- Repeat this process for any other disbursement transaction that occurred during this time. Note: disbursements for independent expenditures related to opposing candidates in the same election are aggregated for 24- and 48-hour reporting. If expenditures related to different candidates in the same election (for instance, supporting one and opposing the other) are entered correctly expenditures for both candidates will aggregate properly on reports filed with the following steps here.
- For FEC reports, if you need the Date of Disbursement or Obligation field to be populated, you'll need to expand the User Defined Fields section of the transaction, and enter the date into the FEC IE Payment Date field.
27. Campaigns / Activity Campaigns
27.1. Adding Components to Campaigns
The Components in Aristotle 360 are the activities you conduct to support and reach the goals of a Campaign. You select components according to the strategic plan developed for the Campaign. Aristotle 360 provides five categories of campaign components:
- Events (can also be created using the Event tab on the Navigation Bar):
- Email blasts
- Direct mail
- Phone calls
- Canvassing
For more information regarding adding components to Campaigns, please contact Aristotle Technical Support at 888-217-9600 extension 1 or support@aristotle.com.
27.2. Creating a New Campaign
- Beginning on the Campaign View/Search page, use the Search for existing campaigns fields to search the system to make sure the campaign you want to create has not already been created.
- If no existing campaign is found, click the Add New Campaign option.
- The Campaign page redisplays with a New Campaign entry form. Enter the name of the campaign in the Campaign Name: field.
- Next, set a start and end date, if applicable. In most cases, you will want a timeframe to help assess the effectiveness of the campaign.
- Select a category for this Campaign by clicking the drop-down arrow on the Category: field.
- The Campaign page redisplays.
- Click the Add button.
- The newly added category name is populated in the Category: field. Since you added a new category you will have to add a new sub-category. Click the New button next to the Sub-Category: field.
- The Campaign page redisplays.
- Click Add button.
- The newly added sub-category name is populated in the Sub-Category: field.
- Add any detailed notations for this campaign in the Description text box.
- Click the Save Changes option on the Options Bar.
- Click OK on the dialog box confirming the save so your base Campaign record is saved.
27.3. How to Create an Email Component for a Campaign
1. Beginning on the Campaign Page of your target Campaign, select the Campaign Components Panel Pane.
2. The Campaign Components Panel Pane displays. Click the Add Component button.
3. The Add Components Button List appears. Click the New Email button.
4. The Email Component Page displays. Notice your Campaign name appears as a link in the Campaign field. Clicking this link will open the Campaign page. Enter a name for this Email Component in the Name field.
5. If your email requested a response, you can enter that "respond by" range in the Start and End fields for tracking purposes.
6. Enter a description of the purpose of this Component in the Description field.
7. Click Save Changes on the Options Panel to save the email
parameters.
8. The Next steps are to populate the Panel Panes that support the purpose of your Email.
9. Select the Individuals Panel Pane.
10. The Individuals Panel Pane displays. Click the New Individual button.
11. The Campaign Component: Individual Add page displays. If you know the name of the list to use for this email, enter it in the Search Criteria field.
12. Select the List radio button.
13. Click the Search button.
14. The Search area redisplays with a listing of lists that matched your search criteria, or all system lists if you did not enter anything in the Search Criteria field. Double-click the list item if you want to review the list members. When you are ready to proceed, select the checkbox next to the list item.
15. IMPORTANT: Because you can only choose to send to an individual's work or personal email per Email Component, make sure you create separate lists for each type. Also, make sure the correct email type is selected in the Email field before you attach the list of added individuals. Click the Attach button to associate the list to the Email Component.
16. You will see a brief progress window, and then the Campaign Component Panel Pane will redisplay. Click Individuals to redisplay the Individuals Panel Pane.
17. The list of individuals is displayed. You can repeat the process to add more lists and individuals. Once the list is over ten individuals, you will only see the count displayed.
18. The next step is to create the content of the email. Select the Content Panel Pane.
19. The Content Panel displays. Enter the email you want to appear as the email sender in the From: field. This is the email address that appears in the recipient's inbox, telling them whom the email is from.
20. Enter the subject text in the Subject: field.
21. Enter the email address that you want responses to this email to go to in the Cc: field.
22. Enter email addresses to receive hidden a copy of this email in the Bcc: field. Recipients do not see these email addresses on the distribution list.
23. If you have a template created that you want to use for this email, click the Select Template button. If you would like to save this email as a template, fill in the Name: and Description: fields and then click the Save Template button after you finish creating your email content.
24. By default, the Track eMail checkbox is selected. This option allows you to run the metrics report from the Reports Panel Pane on this Email Component.
25. The bottom of the Content Panel contains two content areas. The top area allows you to create the email in HTML format with formatting options. The bottom area is a plain text version. It is best to create the top area version first, then copy and paste that into the bottom area. Select and delete the placeholder text and write the body of your message.
26. You can add in merge codes, such as #FIRSTNAME#, #LASTNAME#, by selecting them from the bottom of the panel and pasting them into the body of the message.
27. Click the Save changes option on the Options Bar.
28. The Email Component Panel redisplays and the email is saved, but not sent. Next, you want to test your message by sent a test email to yourself. Click the Email Processing Panel Pane to expand it.
29. The Email Processing Panel Pane displays. Enter an email address to receive a "sample" of this email for reviewing purposes in the Send Test To: field. Your personal email or another email account that you have read access to will work
for this purpose.
30. Click the Send Test button. Wait a few minutes then check the inbox of the test email account. You should see five versions of the email, addressed to the first 5 people from your list, for each format you used. So, if you created both a formatted and plain text version of the email, you receive 10 test emails.
27.4. How to Add a Component to a Campaign
1. Beginning on the Campaign page of a selected Campaign, click the Campaign Components Panel Pane to expand it.
2. The Components Panel appears. Click Add Component to add a new component to the Campaign.
3. The Add Components Button List appears. Click a button to add that component type.
4. Notice your Campaign name appears as a link in the Campaign field. Clicking this link will open the Campaign
page.
5. Enter a description of the purpose of this Component in the Description field.
6. Enter the start and end dates for this Component in the Start and End fields. Today's date defaults in both fields. Remember you can click the Calendar icon to pick the date from the Calendar function.
7. Click Save Changes on the Options Bar.
8. The Component is saved.
27.5. Using the Report Panel Pane for Email Components
Once you have sent the email, you can use the Reports Panel Pane to view the status of the emails sent.
- Beginning on the Email component page of the Email Component you created for your Campaign, select the Reports Panel Panel.
- The Reports Panel displays. The Email Statistics: area shows you the total number of individuals the email was to be sent to, how many had no email address, and how many were successfully sent.
- The Email report: area allows you to run a basic status report on the email communication you sent. Select the radio button of the grouping option you prefer, and then click the Run Report button.
- The report displays and shows how many emails were sent and how many were opened. You can periodically run this report to verify when most of the emails have been viewed.
28. Events
28.1. About Events
An event is used to group transactions that came in through a similar way. For example if a Committee has a dinner to bring in contributions, the contributions can be grouped in an event. Events are also used in the Form 3x to pull items to the H Schedules. This is done in the Joint Activity subfile of the event.
28.2. How to Create a New Event in Aristotle 360
- From the menu bar, select Events and then New Event. This will bring up the New Event page.
- Enter in the name for the event in Event Title.
- Enter in the description in Description.
- Enter in the time of the event in Start Date/Time and End Date/Time.
- Enter in the contact information in Contact Person and Contact Phone.
- Click on Event Details to expand the pane and enter in the Event Location Details and RSVP Information.
- Click on Attendees/Participants to expand the pane and then click the Add Attendee/Participant button to add to the event.
- Click on Add Receipts to expand the pane to add receipts.
- Click on Add Disbursements to expand the pane to add disbursements.
- Click on Notes to expand the pane and add notes.
- Click on Joint Activity to expand the pane and add the Joint Activity information.
- Click Save
28.3. How to Search for an Existing Event
- From the Dashboard or Home Page, go to Events > View/Search Events.
- This will bring us to a page were we can search for an event based on either Name, Contact, City, State, or Date of the event.
- After entering in you search criteria, select Search.
- The results of the search will appear. Select the Event you would like to open by clicking on that Event.
28.4. Adding Individuals or a List to an Event
- Open an Event. If you are unsure of how to add a new Event or open an existing Event please reference the related articles on "How to add a New Event" or "How to Search for an Existing Event."
- Select the Attendees/Participants subfile.
- Next select Add Attendees/Paricipants.
- Select New Individual, Organization or Committee as needed. If you select Individual you will have the option to search for and select an indivudal or a list.
- Once you select an indivudal or a list you will be able to put in additonal information such as an amounts targeted, requested, pledged, or raised. You will also be able to say wether the indivudal has RSVPed or not.
- Select the individual or list you would like to add and select Attach.
28.5. How to Add a Receipt or Disbursement to an Event
- Open a receipt or disbursement you would like to attach to an event. If you do not know how to create a receipt or disbursement please reference those articles.
- Scroll down to the field called Campaign.
- Select the Event from the drop-down bar.
- Select Save to save the receipt or disbursement.
29. Reporting
29.1. Setting Up Administrative Allocation Ratios
Establishing Administrative Allocation Ratios in 360
This article will explain how to establish the administrative allocation ratio on Schedule H1 for allocable administrive expenses reported on Schedule H4 of the Form 3X. Committees that do not allocate expenses between federal and non-federal accounts are not required to file the Schedule H1.
- Go to Settings > Filing Committees.
- Select the appropriate Filing Committee and click on the the Set Allocable Activity Ratios button.
- Enter the beginning and ending coverage dates for the administrative ratio (typically the calendar year), the committee type, and the fixed percentage.
- Click Save.
Once the allocation ratio is established, 360 will autocalculate the federal and non-federal portion of allocated administrative expeditures.
29.2. 1099 Form
Unfortunately, the 1099 is not supported in 360. Clients will have to file that form themselves.
29.3. The "File Now" Button
The File Now button goes away when the user uses the File Now option within 360. It will also go away when a user locks a report. "Locking a report" actually locks the transactions on the report - not the report itself, but it effectively locks the report since it has been filed.
It is possible to have an unlocked report that has been filed and have the File Now button hidden.
Also note, there is an Edit option on the Saved Reports tab that allows the user to mark a report as Filed manually if they filed it through another method.
30. Reporting - E-Filing
30.1. Walkthrough: Manually Filing an FEC Report
Manually Filing an FEC Report Using FECload.
There may be a time when you will need to file your FEC report outside of the 360 software, such as when using a back-door password to change a report type or date range. The steps below will guide you through using the FEC's Upload tool. To manually upload your report, you will need the upload software provided by the FEC. It can be found here: http://classic.fec.gov/elecfil/vendors.shtml.
If you already have the FEC software downloaded, please skip to step II.
I. Downloading and Unzipping the FEC Vendor Tools.
When downloading, choose "Save" to save the files to your computer. Locate the file where you downloaded it you will see a zipped folder icon. Right-click, and choose "Extract All."
Once the file has been unzipped, you will see three folders. We recommend that you do not save any files to, nor remove any files from this folder, as it can disrupt functionality.
You are now ready to file your report.
II. Filing Your Report
- Open the "FECload" folder, then double-click "FECload" to open the program.
1. Click File > Upload. Locate your FEC file ("Sample FEC Form").
2. You will now need to enter your e-filing information.
a. ID: Enter your FEC Filing ID it should be formatted like this: C12345678
b. Fax: If you would like a faxed confirmation, enter your fax number here. This is not necessary.
c. Password / Confirm: type your e-filing password. Please note, if you do not know your FEC e-filing password, you will need to contact the FEC we do not have this information.
d. Email 1 / Confirm: the email address where you would like to receive the receipt confirmation.
e. Email 2 / Confirm: a second email for the confirmation (if desired)
f. This filing amends: If your file is an amendment, enter the Filing ID of the original report. This must be in the format FEC-123456, and it must be the filing ID of the original report. For example, if you are filing a second amendment, enter the original report ID, not the report ID of your first amendment.
3. You have two options for e-filing your report: TCP/IP and SSL. Each of these will need specific information added to the "Configure" tab please note, this tab will not be available until you have entered all of the information in Step 2.
Please note: the two possible filing methods are equivilent, the choice of one over the other has only to do with your network settings. Normally TCP/IP is sufficient. If you receive a message on-screen stating that TCP/IP was unable to connect then you may wish to try SSL. Please note that your local network administrator may need to configure you network security to allow connections. The configuration tab should contain all of the information your network administrator will need.
a. For TCP/IP, enter the following information:
i. TCP/IP hostname: disclose.nictusa.com
ii. Agency ID: FEC
b. For SSL, enter the following information
i. Port: 80
ii. HTTP(s): https://webforms.nictusa.com/cgi-bin/disclose_ssl/upload
iii. Agency ID: FEC
4. Confirm that your information is correct, and click "OK." The upload process will begin immediately. Please DO NOT close the FECload program until either:
a. You receive an email confirmation from the FEC
b. You receive a pop-up notification in the FEC uploader with a "Success!" message.
Please note: if you are unsure of whether or not your report was successfully uploaded, you can always check its status on the FEC website using your committee name and/or committee ID to search: http://fec.gov/finance/disclosure/efile_search.shtml
Please check the FEC website before attempting to file again.
31. Reporting - System Reports
31.1. Briefing Book Report
When you finish setting the content of your report, click the Run Report button in the lower right corner of the panel. Aristotle 360 generates your report and then provides a link to the report in a separate window. You can view the report by clicking the link, or you can download and save the report.
31.2. Disbursement Transaction List Report
The Disbursement Transaction List report is the base report interface for the following Disbursement Financial reports: Disbursements by Month, Disbursements by Type, Disbursements by Party, Disbursements by Leg. House, Disbursements by Jurisdiction, Disbursements by Period, Disbursements by Batch and Disbursements by Quarter.
Report Options:
- Select the Start Date of the Disbursement for the report.
- Select the End Date of the Disbursement for the report.
- Select the Period (election period) for the report.
- Select the Filing Committee for the report.
- Select the Entity Type for the report (Individual, Organization, Committee, or Legislator Records).
- Select the Disbursement Type for the report (Loan, Coordinated Expenditure, Refund, etc.).
- Select the Disbursement Sub-type for the report (Third-Party Repayment, Transfer of Funds, Credit Card Payment, etc.)
- To show disbursements with a Memo sub-type in your report totals, select the True radio button (if not, select False).
- Select the Chart Type for the report. NOTE: the Chart Type will default to the specific Disbursement Transaction List report you choose.
- Select the List you have created from the List drop-down menu to limit disbursements on your report to those from the records on that list.
- Click the View Report button to produce the chart for the report.
- To export the chart, select a format from the drop-don list and then click Export.
- To view and then export transactions from a specific period, click that bar on the bar chart.
- To view and then export all transactions for this report, click the (View All Disbursements) link.
31.3. Individual Details Report
Individual Details report includes pertinent details about a single individual record, a group of individual records, or a list of individual records.
Report Options:
- To select a single individual, go to Search > Individual Search > Basic Search and enter your search criteria. You can then select the individual from the results.
- To run the report based on a list of individuals, click within the List box and a search box will appear, allowing you to enter search criteria. Again, you can then select the appropriate list from the results.
- You can select from a list of criteria for sorting your report including: First Name, Last Name, Title, Mail Name, Birthdate, Registered, Gender, Marital, Source ID, Ethnicity, Race, Occupation, Employer and Address.
- You can also elect to have the report further sorted by households if you select the Group by Household checkbox.
- You can select from four different formats for your report output. The output format will determine how much detail is included for each individual in the report. You can choose from HTML, CSV, XML and PDF.
- Use the drop-down menu to select Phone list if you only want name and phone numbers instead of the Details report.
31.4. Receipt Transaction List Report
Receipt Transaction List is the base report interface for the following Receipt Financial reports: Receipts by Quarter, Receipts by Type, Receipts by Election Period, Receipts by Election Quarter and Receipts Batch Report
Report Options:
- Enter Receipt Start Date and Receipt End Date timeframe criteria by choosing dates for the receipts.
- Enter Deposit Start Date and Deposit End Date timeframe criteria by choosing dates for the deposits. NOTE: The report will display data that falls within the shorter timeframe specified between these fields.
- Select the Chart Type for the report (Months, Receipt Type, Election Period, Batches, Quarter of Report). NOTE: the Chart Type will default to the specifc Receipt Transaction List report you choose.
- Select the Receipt Type for the report (Contribution, In-Kind, Debt etc.).
- Select the Receipt Sub-Type for the report (Cash, Check, Memo, etc.).
- Select the Filing Committee for the report.
- Select the Entity Type (Individual, Organization, Committee or Legislator).
- Click the View Report button to produce the chart for the report.
- To export the chart, select a format from the drop-down list and then click Export.
- To view and then export transactions from a specific period, click that bar on the bar chart.
- To view and then export all transactions for this report, click the (View All Receipts) link.
31.5. Transaction Report
Transaction reports provide the information necessary to review, plan, and audit your organization's financial data input into Aristotle 360. The Transaction report combines some of the same reporting parameters as does the Receipt and Disbursement Transaction List with a few extra data points to select from. The output of this report is a list of transactions and the entity it is linked to; there is no chart output for this report.
Some common uses for this report include:
- Identify a missing transaction for balancing your checkbook by specifying an amount and date range
- Confirming compliance report totals by specifying the type of transaction and the date range for the filing period
- Run for a specific batch to retrieve a detailed list of transactions entered and attributed to that batch
- Isolate transactions attributed to the filing committee and/or certain bank accounts
Report Options:
- Run the report for either Receipts or Disbursements by choosing the appropriate radio button.
- Use the default setting of All Types and Sub-types, or select to focus on a single Type and/or Sub-type
- Focus on a single entity of Individual, Organization, or Committee records, or choose any combination by selecting the checkbox. You can also include the candidate information by checking the Candidate box.
- Enter a List name to only view transactions for records on that list.
- Set a Start and End Date range.
- Set a Statement From and Statement To Date range.
- Select the Filing Committees or Account for the transactions.
- Identify a Batch, Source and Election Period.
- Select the Party, Office or Chamber held. NOTE: these fields are enabled only after checking the Include Candidate box.
- Select the Report Type, either Summary (snapshot) or Detail report type (detailed transactions).
- Select the appropriate Group or Sort option for the report.
- Select one of the four format options for your report (HTML, CSV, XML or PDF).
- When you finish setting the parameters of your report, click the Run Report button in the lower right corner of the panel. Aristotle 360 generates your report and then provides a link to the report in a separate window.
- You can view the report by clicking the link, or you can download and save the report. If you selected the .pdf format, the report opens automatically in Adobe Reader.
31.6. Contribution Analysis Report
Contribution Analysis Report displays receipts with Type = Contribution for a specified time period. This report is useful if you are looking for a statistical breakdown on the contributions received. This report will show you percentages, averages, highest, lowest and other useful statistics about your contributions.
Report Options:
- Select the Start Date and End Date of the report.
- Enter a number in the Display Top field to limit the report to only show the highest number of contributions for the specified time period.
- Select Yes from the Include Memo drop-down list to include transactions with Sub-Type = Memo in the totals
- Click View Report to generate the report based on the parameters selected.
- The top of the reports displays general contribution statistics for this report.
- The list of contributors (per how many you chose to display) are listed in the bottom of the report page.
- Click the plus or minus sign next to the contributor's name to view the associated transaction(s)
- Click the contributor's name to open their entity record.
- Select an export format from the drop-down list, and then click the Export link.
31.7. Check Request Report
A Check Request report lists requests for checks for a specific Payee or all payees, and by all individuals making requests, or requests by a specific entity. This report is commonly used by PACs that contribute to candidates and have a division of oversight, or checks and balances, between the person responsible for nominating candidates to support (with how much to donate) and the person responsible for approving the disbursement, reviewing the compliance implications and cutting the check. This report supports the workflows already in place for most organizations.
- The default selection is a report listing all payees and all requestors.
- To generate a more specific report, select payees or requestors.
- The two output formats for the Check Request report is HTML and PDF.
- When you finish setting the content of your report, click the Run button in the lower right corner of the panel.
- Aristotle 360 generates your report and then provides a link to the report in a separate window.
- You can view the report by clicking the link, or you can download and save the report.
31.8. Total Receipts Per Election Period Report
To pull the Total Receipt Per Election Period:
1. Go to Search > List Manager > Find List
2. Open as Universal list > Individuals (lightning bolt icon)
3. On Right-hand side, I clicked Add/Edit Fields and Calculations
4. Under Calculated Fields select Total Receipts and click Add (>)
5. Click Apply.
6. On the right-side you will see the ability to put in a date range. Put in your election period dates.
7. Click Apply.
8. Click Export List on right-hand side.
31.9. Error Running System Event Contribution Report
Problem: When doing a system event contribution report, the resulting totals are incorrect or the results are inconsistant.
Solution: Do a name search with an astrisk(*) and the wild card box checked to clear the current selection. Run the report again.
32. Reporting - Compliance Reports
32.1. Reporting In-State Activity Only on a State Report
Reporting In-State Activity Only on a State Report
Some state reports only require that you report transactions that were collected either within the state or for in-state campaigns. For further information on which states require this type of reporting, and what kind of transactions should be disclosed, please consult your local state analyst.
Selecting on state-specific transactions for a report is done from the report generation screen of your state report. The Arizona state report is shown as an example - please be aware that your report generation screen may look slightly different.
There are two options for generating a state report with in-state activity only.
The first option is to select "By Address." This will select which transactions to pull based on the state listed in the Primary Address for the entity. This requires no additional data entry.
The second option is to select "By Transaction State." This will select only transactions where the transaction's State field has been set to the state for which this report is being run (e.g. Arizona).
Please note: this option requires specific data entry within the transaction itself:![]()
Only transactions where the State has been set will be pulled to your report. By default, the State field in a transaction is blank, so it must be selected when doing data entry.
33. Lobby Disclosure Reports
33.1. Lobby Disclosure 203 (LD-203)
This report is set up to pull only transactions with the disbursement type / subtype of Contribution to Committee / FECA which have an aggregate total of $200 or more. The report will pull the candidate or chairman linked to the filing committee as the "Recipient Name" in order to properly cover both candidate committees and PACs.
The parameters are very simple:
- A schedule type drop down.
- Period From and To Dates that determine what transactions will pull to the report.
- A sorting option
34. FEC Compliance FAQs
34.1. How To Enter a Refund of a Disbursement
How to Enter a Refund of a Disbursement
To correctly report a refund of a disbursement, create a new disbursement, and set the 'Type' to 'Offset of Operation Expenditure' and the 'Subtype' to 'Refund'. The original disbursement & refund do NOT need to be linked to show correctly on the form.
For example, of the screenshot below, a new transaction was created, and set as a refund. Again, you do not need to link the refund under 'Add Transaction Links'.
34.2. How To Adding a Joint Fundraising Committee (JFC) so that it appears on FEC Form 1 and Form 2 correctly
Adding a Joint Fundraising Committee (JFC) so that it appears on FEC Form 1 and Form 2 correctly
1. The first thing you will need to do is set up the JFC committee record. There are two ways to do this:
Option 1: Go to "File" and select "New Committee"; perform data entry for the committee and save record. As Committee Type, you should choose "Authorized Committee" in most instances, which is the default.
Option 2: Search for the committee name you wish to add in your database by going to "Search" and select "Committee Search," choosing "Basic Search" as your search method. The system will return no results found since there is no record for that committee yet created.
2. The next step is to expand the area below towards bottom that reads "Possible Committee Matches from COSMOS Database." This is where the committee name you want to add should be listed. Click on the name of the committee.
Choose "Add Committee" and the committee record will be created. As Committee Type, you should choose "Authorized Committee" in most instances, which is the default.
3. The next step will be to add the committee as a joint fundraising committee. To do this, you will need to go to "Settings" and select "Filing Committees."
Select desired filing committee and then expand the "Relationships" section within the filing committee record.
4. Next, select "Add Relationship." You will be prompted to search for the committee you entered in the prior step.
5. After you search for the committee, select it and choose to add the date of affiliation as well as the type. For the type, select "Joint Fundraising REP."
6. In order for all pertinent information to be properly included in Form 1 and 2, you will need to enter the banking information for the JFC into the Filing Committee record. To do this, select "Bank Accounts" and then choose "Add Account." The only information needed in this step are the bank name and address, no account information is necessary. We suggest the "Account Name" field be named something like "JFC Bank Information" or another name that will not be confused with your organization's banking information.
7a. These instructions will show the newly-created JFC on Form 1 this way:
7b. These instructions will show the newly-created JFC on Form 2 this way:
34.3. How To Enter a Reattribution vs. Redesignation
REATTRIBUTION:
Transferring funds from one individual to another. This is often done when a check is received from one spouse and split between both.
REDESIGNATION:
Transferring funds from one election cycle to another. This is often done when either one check is received for at the contribution limit and split between Primary and General or if the check was received close to the election date and is moving from the General election cycle that just passed to the upcoming Primary cycle.
NOTE: This is only intended as a guide. This should NOT be taken as legal advice. Please consult the guidebook for your appropriate committee type and/or your analyst at the FEC.
34.4. How To Enter a Redesignation
To redesignate a check you'll need to create 2 additional transactions:
Redesignation From Memo
Your first transaction will be a transaction that moves funds from the original period in which it was reported. You'll need to create a transaction in the amount that is being redesignated, entered as a negative amount, with the same election period as the original transaction. You'll also need to use the same Type that was used in the original transaction and the Subtype Redesignation From Memo.
For instance, if you wrote a $2000 check to a congressman, you would have likely used the Type Contribution to Committee and Subtype "Federal". Your Redesignation from Memo would then use the Type Contribution to Committee and Subtype Redesignation from Memo.
Redesignation To Memo
Your second transaction will be a transaction that receives the redesignated funds into the new period. You'll need to create a new transaction in the amount that is being redesignated, using the new election period that the funds are being redesignated into. Once again, you will use the same Type as the original transaction, and this time you will use the Subtype Redesignation to Memo.
Linking these transactions
You will now need to link all 3 transactions. You can do this by going into the original transaction and selecting the "Add Transaction Links" tab on the bottom of your transaction window, searching for the two redesignation transactions through the tool and selecting them one at a time to be linked to the original "parent" transaction. From there, save the entire entry, and you should be good to go!
34.5. 35.2. Adding a Joint Fundraising Committee
Adding a Joint Fundraising Committee (JFC) so that it appears on FEC Form 1 and Form 2 correctly
The first thing you will need to do is set up the JFC committee record. There are two ways to do this:
Option 1: Go to "File" and select "New Committee"; perform data entry for the committee and save record. As Committee Type, you should choose "Authorized Committee" in most instances, which is the default.
Option 2: Search for the committee in your database by going to "Search" and select "Committee Search," choosing "Basic Search" as your search method. The system will return no results found since there is no record for that committee yet created.
The next step is to expand the area below towards bottom that reads "Possible Committee Matches from COSMOS Database." This is where the committee you searched for should be listed. Click on the name of the committee.
Choose "Add Committee" and the committee record will be created. As Committee Type, you should choose "Authorized Committee" in most instances, which is the default.
Linking the Joint Fundraising Committee to the main Filing Committee
After setting up the JFC record in the database, the next step will be to add the committee as a joint fundraising committee. To do this, you will need to go to "Settings" and select "Filing Committees."
Select desired filing committee and then expand the "Relationships" section within the filing committee record.
Next, select "Add Relationship." You will be prompted to search for the committee you entered in the prior step.
After you search for the committee, select it and choose to add the date of affiliation as well as the type. For the type, select "Joint Fundraising REP."
Setting up the Joint Fundraising Committee bank account
In order for all pertinent information to be properly included in Form 1 and 2, you will need to enter the banking information for the JFC into the Filing Committee record. To do this, select "Bank Accounts" and then choose "Add Account." The only information needed in this step are the bank name and address, no account information is necessary. We suggest the "Account Name" field be named something like "JFC Bank Information" or another name that will not be confused with your organization's banking information.
How the Joint Fundraising Committee appears on Forms 1 and 2
These instructions will show the newly-created JFC on Form 1 this way:
These instructions will show the newly-created JFC on Form 2 this way:
34.6. How to Enter an Earmarked Contribution and the Accompanying Fee Disbursement
Pursuant to Federal Election Regulations, the full amount of the contribution should be disclosed as an earmarked contribution from the donor listed, and the conduit committee should be identified as the conduit. The conduit committee typically deducts a processing fee and this fee is disclosed as a separate operating expenditure.
This follows the applicable regulations (110.6) which state in part:
"The recipient candidate ... shall report each conduit or intermediary who forwards one or more earmarked contributions which in the aggregate exceed $200 ... The report by the recipient candidate ... shall contain the following information: (A) The identification of the conduit ... (B) The total amount of earmarked contributions received from the conduit ... (C) The information required ... for each earmarked contribution which in the aggregate exceeds $200."
34.7. How To Mark A Compliance Report As Filed
On the chance that the FEC's server does not return the confirmation and mark the FEC report as filed - the user in 360 can manually override and mark the report as filed themselves.
This sometimes occurs when the FEC's webserver does not transmit the filed mark back to the report. If a report does not show up as filed even though it was efiled with the FEC, you can actually go in and mark the report as filed yourself so it appears in your compliance history as filed.
Follow the steps below to do this -
Hover over compliance > click compliance reports.
Select the proper authority, FEC, and then select the report type that you want to mark as efiled.
Click the view history button to open up the previously generated FEC reports.
Find the report that you want to mark as efiled, and then hover over the name of the report. Click on the name.
Check the "edit filed date" button. Enter in the date that it was filed, and then click on Update.
After clicking update, you should see the filed column will have the date you edited as the report's filed date.
35. Reporting - FEC - Filing Committees
35.1. Filing Committee Basic Information
You will fill in the Basic Information with the same type of info that appears on your compliance report's cover page. Select the committee type, add a reg ID, and fill in the contact information. When done you need to click save at the top of the page to commit the information you have entered.
35.2. About Filing Committees
A Filing Committee is just a Committee record with a special designation. You can even view the same record on the committee page that you see on the filing committee page. You will not have as many options, and things like bank accounts, bank reports, and linked orgs are not available on the basic committee page.
35.3. Selecting Filing Committee
You can have one or more filing committees in a dataset. You set up the info for the filing committee on the Filing Committees page by going to Settings > Filing Committees. Select the filing committee you wish to reveiw or edit by clicking on the magnifying glass next to the name of the filing committee.
35.4. Creating a New Filing Committee
To create a filing committee, Go to Settings > Filing Committees. Click on the Add New Filing Committee link on the right-hand side of the page.
36. FEC Form 1 Compliance
36.1. FEC Form 1 Walkthrough
FEC Form 1 is used for reporting the formation of an organization or campaign.
Accounts
Select the filing committee you would like to run the Statement of Organization (FEC Form 1) for. Additionally, you will need to select the bank accounts you wish to have reported to the Form 1.
Form Information
Type of Committee: Select the type of committee which accurately describes your organization. If you are unsure of which option to select, please consult your FEC analyst for that information. Type of Organization - Select the type of organization which accurately describes your organization. If you are unsure of which option to select, please consult your FEC analyst for that information.
Party Code: If your organization is a political party, then you will select your party code from the drop down box. If your code is not on the list, or you are not a political party, then you should leave as "NOT SPECIFIED".
Party Type: If your organization is a political party, then you will select your party type from the drop down box. If your code is not on the list, or you are not a political party, then you should leave as "NOT SPECIFIED".
Address is different then previously reported: Check off this box if you are amending a previous report to update your address.
Name is different then previously reported: Check off this box if you are amending a previous report to update your organization's name.
Leadership PAC: Check off this box if your organization is a Leadership PAC. If you are unsure whether or not your organization is a Leadership PAC, please consult your FEC analyst.
Amend a Previous Report: Check this box if you are amending a previous report you have filed with the FEC. If you check this box, you will need to fill in the additional fields below it:
- Amended Schedule ID: Here, you'll need to enter the ID that was assigned to the original filing that is being amended. The format of this field must be FEC-XXXXXX (e.g. FEC-123456). Please note that no matter how many times you amend your Form 1, you'll always want to use the original filing's ID - not the ID of the most recent amendment.
- Amendment Number: This data point is used to show the sequence of amendments. For instance, if this is the first time you're amending your Form 1, you'll want to enter a 1 for this field. The next time you go to amend (your second time amending), you'll want to enter a 2 and so on.
Change of Committee Email: Check off this box if you are amending a previous report to update your organization's email address.
Change of Committee URL: Check off this box if you are amending a previous report to update your organization's URL (or web address).
Lobbyist/Registrant PAC: Check off this box if your organization must identify itself as a registered lobbyist or lobbyist PAC.
Settings
Print Text to Report: If you need to attach a short text memo to your report, type that text directly into the box (do not copy and paste text from Microsoft Word, or other word processing applications). Lastly, make sure to check off the box.
Form Actions
Previous: Click on 'Previous' to go to the previous tab of the report, for instance, going from Form Information to Accounts.
Next: Click on 'Next' to go to the next tab of the report, for instance, going from Accounts to Form Information.
Generate Report: Click on 'Generate Report' to generate a report with the options and parameters selected in the different tabs of this particular compliance report. After clicking this button, the system will begin generating a draft of the report based on the parameters you have entered. If you stay on the page, you will land on the Results screen, where you can download each of the files associated with the report. In addition, you can click the red X button to return to the report's parameters screen.
Saved Reports
Load: This will allow you to load of the same parameters used for a previous draft, so you can generate a new one without having to re-select all of the parameters.
View Output: This drop-down will allow you to download any of the files associated with the report:
- Electronic: A .fec formatted file. This is the file type that is submitted to the FEC when you file the report.
- Validation: A .txt. formatted file. This will allow you to view all of the validation info related to the report; if your report has any warnings or errors, this file will include more details on what is triggering them.
- Viewable: A .pdf formatted file. This file can be used to review your report.
Filed: Click here when you are ready to submit your report.
- Committee ID: Enter your committee's FEC registration ID. This ID is usually in the format C#######.
- Password: Enter your filing password. If you are unsure of what your password is, you'll need to reach out to the FEC, as Aristotle does not store any filing passwords for security reasons.
- Email: Enter the email address that you want to receive the filing confirmation.
- Connection Type: You will generally want to leave this set to the TCP/IP option, as SSL is an older option that is seldom used.
- Upload FEC File: Clicking here will officially file the report.
Edit: This option will allow you to change the name seen in the Name column of the selected report. You can also manually mark the report as being filed on a specific date, if desired.
Delete: Clicking the red X in this column will delete that report. Please be aware that once a report is deleted, it cannot be easily recovered. Deleting a report from this page only deletes it within AI360 - doing so will not have any effect on the FEC side if the deleted report was previously filed.
FAQ
My report is receiving validation errors for missing committee info - where do I add that info so that it pulls to the report?
Most of the info that pulls to the Form 1 comes from the filing committee page, which you can get to by going to Settings > Filing Committees (old layout) or Compliance > Filing Committees (new layout). From there, you'll be able to view all of the filing committees you have on your database.
Once you click the View icon for a committee, the top portion of the page will include all of the committee's basic info like address and contact info. Info pertaining to bank accounts, individuals associated with the committee, or other organizations associated with the committee can be found under the Bank Accounts, Committee Staff, and Relationships sections, respectively.
My committee has a new treasurer and/or custodian of records - where can I update that info?
See the question above - the treasurer can be updated by going to the filing committee's page, and then going to the Committee Staff section. From there, you'll be able to add links to individuals. Before doing so, however, you'll need to make sure that you already have an existing profile for any individuals that you want to link to the filing committee.
36.2. Why am I seeing Blank Fields in my Form 1?
This is most likely occurring because some of the bank accounts you have selected for your report don't contain bank information.
In order to add this information, use the following steps:
1) Go to Settings>Filing Committees.
2) In the Filing Committee Administration screen, click on the filing committee that contains the bank account with missing information.
3) In the Filing Committee screen, click Bank Accounts to expand. From here you can either click directly on the account you wish to edit or you may click the blue Add Account button to add a new bank account to the filing committee:
4) In the next screen, enter in the bank account information. When you are finished click Save and Close:
36.3. My Committee has a new treasurer - how do I update that within AI360?
Changing Treasurer
To update the individual that appears on your reports as your treasurer, you'll need to take the following steps:
- Create a individual record profile for the new treasurer, if you don't already have one for them. This can most easily be done by going to Quick Add > Individuals (File > New Individual on the old layout).
- Once you have an individual record for the new treasurer, go to Compliance > Filing Committees (Settings > Filing Committees on the old layout).
- Click on the name of the committee you need to change the treasurer for.
- Expand the Committee Staff section. From here, you can click the red X button to remove any staff you no longer need to keep linked to the filing committee (such as the previous treasurer).
- Click the Add Staff button.
- Use the fields to search for the new treasurer's record. Click the Select button next to the record you want to use.
- Fill out the fields on the Adding Contact window. One of these fields is the Contact Type, which you'll need to set to Treasurer. Note that the End Date is optional, so it can be left blank, but the others must be filled in.
- Click the Add button.
Once you complete that process, the newly added individual will appear on reports generated going forward.
Additional Notes
- Changes made to the committee staff section of the filing committee page applies to the Form 1, as well as other FEC forms that pull the name of the committee's treasurer, such as the Forms 3 and 3X, etc.
- If you are attempting to amend a Form 1 report that needs to include other individuals, such as a custodian of records or an assistant treasurer, those are added to the committee staff section of the filing committee page as well. The steps to do so are nearly identical, with only difference in the process being step 7 listed above; instead of selecting Treasurer for the Contact Type, you would just select the desired position.
37. FEC Form 2 Compliance
37.1. Form 2
FEC Form 2 is used for reporting the statement of candidacy of an individual.
Accounts Select the filing committee you would like to run the Statement of Candidacy (FEC Form 2) for.
Form Information Election Date Enter the date of the election the candidate is declaring his candidacy for. Address has changed Check off this box if you are amending a previous report to update your address. Amendment - Check this box if you are amending a previous report you have filed with the FEC. If you check this box, you will need to fill in the Amended Schedule ID field with the FEC report number of the original report it is amending. The format of this field must be FEC-XXXXXX (e.g. FEC-123456). Additionally, in the Amendment # field you will need to put the number which this amendment is in the sequence of all previous amendments. For instance, if this is the 2nd amendment to the original report filed with the FEC, you will put a 2 in this box. 9A and 9B These fields are no longer used on the FEC report, and so you can disregard if you like.
Settings Print Text to Report If you need to attach a short text memo to your report, type that text directly into the box (do not copy and paste text from Microsoft Word, or other word processing applications except for Microsoft Notepad). Lastly, make sure to check off the box.
Form Actions Previous Click on 'Previous' to go to the previous tab of the report, for instance, going from Form Information to Accounts. Next Click on 'Next' to go to the next tab of the report, for instance, going from Accounts to Form Information. Generate Report Click on 'Generate Report' to generate a report with the options and parameters selected in the different tabs of this particular compliance report.
38. FEC Form 3 Compliance
38.1. Form 3
FEC Form 3 is used by quarterly filers to disclose the financial transactions which took place in a given period.
Accounts - Select the filing committee you would like to run the FEC Form 3 report for. Additionally, you will need to select the bank accounts whose transactions you would like to disclose in the report.
Form Information
Report Schedule - Select the appropriate report Schedule (such as April Quarterly, or 12 day preceding) from the drop down box. If you are not sure which Report Schedule you are reporting on, please contact your FEC analyst.
Report Start Date - Set this date to the first date of the reporting period you are reporting on. If you are not sure what your reporting dates are, please contact your FEC analyst. Transactions in your dataset with a transaction date on or after this date (and before the Report End Date) will pull to the report.
Report End Date - Set this date to the last date of the reporting period you are reporting on. If you are not sure what your reporting dates are, please contact your FEC analyst. Transactions in your dataset with a transaction date on or before this date (and after the Report Start Date) will pull to the report.
Itemization Threshold Start Date - Set this date on or before the Report Start Date. Any transaction with a transaction date after this date, which is linked to another transaction with a transaction start date between the Report Start and End Date, will pull to the report. People generally set this date to either the first of the current year, or the day after the previous election.
Election Date - Set this date to the most recent or applicable election. If you are not sure what Election Date you need to have on your report, please contact your FEC analyst.
Itemization Threshold Start Amount - Set this amount to the amount above which transactions pull to the report. For instance, if you want all transactions above $200.00 to itemize, set this value to $200.01. To be clear, the transactions below this amount are still calculated in the summary totals, but simply do not itemize.
Itemization Threshold End Amount - Set this amount to the amount below which transactions will pull to the report. For instance, if you want all transactions below $99999.99 to itemize (and above the Threshold Start Amount) you will set this value to $99999.99.
Cash on Hand at Beginning of Period - Set this amount to the amount of cash on hand your campaign or organization has at the beginning of the period. This value can be taken from Line 8 (Cash on Hand at Close of Reporting Period) of the summary page of the previous report.
Current Period - Set this value to the current election cycle period, for instance, Primary or General. If you are running a pre- or post- report setting this field will specify whether it is a pre- or post- general or primary. If you are not sure what to set as the current period, please contact your FEC analyst.
Election State - Set this value to the State Code of the State in which the election the candidate of this committee is participating in.
Sort By - Check off the box which represents how you would like the report ordered. For the purposes of grouping memo entries with their parent transactions, it is recommended to use "Natural Order", though technically it is fine if the memos are not physically next to their parent transactions.
Amend a Previous Report - Check this box if you are amending a previous report you have filed with the FEC. If you check this box, you will need to fill in the Amended Schedule ID field with the FEC report number of the original report it is amending. The format of this field must be FEC-XXXXXX (e.g. FEC-123456). Additionally, in the Amendment # field you will need to put the number which this amendment is in the sequence of all previous amendments. For instance, if this is the 2nd amendment to the original report filed with the FEC, you will put a 2 in this box.
Form 3 Schedules
Print 3Z-1 - this schedule has been eliminated from the FEC reporting requirements.
Schedules A through D - Select the schedules for which you would like to disclose financial information for. If you check off a box, and there are no transactions that are to be reported for that type of schedule, the schedule will simply not print on the report. For this reason, it is recommended that when running the report, unless you have a specific reason for not including a particular schedule, that you select all schedules.
Other Schedules
Form 3Z-1 - This section is no longer necessary to use, as the FEC does not require the filing of the Form 3Z-1 anymore.
Print Text to Report - If you need to attach a short text memo to your report, type that text directly into the box (do not copy and paste text from Microsoft Word, or other word processing applications except for Microsoft Notepad). Lastly, make sure to check off the box.
Fill in Empty Occupation with 'Information Requested' - Check this box if you would like the program to automatically fill in, on the FEC report, occupation fields for individuals whom you have no occupation data for with the text - "Information Requested".
Fill in Empty Employer with 'Information Requested' - Check this box if you would like the program to automatically fill in, on the FEC report, employer fields for individuals whom you have no employer data for with the text - "Information Requested".
Change Address - Check off this box if your committee has changed its address since the last report was filed.
Auto Generate Line 11a - Check off this box if you would like the system to automatically calculate and enter the amounts for Line 11ai and 11aii cycle total before this period. If you would like to manually enter these numbers then you will need to check and then uncheck this box, and then enter those amounts in the fields that appear below the box.
Form Actions
Previous - Click on 'Previous' to go to the previous tab of the report, for instance, going from Form Information to Accounts.
Next - Click on 'Next' to go to the next tab of the report, for instance, going from Accounts to Form Information.
Generate Report - Click on 'Generate Report' to generate a report with the options and parameters selected in the different tabs of this particular compliance report.
38.2. Proper Data Entry for Reattribution of Contributions on FEC Form 3 or 3X
The following is an example of a contribution that was reported in Q1, but then was partially reattributed to a spouse/other person during Q2. This involves 3 transactions in total:
1) The original contribution
Example:
Entity: Ellen Nye
TYPE: Contribution
SUBTYPE: Check
Date: 03/13/2010
Amount: $4800
2) Create "Reattribution FROM" contribution. This transaction will -MOST LIKELY- be a negative amount, and will be dated within the reporting period. Link to original contribution.
Entity: Ellen Nye
TYPE: Contribution
SUBTYPE: Reattribution from Memo
Date: 06/01/2010
Amount: $-2400
3) Create "Reattribution TO" contribution. This transaction will -MOST LIKELY- be a positive amount, to a different entity and will be dated within the reporting period. Link to original contribution.
Entity: Bill Nye
TYPE: Contribution
SUBTYPE: Reattribution to Memo
Date: 06/01/2010
Amount: $2400
Both MEMO transactions need to pull to the report on the same line as a Contribution/Memo transaction that the system will automatically generate. The original parent transaction that is not a memo does not pull to the report.
Here is how the sample transactions outlined above will display on the Form 3:
38.3. Proper Data Entry to Forgive a Loan Made By the Candidate
The data entry to forgive a candidate loan is as follows:
1) The original loan receipt must be saved to the candidate's record, not an individual record
2) The receipt must have the following data entry:
Type = Loan
Subtype = Made by Candidate
3) The loan forgiveness transaction must also be a receipt saved to the candidate's record
4) The receipt must have the following data entry:
Type = Loan
Subtype = Forgiveness
5) The two receipts must be linked together using the "Add Transaction Links" tool
This will cause the loan to show an outstanding balance of zero on the Form 3 report.
38.4. Proper Data Entry to Record/Reimburse Campaign Expenditures Made by the Candidate as an In-Kind Contribution
Please see below for a link to the FEC's guidelines on how to show this type of activity:
http://fec.gov/pdf/candgui.pdf
Page 95 - Campaign expenditures made by the candidate from personal funds that are not to be reimbursed are reported as in-kind contributions from the candidate. If the candidate makes unreimbursed payments on behalf of the committee to any single vendor that exceed $200 for the election cycle, the committee must identify the ultimate payee (i.e., the vendor) in a separate memo entry on Schedule B.
The process to enter this correctly in 360 is:
1) Create a new receipt on the candidate's record with "Type" set to "In-Kind" and "Subtype" set to "Goods and Services"
2) Create a new disbursement on each vendor record with "Type" set to "Operating Expenditure" and "Subtype" set to "Memo"
3) Scroll down to the transaction links section, use the search fields to find the in-kind saved to the candidate record, and then click the icon to link the two transactions together
4) Make sure that the Candidate is linked to their Committee. (for instructions, see here)
Then when you generate your report you'll see the candidate in-kind on schedule A, a corresponding candidate in-kind on schedule B, and the memos on schedule B as well falling directly below the candidate in-kind.
38.5. FEC Form 3 Types and Subtypes Chart
|
Form 3 Types and Subtypes Chart
Schedule A (Contributions)
Schedule B (Disbursements)
Schedule C: Contributions:
Disbursements:
Schedule D:
|
38.6. Getting "Personal Funds" to Pull to Schedule C When the Loan Is From the Candidate (Form 3)
The FEC Form 3 code will mark a field on the efile that the Loan is from "Personal Funds" when the subtype is "Made by Candidate". When that field is "Y" the fec print engine prints "[Personal Funds]" next to the candidate name.
The other method is to add a "Receipt Code" on the Loan Record.
1) Open the Loan Transaction
2) Click on the "Receipt Code" tab,
3) Select "FEC" as the state
4) Select "Personal Funds" as the code
38.7. Calculating Election Cycle to Date and out of Period Transactions
Calculating Election Cycle to Date and out of Period Transactions
The FEC's guidelines for the Form 3 Cycle to date totals are calculated up to the date of the contribution they are displaying for. For example (of the screenshots below), this individual had given the campaign $7500. The refund didn't happen until June so any contributions dated after the refund would have the $2100 deducted from the CTD amount. The only way the redesignation memos would show $5400 would be if the refund happened prior to the date of the memos (5/16/16).
Now you need to show the original contribution for the redesignation memos, so just enter a brand new contribution that is dated within the Q2 period, then set the "Type" to "Contribution" and the "Subtype" to "Memo" so it doesn't affect your cash on hand. You'll need to use the "Add Transaction Links" tool at the bottom of the contribution to link it to the redesignation memos.
38.8. FAQ: Why is my "Election Cycle To Date" amount zero for my earmarked memo entries?
The FEC's guidelines state that contributions received from a conduit committee should not apply to the contribution limits of the committee. The committee is just acting as a conduit and as such, the contributions will apply to each of the individual's cycle to date totals and not the committee's. The memos simply show the amount passed through the conduit committee and does not factor into the committee's contribution limit or cycle to date totals.
38.9. FAQ: Why is "Candidate Name" pulling in the Campaign Name Field on my report?
Why is the candidate's name showing in the "Campaign Name" field on my report?
The candidate name pulls to the report when the candidate's record has its "District Level" set to "Federal". If "State" or "Local" is used the field will be left blank.
If this is a contribution to a candidate committee, make sure to set the type to "Contribution to Committee" and the Sub-Type to "Federal."
38.10. FAQ: Why are my Earmarks Itemizing in two separate Periods?
This can occur sometimes and is a result of bad data entry. You will see earmarks itemizing in multiple reports if the dates on the memos are in one reporting period while the actual parent contribution is dated in a different reporting period. The memo contributions and the parent contribution should have the same dates.
38.11. FAQ: How to get memo entries when you receive multiple earmarked contributions through the same conduit on the same date
Using a single conduit memo for the entire amount of the transfer is okay, and our report is coded to accommodate this instance. Filers should add a memo text explanation to the conduit memo. The memo text the FEC recommends is as follows:
"Conduit transfer comprised of [insert number] individual contributions."
In 360, all that needs to be done to add this text is to open the Type = Earmarked / Subtype = Conduit Memo transaction and add the text to the "Purpose" field of that transaction.
39. FEC Form 3P Compliance
39.1. Form 3P
FEC Form 3P is used by Presidential Candidates to disclose the financial transactions which took place in a given period.
Accounts - Select the filing committee you would like to run the FEC Form 3P report for. Additionally, you will need to select the bank accounts whose transactions you would like to disclose in the report.
Form Information
Report Schedule - Select the appropriate report Schedule (such as April Quarterly, or 12 day preceding) from the drop down box. If you are not sure which Report Schedule you are reporting on, please contact your FEC analyst.
Beginning Cash On Hand - Set this amount to the amount of cash on hand your campaign or organization has at the beginning of the period. This value can be taken from Line 8 (Cash on Hand at Close of Reporting Period) of the summary page of the previous report. 20%
Report Start Date - Set this date to the first date of the reporting period you are reporting on. If you are not sure what your reporting dates are, please contact your FEC analyst. Transactions in your dataset with a transaction date on or after this date (and before the Report End Date) will pull to the report.
Report End Date - Set this date to the last date of the reporting period you are reporting on. If you are not sure what your reporting dates are, please contact your FEC analyst. Transactions in your dataset with a transaction date on or before this date (and after the Report Start Date) will pull to the report.
Itemization Threshold Start Date - Set this date on or before the Report Start Date. Any transaction with a transaction date after this date, which is linked to another transaction with a transaction start date between the Report Start and End Date, will pull to the report. People generally set this date to either the first of the current year, or the day after the previous election.
Election Date - Set this date to the most recent or applicable election. If you are not sure what Election Date you need to have on your report, please contact your FEC analyst.
Current Period - Set this value to the current election cycle period, for instance, Primary or General. If you are running a pre- or post- report setting this field will specify whether it is a pre- or post- general or primary. If you are not sure what to set as the current period, please contact your FEC analyst.
Election State - Set this value to the State Code of the State in which the election the candidate of this committee is participating in. Amend a
Previous Report - Check this box if you are amending a previous report you have filed with the FEC. If you check this box, you will need to fill in the Amended Schedule ID field with the FEC report number of the original report it is amending. The format of this field must be FEC-XXXXXX (e.g. FEC-123456). Additionally, in the Amendment # field you will need to put the number which this amendment is in the sequence of all previous amendments. For instance, if this is the 2nd amendment to the original report filed with the FEC, you will put a 2 in this box.
Report Activity - Check the box of the period you wish to report the transactions from.
Sort Order - Check off the box which represents how you would like the report ordered. For the purposes of grouping memo entries with their parent transactions, it is recommended to use "No Order", though technically it is fine if the memos are not physically next to their parent transactions.
Form 3P Schedules
Schedules A through D - Select the schedules for which you would like to disclose financial information for. If you check off a box, and there are no transactions that are to be reported for that type of schedule, the schedule will simply not print on the report. For this reason, it is recommended that when running the report, unless you have a specific reason for not including a particular schedule, that you select all schedules.
Settings
Fill in Empty Fields with 'Information Requested' Employer / Occupation - Check this box if you would like the program to automatically fill in, on the FEC report, occupation fields for individuals whom you have no occupation data for with the text "Information Requested".
Print Text to Report - If you need to attach a short text memo to your report, type that text directly into the box (do not copy and paste text from Microsoft Word, or other word processing applications except for Microsoft Notepad). Lastly, make sure to check off the box.
Change of Address - Check off this box if your committee has changed its address since the last report was filed.
Form Actions
Previous - Click on 'Previous' to go to the previous tab of the report, for instance, going from Form Information to Accounts.
Next - Click on 'Next' to go to the next tab of the report, for instance, going from Accounts to Form Information. Run click on 'Run' to generate a report with the options and parameters selected in the different tabs of this particular compliance report.
39.2. Form 3P Filing Error: No Match Found for Back-Reference to Schedule/TranID
Problem: The below Fatal Error occurs:
Form{Item}: SA20A {United States Postal Service}
Field Name: #004 Transaction ID of Schedule referenced by this record
*Error* No Match Found for Back-Reference to Schedule/TranID - A507C6E7093994EF9B14
Solution:
Correct Data Entry. According to our contact at the FEC-EFO, we do not need Back-Reference Transaction IDs to define the expenditure-refund relationship. A simple text in the purpose field will suffice.
Example:
Entity: United States Post Office (Organization)
Expenditure:
Type: Operating Expenditure
SubType: Payment
11/1/2011
$500.00
***Purpose: Stamps for mailer***
Receipt:
Type: Offset to Operating Expenditure
SubType: Refund
11/2/2011
$500.00
***Purpose: Refund of purchase of Stamps from 11/1/2011***
40. FEC Form 3X FAQs
40.1. How Do I Enter An H2 Fundraising Allocation And Then Utilize That On An H4 Allocable Disbursement?
How Do I Enter An H2 Fundraising Allocation And Then Utilize That On An H4 Allocable Disbursement?
This helpfile will walk you through how the proper data entry to both pull a schedule H2 and itemize the corresponding disbursement in your FEC Form 3X report.
- You'll first need to create an event with a date range that falls within the filing period of your report (ie. if you are scheduling a June 3X filing, you'll need an event that falls within the 5/1-5/31 window)
- Once you've saved the event, you'll see that more tabs will now be accessible within the events page. Click the Joint Activity (Compliance) tab to see the Joint Activities options for your event-related allocable disbursement:
- In the Joint Activity (Compliance) tab, you'll need to do the following
- Set a date range that the allocation ratio applies (this must be listed in a wider range than your event date range in order for your Schedule H2 to pull properly)
- Select the ratio type
- Input the proper ratio
- click the "Save" button
Next you'll need to create the disbursement in the record itself. You can do this by either going to the add disbursement option on the right side of the event page or going in to the record profile of the entity to which the disbursement was paid out to and create a new disbursement
Your disbursement will need to have 3 things to ensure that it will populate Schedule H4 and have the allocations set in your event to properly populate it.
- The Type needs to be set to "Joint Activity"
- The Sub Type needs to be set to "Fundraiser"
- The event needs to be set to the event you created for your H2
40.2. Why Are the Wrong Dates Loading on the Parameter Screen When I Select the Report Schedule?
When you are on the parameter screen for the FEC Form 3X and you make a selection from the Report Schedule drop-down, the system should automatically fill in the Report Date range as well as the Threshold Start Date. When you do so while working on reports covering financial activity taking place in the first quarter (Jan through Mar), you may see that the dates loading in are from the previous calendar year. This is because those auto-loading dates are updated on the backend by our Compliance team at the beginning of every calendar year.
However, due to filing deadlines for both FEC and state reports, the process of updating these auto-loading dates can take some time to complete, so for the first few reporting periods of a new calendar year, you may need to manually edit the dates to make sure they are accurate.
Also, even once that update process has been completed, we strongly recommend that you review all of your report's parameters before generating a draft to make sure they are correct. If you are ever unsure if your reporting parameters are correct or not, please reach out to your committee's FEC analyst for more guidance.
40.3. I'm Seeing a Discrepancy in My Report's Year-To-Date Column - What Are Some Possible Causes?
FEC Form 3X Column B Discrepancies
Here are some potential causes for why you may be seeing discrepancies with your report's YTD column:
- There may be transactions duplicating. Typically, the easiest way to tell if this is the case is by checking the report's validation file. If there are any transactions duplicating, that will most likely result in a validation error.
- If column A totals are correct, and the discrepancy is only in column B, then it's possible that data from a previous reporting period may have changed (transactions could have been added/deleted/edited since a previous report was filed). For example, if you previously filed a report that covers Jan 1 through Jan 31, but then add a new transaction dated within that time frame and don't amend that report, then the report following that one will likely not account for that newly added transaction. This will often result in the following report's starting cash on hand amount being incorrect, thus affecting its ending balances as well.
- If you have a refund dated in the current calendar year, but it is meant to be refunding a contribution that was received last year, that can often also result in column B discrepancies. In this scenario, there are two potential solutions:
- A). The refund entry will need to be linked to the contribution from the previous year. This can be done by opening the refund entry, scrolling down to the Add Transaction Links section, and then using the options there to search for and link the entry to the original contribution.
- B). If you are seeing a discrepancy due to a refund, and there is a contribution on your current period's report, then marking the Force Itemize box on that entry can also allow the system to calculate totals correctly.
Please note: the list above are just some of the more common reasons why discrepancies can happen, but there may be others that were not included here. If you are seeing a discrepancy on your report and are unable to track down the causes, please reach out to us for more assistance.
41. FEC Form 3X Compliance
41.1. FEC Form 3X Parameter Screen
The FEC Form 3X is used by monthly, quarterly, and semi-annual filers to disclose the financial transactions which took place in a given period. If you are unsure if you should be using the Form 3X or not, please contact your FEC analyst for more guidance.
View History button: Proceeds to the list of all previously generated reports (drafts and filed) without generating a new one. For more info on the History screen, click here.
Parameter Screen
Email: The email address entered here is just to receive a notification once the report has completed generating.
Filing Committee: Select the filing committee you want to generate a report for.
Account: Select any bank accounts whose transactions you would like to disclose in the report.
Report Schedule: Select the appropriate report Schedule (such as April Quarterly, or 12 day preceding) from the drop down box. Please note, Termination Reports are selected from the "Current Period" drop down box (see explanation below). If you are not sure which Report Schedule you are reporting on, please contact your FEC analyst.
Report Start Date: Set this date to the first date of the reporting period you are reporting on. If you are not sure what your reporting dates are, please contact your FEC analyst. Transactions in your dataset with a transaction date on or after this date (and before the Report End Date) will pull to the report.
Report End Date: Set this date to the last date of the reporting period you are reporting on. If you are not sure what your reporting dates are, please contact your FEC analyst. Transactions in your dataset with a transaction date on or before this date (and after the Report Start Date) will pull to the report.
Itemization Threshold Start Date: Set this date on or before the Report Start Date. Any transaction with a transaction date after this date, which is linked to another transaction with a transaction start date between the Report Start and End Date, will pull to the report. People generally set this date to either the first of the current year, or the day after the previous election.
Election Date: Set this date to the most recent or applicable election. If you are not sure what Election Date you need to have on your report, please contact your FEC analyst.
Threshold Start Amount: Set this amount to the amount above which transactions pull to the report. For instance, if you want all transactions above $200.00 to itemize, set this value to $200.01. To be clear, the transactions below this amount are still calculated in the summary totals, but simply do not itemize.
Threshold End Amount: Set this amount to the amount below which transactions will pull to the report. For instance, if you want all transactions below $99999.99 to itemize (and above the Threshold Start Amount) you will set this value to $99999.99.
Load from Last Filing button: If you have previously filed a Form 3X via 360, you can use this button to load the cash on hand amounts below based on the numbers from the last filed report. Please note that if you use this button but your last filed report was an amendment for an older report, that may cause the wrong amounts to load in; we strongly recommend that you still refer to your previous report to ensure that the Cash on Hand amounts are pulling correctly;
Cash on Hand at Beginning of Year: Set this amount to the amount of cash on hand your committee has at the beginning of the year. This value can be taken from Line 8 (Cash on Hand at Close of Reporting Period) of the summary page of the previous year end report. This amount should remain the same for all of your filings for the current calendar year.
Cash on Hand at Beginning of Period: Set this amount to the amount of cash on hand your committee has at the beginning of the period. This value can be taken from Line 8 (Cash on Hand at Close of Reporting Period) of the summary page of the previous report.
Levin Cash at Beginning of Period: If you have a Levin Fund, set this amount to the amount of cash on hand your Levin fund had at the beginning of the period.
Levin Cash at Beginning of Year: If you have a Levin Fund, set this amount to the amount of cash on hand your Levin fund had at the beginning of the year.
Current Period: Set this value to the current election cycle period, for instance, Primary or General. If you are running a pre- or post- report, setting this field will specify whether it is a pre- or post- general or primary. This is also the field used to select "Termination" reports. If you are not sure what to set as the current period, please contact your FEC analyst.
Election State: Set this value to the State Code of the State in which the election the candidate of this committee is participating in.
Sort By/Second Sort: Select an option from the drop-down(s) which represents how you would like the report ordered. For the purposes of grouping memo entries with their parent transactions, it is recommended to use "Natural Order", though technically it is fine if the memos are not physically next to their parent transactions.
Address Type: If you need to specify the committee's address type, you can select that here.
Itemize all JFC Memo Transactions: Check this option if you need all JFC memo entries to itemize.
Itemize all Disbursements: Check this option if you need all disbursements within the report's date range to itemize.
Amend: Check this box if you are amending a previous report you have filed with the FEC. If you check this box, you will need to fill in the Amended Report ID field with the FEC report number of the original report it is amending. The format of this field must be FEC-XXXXXX (e.g. FEC-123456). Additionally, in the Amendment Number field you will need to put the number which this amendment is in the sequence of all previous amendments. For instance, if this is the 2nd amendment to the original report filed with the FEC, you will put a 2 in this box. For more info on amendments, click here.
Auto Generate Line 11a: Check off this box if you would like the system to automatically calculate and enter the amounts for Line 11ai and 11aii cycle total before this period. If you would like to manually enter these numbers then you will need to check and then uncheck this box, and then enter those amounts in the fields that appear below the box.
Multi-Candidate Committee: Check this box if your committee is a qualified multi-candidate committee.
Change of Address: Check off this box if your committee has changed its address since the last report was filed.
Fill in Empty Occupation with 'Information Requested': Check this box if you would like the program to automatically fill in, on the FEC report, occupation fields for individuals whom you have no occupation data for with the text "Information Requested".
Fill in Empty Employer with 'Information Requested': Check this box if you would like the program to automatically fill in, on the FEC report, employer fields for individuals whom you have no employer data for with the text "Information Requested".
Print Text to Report: If you need to attach a short text memo to your report, type that text directly into the box (do not copy and paste text from Microsoft Word, or other word processing applications except for Microsoft Notepad). Lastly, make sure to check off the box. This will add an additional page to the report immediately following the summary pages.
Selected Schedules: Schedules A through L; select the schedules for which you would like to disclose financial information for. If you check off a box, and there are no transactions that are to be reported for that type of schedule, the schedule will simply not print on the report. For this reason, it is recommended that when running the report, unless you have a specific reason for not including a particular schedule, that you select all schedules.
Group Payroll Contributions/Payroll Deduction Frequency: Rather than showing all payroll deduction transactions, the check box will force the report to lump these together for each individual based on the timeline selected in the drop down.
Generate Report button: Generates a Form 3X report based on all of the options selected/inputs above, and brings you to the History Screen. Note that this just generates a draft of the report - submitting it to the FEC takes place on the History screen when you click on the Efile Report button.
Please Note:
Many of the check box options on the parameter screen deal with specific scenarios, so if there are any options that you are unsure if you should be using, please contact your FEC analyst. They can provide you with guidance on your required report parameters.
41.2. FEC Form 3X History Screen
While you are on the Form 3X's parameter screen, two buttons will bring you to the report's history screen when clicked:
- View History: This will bring you to the history screen without generating a new draft.
- Generate Report: This will begin generating a new draft of the Form 3X using the parameters on the screen. You will automatically be redirected to the history page upon clicking. Note that when you generate a report, the history page does not update in real time, so if you stay on the screen, your report may still show the Status as "Inprogress" even if your report has finished generating. You can use the Reload button above the Name column to refresh the history page.
History page
Name: The report's name will be the Report Schedule by default, but you can click on it to change it if desired. Also, you'll see an Edit Filed Date option — see Filed section below for more details.
Date: The date and time a report was generated. Not to be confused with the date a report was filed.
Status: A report's current generation status. You can click the Reload button above to refresh the entire screen, including the Status.
Download: All file types associated with a generated report. If you do not see one of the formats below, then it may have been disabled on the parameter screen.
- PDF: The printable version of the report — this will probably be the version most commonly used to review the report before filing. Note that there is an option on the parameter screen to generate this format, and PDFs typically take the most amount of time out of all of the report's files, so you can choose to generate a report without a PDF version.
- Validation: This file contains the validation info for the report. If a report passes validation, or has errors or warnings, the text of the download link will reflect that.
- FEC: the electronic version of the report — this is the version that is sent to the FEC when you file the report.
- Excel: A spreadsheet version of the report that can also be used for review. Like the PDF, there is also an option for this format on the parameter screen.
Load
- Load Params: Clicking here will bring you back to the parameters screen, with all of the options that were used for the report that you clicked on. This will allow you to generate new drafts of previous reports without having to re-enter all of your parameters.
Filed
- Efile Report: Once you are ready to file, click here. On the window that opens, you'll need to enter all of your filing credentials. Once your report is filed, the Efile Report link will be replaced with the date the report was filed. However, please be aware that there are times when a report will not get marked as filed with the date — this can often happen due to high traffic on the FEC system near filing deadlines. In these situations, you can always manually mark a report as filed on a specific date by click on the name of the report and using the Edit Filed Date option.
Del: Clicking the 'X' in this column will delete that report. Note that if the report was one that was filed to the FEC, deleting it from this page will only delete it on the Aristotle side - there is no way to delete a filed report, so if a report needs any changes, filing an amendment would be the only way to do so.
41.3. FEC Form 3X Receipt Types and Sub-Types
|
Entity: |
Line # |
Type |
Sub-Type |
|
Individual |
11(a) |
Contribution |
Check |
|
|
|
|
Credit Card |
|
|
|
|
Payroll Deduction |
|
|
|
|
Reattribution To Memo |
|
|
|
|
Reattribution From Memo |
|
|
|
|
Cash |
|
|
|
|
Proceeds From Sales |
|
|
|
|
Memo |
|
|
|
Earmarked |
Non-Directed |
|
|
|
|
Directed |
|
|
|
|
Non-Deposited |
|
|
|
|
Conduit Memo |
|
|
|
|
Memo |
|
|
|
In-Kind |
Goods and Services |
|
|
|
|
Goods |
|
|
|
|
Services |
|
|
|
FEA In-Kind |
Goods, Services, Goods and Services |
|
|
|
|
|
|
Company: |
|
|
|
|
Partnership/LLC |
11(a) |
Contribution |
Check |
|
|
|
|
Credit Card |
|
|
|
|
Cash |
|
|
|
|
Proceeds From Sales |
|
|
|
Earmarked |
Non-Directed |
|
|
|
|
Directed |
|
|
|
|
Conduit Memo |
|
|
|
|
Non-Deposited |
|
|
|
|
Memo |
|
|
|
In-Kind |
Goods and Services |
|
|
|
|
Goods |
|
|
|
|
Services |
|
|
|
FEA In-Kind |
Goods, Services, Goods and Services |
|
|
|
|
|
|
Committee: |
|
|
|
|
Political Party Committee |
11(b) |
Contribution |
Check |
|
|
|
Contribution |
Credit Card |
|
|
|
Contribution |
Cash |
|
|
|
Contribution |
Proceeds From Sales |
|
|
|
Contribution |
Redesignation From Memo |
|
|
|
Contribution |
Redesignation To Memo |
|
|
|
Earmarked |
Non-Directed |
|
|
|
Earmarked |
Directed |
|
|
|
Earmarked |
Non-Deposited |
|
|
|
Earmarked |
Conduit Memo |
|
|
|
|
Memo |
|
|
|
In-Kind |
Goods and Services |
|
|
|
|
Goods |
|
|
|
|
Services |
|
|
|
FEA In-Kind |
Goods, Services, Goods and Services |
|
|
|
|
|
|
Committee: |
|
|
|
|
PAC |
11c |
Contribution |
Check |
|
Candidate Committee |
|
Contribution |
Credit Card |
|
Authorized Committee |
|
Contribution |
Cash |
|
Political Action Committee |
|
Contribution |
Proceeds From Sales |
|
|
|
Contribution |
Redesignation From Memo |
|
|
|
Contribution |
Redesignation To Memo |
|
|
|
Earmarked |
Non-Directed |
|
|
|
Earmarked |
Directed |
|
|
|
Earmarked |
Conduit Memo |
|
|
|
|
Memo |
|
|
|
Earmarked |
Non-Deposited |
|
|
|
In-Kind |
Goods and Services |
|
|
|
|
Goods |
|
|
|
|
Services |
|
|
|
FEA In-Kind |
Goods, Services, Goods and Services |
|
|
|
|
|
|
Committee: |
|
|
|
|
Authorized Committee |
12 |
Transfer |
From Affiliated |
|
Political Party Committee |
|
Transfer |
Memo |
|
Individual |
|
Transfer |
From Non-Federal |
|
PAC |
|
|
|
|
Candidate Committee |
|
|
|
|
|
|
|
|
|
Entity |
|
|
|
|
Individual |
Line 13 |
Loan |
Received |
|
Committee |
|
|
Guarantor |
|
Bank/Lender |
|
|
|
|
|
|
|
|
|
|
|
|
|
|
Entity: |
|
|
|
|
All |
14 |
Loan |
Repayment |
|
|
|
|
|
|
Entity: |
|
|
|
|
All |
15 |
Offset of Operating Expenditure |
Refund |
|
|
|
|
Rebate |
|
Entity: |
|
|
|
|
All |
16 |
Other Receipt |
Refund Of Contribution Made |
|
|
|
|
|
|
Entity: |
|
|
|
|
All |
17 |
Other Receipt |
Asset |
|
|
|
|
Interest |
|
|
|
|
Exempt Legal/Accounting (Memo) |
|
|
|
|
|
|
|
|
Debt |
Repayment |
|
|
|
|
|
|
Entity: |
|
|
|
|
Committee |
18(a)/H3 |
Transfer From Non-Federal |
Direct Candidate Support |
|
|
|
|
Exempt |
|
|
|
|
Fundraising |
|
|
|
|
Public Communication by PAC |
|
|
|
|
Administrative |
|
|
|
|
Voter Drive |
|
|
|
|
|
|
Entity: |
18(b)/H5 |
FEA Allocated |
Voter Registration |
|
Committee |
|
|
Voter ID |
|
|
|
|
GOTV |
|
|
|
|
Generic Campaign Activity |
|
|
|
|
Memo |
|
|
|
|
|
|
|
|
|
|
|
Entity: |
|
|
|
|
All |
Line 14, Sch D and Line 9 |
Loan |
Repayment |
|
|
Sch C and Line 9 |
Loan |
Forgiveness |
|
|
Sch D and Line 9 |
Debt |
3rd Party Repayment |
|
|
Line 17, Sch D and Line 9 |
Debt |
Repayment |
|
|
Sch D and Line 9 |
Debt |
Forgiveness |
|
|
Sch D and Line 9 |
Debt |
Owed to Committee |
|
|
|
|
|
|
Entity: |
Entity: |
|
|
|
Bank/Lender |
C1 |
Loan |
Guaranteed by Candidate |
|
|
|
Loan |
Received |
|
Bank/Lender |
Section A |
Loan |
Restructured |
|
Bank/Lender |
Section C |
Loan |
Guarantor |
|
Bank/Lender |
Section D |
Loan |
Collateral (Memo) |
|
Bank/Lender |
Section E |
Loan |
Future Collateral (Memo) |
|
Bank/Lender |
Section F |
Loan |
Other Collateral (Memo) |
|
|
|
|
|
|
|
L-A/1 |
Levin |
Check |
|
|
|
|
Credit Card |
|
|
|
|
Reattribution From Memo |
|
|
|
|
Reattribution To Memo |
|
|
|
|
Cash |
|
|
|
|
Proceeds From Sales |
|
|
|
|
Memo |
|
|
|
|
|
|
|
L- A/2 |
Levin (same type as above) |
Interest |
|
|
|
|
Asset |
41.4. FEC Form 3X Disbursement Types and Sub-Types
Entity: Line # Disbursement Type Sub-Type
ALL 21(a)/H4 Joint Activity Administrative
Direct Candidate Support
Exempt
Fundraising
Memo
Public Communication by PAC
Voter Drive
DCS 100% Federal
DCS 100% Non-Federal
Fundraising 100% Federal
Fundraising 100% Non-Federal
Administrative 100% Federal
Administrative 100% Non-Federal
Exempt 100% Federal
Exempt 100% Non-Federal
Public Comm. 100% Federal
Public Comm. 100% Non-Federal
Voter Drive 100% Federal
Voter Drive 100% Non-Federal
Entity:
ALL 21(b)/B Operating Expenditure Payment
Memo
Exempt Legal/Accounting (Memo)
Credit Card Payment
Reimbursement
Entity:
Committee 22/B Transfer to Affil/Auth. Transfer of Funds
Memo
Entity:
ALL Types 23/B Contribution To Committee Federal
FECA
Memo
In-Kind Federal
Earmark Directed
Non-directed
Entity:
All Types 24/E Independent Expenditure Payment, Memo
All Types 25/F Coordinated Expenditure Payment, Memo, Designated (Memo), Subordinate (Memo), Memo
Individual 26/B and C Loan Repayment
Entity:
All Types 27/B and C Loan Made to Other
Entity:
Individual 28(a)/B Refund Contribution, Memo
Entity:
Political Party 28(b)/B Refund Contribution, Memo
Committee
Entity:
28c/B Refund Contribution, Memo
Entity:
ALL 29/B Other Disbursement Contribution
Payment
Contribution To Committee State/Local
In-Kind State/Local
Entity:
All 30(a)/H6 FEA Allocated Voter Registration
Voter ID
GOTV
Generic Campaign Activity
Memo
Direct Candidate Support
All 30(b)/B FEA Debt Payment, Payment Memo
Memo
Entity:
ALL D/Line 10 Debt Owed By the Committee, Repayment, 3rd Party Repayment, Forgiveness
Line 21b, 21(a),
30(a) and
Sch D/Line 10
D/Line 10
C/Line 10 Loan Forgiveness
Entity:
Committee L-B/4a Levin Voter Registration
L-B/4b Voter ID
L-B/4c GOTV
L-B/4d Generic Campaign Activity
All L-B/5 Levin Payment, Memo
41.5. How to Generate and File an Amendment
Generating an Amendment
To generate an amendment for a previously filed report, the majority of the report's parameters should remain the same, unless the issue causing the need for an amendment was an error with the parameters themselves. Assuming that that is not the case, then the only difference with an amendment's parameters will be the following options/fields:
- The Amend box needs to be checked. This will indicate to the FEC system that the report being filed is an amendment for a previously filed report.
- Amended Report ID: This needs to be the report ID for the original filing. If a report has been amendment multiple times, be sure to use the ID of the original filing, and not of the previous amendment. If you are unsure of what a report's ID was, you can refer to the confirmation email that was received when the original was filed. If you no longer have access to that email, you can find that ID on the FEC website by going to the search page found here, searching for your committee, and navigating to the committee's filings page. Note: when you are ready to submit your amendment and you click on the Efile Report link, this ID will need to be entered here as well.
- Amendment Number: This number is used to indicate the sequential order of a report's amendments. So if you are amending a report for the first time, you can simply enter a "1" for this field, and if you find that it needs to be amended again later on, you would just use a "2" or any higher number.
Additional Parameters to be Aware of
One other parameter that may be useful for an amendment is the Print Text to Report option towards the bottom of the page. Checking off this box will cause any text typed into the box next to it to be added to the report as an additional page following the report's summary pages. This option is often used to explain why an amendment is being filed, but can be used to add any text to your report. If you are unsure of whether or not you need to use this option, please contact your FEC analyst.
Note: it is best to type your additional text directly into this box rather than cutting and pasting, as doing so can result in strange characters or formatting appearing in the text of the report after it has been generated.
How it appears on the parameters:
How it appears on the report (PDF):
Once you have all of your parameters correct and the fields above are checked off/filled in, you can then proceed to generate the report.
Filing an Amendment
Filing the amendment will be the same process as filing a new report, with the addition of entering the amended report's ID with the rest of your filing credentials. You would just use the same ID that was entered on the parameter screen in item 2 above.
41.6. Proper Data Entry for Reattribution of Contributions on FEC Form 3 or 3X
The following is an example of a contribution that was reported in Q1, but then was partially reattributed to a spouse/other person during Q2. This involves 4 transactions in total:
1) The original contribution
Example:
Entity: Ellen Nye
TYPE: Contribution
SUBTYPE: Check
Date: 03/13/2010
Amount: $4800
2) Create the "Memo" contribution. This transaction will have the same dates & information as Original Contribution. This transaction will -MOST LIKELY- be outside of the reporting period. Example:
Entity: Ellen Nye
TYPE: Contribution
SUBTYPE: Memo
Date: 03/13/2010
Amount: $4800
3) Create "Reattribution FROM" contribution. This transaction will -MOST LIKELY- be a negative amount, and will be dated within the reporting period. Link to Contribution/Memo.
Entity: Ellen Nye
TYPE: Contribution
SUBTYPE: Reattribution from Memo
Date: 06/01/2010
Amount: $-2400
4) Create "Reattribution TO" contribution. This transaction will -MOST LIKELY- be a positive amount, to a different entity and will be dated within the reporting period. Link to Contribution/Memo. Link to Contribution/Memo.
Entity: Bill Nye
TYPE: Contribution
SUBTYPE: Reattribution to Memo
Date: 06/01/2010
Amount: $2400
All three MEMO transactions need to pull to the report on the same line as the Contribution/Memo transaction. The original parent transaction that is not a memo does not pull to the report. The three memos need to be linked to each other and NOT linked to the original contribution transaction.
41.7. Pulling a Subordinate Committee to the Schedule F on the Form 3X
ALL transactions on the Schedule F need to be linked to the subordinate committee with a TYPE: Coordinated Expenditure, SUBTYPE: Subordinate (Memo).
41.8. Data Entry for Independent Expenditures Disseminated in a Prior Period
Below are the data entry steps you'll want to take in situations like these where an IE is disseminated in one period but not paid until a subsequent period. Following these steps will ensure that your IE's properly pull to your reports correctly:
- to the Form 3X report as both an unpaid bill and a memo on schedule,
- to the 48 hour report as memos,
- and to the Form 3X for the later period once it is paid off, on both schedule E and schedule D.
Data Entry Steps:
- Create a new disbursement with the type/subtype set to Debt/Owed By The Committee. The date on this entry should be the date of dissemination. Save and close the transaction.
- Create a new disbursement with the type/subtype set to Independent Expenditure/Estimate (Memo). The date on this entry should be date of dissemination, and the Support box should be checked off. Click save.
- Next, on that same entry, link it to the Debt/Owed By The Committee disbursement from #1 using the “Add Transaction Links” tab and add the candidate using the “Candidate Information” tab. Save and close the transaction.
- Create a new disbursement with the type/subtype set to Independent Expenditure/Payment. This entry should also have the date set to the payment date, the “Ind Exp Paid (Y/N)” checked Y, the “Ind Exp Payment Date” set to the same payment date, and the Support box checked. Click Save.
- Finally, link this transaction to the original Debt//Owed By The Committee from #1 using the “Add Transaction Links” tab and add the candidate using the “Candidate Information” tab. Save and close the transaction.
41.9. Data Entry for Schedule H2
Data Entry for Schedule H2 in A360
Schedule H2 is for fundraising events and direct candidate support activities. To get your data to pull to this schedule correctly in Aristotle 360 - check the event date duration, and make sure the dates are within the allocation date duration. If your H2 is not pulling the event correctly, make the necessary changes to the date allocation so it fits within the report date range.
For example, an event that would pull correctly to a report date range of 3/1/2016 - 6/31/16, would look something like: 'Sustaining Membership 2016' with a date between 3/2/2016 - 6/30/2016.
41.10. Data Entry for Form 3X, Schedule H3
Typical data entry to record transfers that show on the Schedule H3 involves creating two Committee records, one for the Federal Account and another for the Non-Federal Account. The records must be Committees in order for the transactions to show properly.
In order to show the money being transferred from one account to the other, please create the following two transactions:
1) In the record for the account that the money is being transferred into, create a Receipt of Type: Transfer from Non-Federal Subtype: Administrative, Transfer of Funds, Direct Candidate Support, or Payment for the amount of the transfer:
2) In the record for the account that the money is being transferred from, create a Disbursement of Type: Joint Activity Subtype: Administrative for the amount of the transfer and then link this transaction to the Receipt created in step 1:
The Form 3X will pull the name of the Bank Account from the account designated in the linked Disbursement. For instance, in the above Disbursement, the account is "H3 Federal" and will pull to Schedule H3 as follows:
If you are only required to report on the Federal side, you can create a Disbursement of $0 instead of the full transfer amount. The Receipt will need to be the full amount and will still need to be linked to the Disbursement.
41.11. FEC Form 3x - Line 30b
FEC Form 3x - Line 30b - Disbursement tied to a Candidate
On line 30b, do the following:
1) Create an entry as FEA MEMO under the candidate for whom the action is to benefit.
2) Create an entry as FEA Payment under the vendor
3) Link from the vendor transaction to the memo transaction on the individual/legislator.
Salary of Party Employee
Use Type=FEA, Subtype=Debt Payment and the transaction should pull directly to Line 30b.
41.12. Entering Coordinated Expenditures as Debt Repayment
About Coordinated Expenditures and Debts
When preparing a filing, a committee may need to enter a debt, and then indicate that that debt was repaid. This can be by various methods, but one way that a debt can be repaid is by a coordinated expenditure. For more information on who uses coordinated expenditures, please consult the FEC.
How to Enter a Coodinated Expenditure as a Debt Repayment
The date entry for this very similar to regular debt repayments.
Enter debt transaction with TYPE: "Debt," SUBTYPE: "Owed by Committee"
Enter coordinated expenditure transaction with TYPE: "Coordinated Expenditure," SUBTYPE: "Payment." Save this transaction. Check the support/oppose box (as appropriate), and link to the correct candidate.
Under the Transaction Links tab, search for and link the debt transaction. Save this transaction again.
On the Form 3X, the Coordinated Payment pulls to Schedule E and the Coordinated Payment amount is deducted from the outstanding debt total on Schedule D
41.13. Schedule H(4) - Data Entry for Transactions to Pull With Previous Years Allocation Ratio
This helpfile will detail data entry to pull a transaction to the Schedule H(4) of the Form 3X using the previous year's allocation ratio.
Summary of data entry:
The basic format for these transactions is that a transaction in the previous year must be created with Admin Previous Year Rate as the subtype, which should be linked to an event which has the allocation ratio that you want set. This transaction is then linked to the transaction in the current year that you need to have the previous year allocation ratio. This set up will pull the previous year's allocation ratio.
Detailed data entry instructions:
Example disbursements:
2.1.17 Example Insurance Company Joint Activity / Admin Previous Year Rate - $143
2.1.16 Example Insurance Company Joint Activity / Admin Previous Year Rate - $0
Example event (create one with your desired ratios):
2.1.16 2016 Allocation Ratio 1.1.16 12.31.16 Federal: 28%, Non-Federal: 72%
In this situation, the 2.1.17 transaction needs to pull the allocation ratio from 2016 rather than from 2017. Normally it would have the Administrative subtype, but for these transactions, it needs to have the Admin Previous Year Rate subtype to pull correctly.
- Create the transaction in 2016 with the Admin Previous Year Rate subtype, with a $0 dollar amount to ensure that that transaction does not impact any totals, etc.
- Create the Allocation Ratio event. Within that event, under the Joint Activity menu, set the allocation ratio to the 2016 ratio.
- Link the 2016 transaction to the 2016 Allocation Ratio event
- If the event does not show in the edit disbursement screen, go into the event details and add The Texas Mutual Insurance as an attendee. The event will then show in the edit disbursement screen.
- Finally, we need to link the 2016 transaction to the 2017 transaction. This will prompt 360 to pull the previous year's allocation ratios for this transaction.
This is how the example illustrated above will pull to the Form 3X:
41.14. Schedule F: How to Show that Your Committee has been Designated to Make Coordinated Expenditures
To check the box showing that your committee been designated to make coordinated expenditures by a political party committee, create a Disbursement within the committee record with Type = Coordinated Expenditure Subtype = Designated (Memo) for every corresponding transaction:
Then, link each one of the Disbursements you created under the Committee record to the matching expenses:
Once you have done this, the box should check yes under the Schedule F.
41.15. FAQ: Why does my PDF only include the summary pages?
We have added functionality for the Form 3X so that Campaign Manager will only give you the summary pages in the PDF if the e-file (.fec file) is larger than 5 Megabytes. This was done in an effort to try and limit the amount of time the user needs to wait for the report to fully generate.
If you need a full PDF, you can get one from the FEC's site at the below link, simply download the e-file (.fec file) and upload it here:
https://efoservices.fec.gov/webprint/
41.16. FAQ: How to Link Credit Card Memos to Outstanding Debts for Repayment
The process of carrying over debt across multiple periods is a tricky one, and requires some very precise data entry. It is a three step process:
1) The first step is to enter the three transactions:
- The original debt transaction, entered on your credit card vendor record
- The debt repayment transaction, entered on your credit card vendor record
- The memo transaction(s) showing where the money was actually spent, entered on each specific vendor's record
2) Then you will need to open each transaction and scroll to the bottom where you will find the "Transaction Links" section. You need to use these search fields to find all three of the above transactions and link them all together. The transactions must be linked together or they will not report correctly.
3) Then you will need to set the "Memo Group ID" to the same value for all three of the above transactions. An example is as follows:
- Debt transaction, memo group ID = A
- Repayment transaction, memo group ID = A
- Memo transaction(s), memo group ID = A
This will ensure that the memos only appear on your reports when the debt repayment transactions also appear. You can use any value you want in the "Memo Group ID" field, but it must be the same value for all three of the above transactions otherwise it will not report correctly.
41.17. FAQ: Why don't my Debt Repayment memos show on Schedule D along with my Debt Transactions?
Q. Why don't my Debt Repayment memos show on Schedule D along with my Debt Transactions?
A. The FEC regulations state the memos associated with a debt repayment pull to Schedule B along with the payment transaction, not on Schedule D with the payment transactions, not on schedule D with the debt.
41.18. How to add a Presidential District
When adding a Presidential District you need to create a new or search for the legislator record. From there start off by entering the basic information. Under District Information select the District level as Federal. Then Legislative Body as president. For Presidential it is suggested to select DC as the State. Then Select the code 00.
41.19. How do I enter an allocated transfer of in-kind contributions?
In order to properly report the allocated transfer of in-kind contributions from the state to the federal committee, you'll need to follow the steps below. This will report the transaction as the FEC guide dictates: an H3 transfer for the amount of the in-kind, an H4 transaction to the vendor for the amount of the in-kind with the full amount in the Non-Federal share field, and an H4 transaction to the state committee for their share of the in-kind with the full amount in the Federal field while not impacting the event total.
Here are the instructions for doing this in 360:
1. Create H3 transfer for the amount of the in-kind following standard data entry, with a fundraising allocation selected.
2. Create an expense on the vendor record from which the in-kind was purchased for the full amount of the in-kind. Needs the same fundraising allocation as the H3, and the type/subtype Joint Activity / Fundraising 100% Non-Federal
3. Create an expense on the state committee record for the amount of value being claimed by the state committee. Needs the same fundraising allocation as the H3, and the type/subtype Joint Activity / Fundraising 100% Federal
4. Link the above two expenses.
42. FEC Form 3L Compliance
43. FEC Form 5 Compliance
43.1. Form 5
This report is for Independent Election transactions. Once a campaign spends more than $250.00 on an election cycle for a particular race, they are required to file. Therefore, Form 5 thresholds calculate based on ELECTION & legislative office.
If an organization supports/opposes multiple candidates/races, a Form 5 must be submitted for each individual candidate/race. 360 supports running the Form 5 for a specific race. However, if you run a report for a specific race, you must ensure the transactions associated with that race are linked to the legislator. For contributions, this can be done by creating a memo transaction on the legislator's record, and then linking that memo to the corresponding contribution. For expenditures, simply link to the legislator using the "Add Candidate Information" submenu of the disbursement edit screen.
NOTE: the threshold should be set to $0.01 NOT $200.00 like other reports. This will pull all transactions necessary.
44. FEC Form 6 Compliance
44.1. How to File Form 6
Follow these same instructions for any file you need to upload manually.
1. Reporting > Compliance Reports > Form 6
~~~~Enter the appropriate information.
~~~~Click "Generate."
~~~~You will get a pop-up window with several links.
(2.) [If you need to download the viewer again, click the third link. Download and save the viewer. Extract all files].
3. Choose the top link to save your FEC report. Choose "save."
4. TO REVIEW YOUR REPORT:
~~~~Open the VendPak folder. Open "FECprint" > "Fecprn." In the resulting box, choose File > Open and select your document.
5. TO FILE YOUR REPORT:
~~~~Open the VendPak folder. Open "FECload" > "FECload." In the resulting box, choose File > Upload and select your document.
~~~~Enter the appropriate information:
- ID
- Password (and confirm)
- Email (where you would like confirmation receipt to go)
- Filing method
- "This filing amends _______" (when appropriate).
6. BEFORE YOU CLICK OK:
~~~~Click on the "Configure" tab.
~~~~In the following boxes, enter the following information (if it is not already there)
- TCP/IP hostname: disclose.nictusa.com
- Agency ID: FEC
No need to change any other boxes.
7. CLICK OK!
Wait without closing the screen until it tells you that the file has been uploaded successfully.
44.2. Walkthrough: Filing the FEC Form 6 (48-hour Notice of Contributions/Loans Received)
Filing the FEC Form 6 (48-Hour Notice of Contributions/Loans Received)
For information about who must file a Form 6, and when it must be filed, please see the FEC website: http://www.fec.gov/pdf/forms/fecfrm6i.pdf
When filing a Form 6 using Aristotle 360, you will use the manual uploader to file the report, instead of filing it directly through the system. This help file will walk you through this process.
Generating your Form 6
1. To generate your Form 6, mouse over the Reporting tab and choose "Compliance Reports." For Filing Authority, choose "FEC," then click the "FEC Form 6"
***Please note: if you do not see this option, and you need to file a Form 6, please contact Support for assistance.***
2. Fill out the three tabs and click "Generate:"
a. Accounts: Choose the correct filing committee and bank account(s).
b. Form Information: Enter the date range for your report
c. Settings: Additional options for the report
Downloading your Report and the Vendor Tools
1. When the report has finished generating, you will see a pop-up with four choices:
a. To download a viewable version of your FEC file (PDF): Click the Print button. This will bring up your document in a viewable format.
b. To download your FEC file: click on the first link (Click on ____ to download your FEC file) to download and save your FEC file (e.g. "Sample Form 6"). Be sure to save it somewhere you can locate again (such as "My Documents" or the Desktop).
c. To view your validation file: click on the second link to download your validation file (Click on _____ to download the report generated by the FEC). This will inform you of any warnings or errors with your report.
d. To download the Vendor Tools: click the third link (Click here to download Aristotle Vendor Tools): you will need to do this only once. After clicking on the Vendor Tools link, save the file to your computer:
e. Locate the saved file. Right click on the file, and choose "Extract All," "Unzip," or similar.
Filing Your Form 6
1. Once it has extracted, open the unzipped file you just created (it should now have a normal folder icon, not a zipped one). You will now see a series of folders and files.
2. Open the FECload folder, then double-click the FECload icon to open the program.
3. Click File > Upload. Locate your FEC file ("Sample Form 6").
4. You will now need to enter your e-filing information.
a. ID: Enter your FEC Filing ID it should be formatted like this: C12345678
b. Fax: typically not necessary
c. Password / Confirm: type your e-filing password. Please note, if you do not know your FEC e-filing password, you will need to contact the FEC we do not have this information.
d. Email 1 / Confirm: the email address where you would like to receive the receipt confirmation.
e. Email 2 / Confirm: a second email for the confirmation (if desired)
5. Choose "TCP/IP" as the filing method.
6. Click the Configure tab at the top. **Note: you will not be able to click Configure until you have entered the information above.** Enter the following information:
a. TCP/IP hostname: disclose.nictusa.com
b. Agency ID: FEC
7. Confirm that your information is correct, and click OK. The upload process will begin immediately. Please DO NOT close the FECload program until:
a. You receive an email confirmation from the FEC, letting you know that they have received your file, and/or:
b. You receive a pop-up notification in the FEC uploader with a "Success!" message.
Please note: if you are unsure of whether or not your report was successfully uploaded, you can always check its status on the FEC website using your committee name and/or committee ID to search: http://fec.gov/finance/disclosure/efile_search.shtml
Please check the FEC website *before* attempting to file again.
45. FEC Form 24 Compliance
45.1. How to File Form 24; 24/48 Hour Notice Report
Note: Disbursements for independent expenditures related to opposing candidates in the same election are aggregated for 24- and 48-hour reporting. If expenditures related to different candidates in the same election (for instance, supporting one and opposing the other) are entered correctly expenditures for both candidates will aggregate properly on reports filed with the following steps. Please click here for instructions on correct data entry for Entering Independent Expenditure Transactions.
- When it is time to run a 24/48 Hour Notice go to Reporting > Compliance Reports
- For Filing Authority choose "FEC."
- Once the Available Forms load, select "Form 24."
- In the Filing Committee drop-down select the committee that is filing this notice. Also, select the check boxes next to the Accounts associated with the independent expenditure payments.
- Next, select the Form Information tab.
- For Reporting Period choose the date range of this report. Typically, for 48-hour notice this will be the one day or a two day span.
- For Itemization Threshold Start Date enter the corresponding date.
- For Itemization Threshold enter "0.00" as the minimum.
- Select the radio button indicating whether this is a 24 or 48 Hour Notice.
- Next, select the Form 24 Schedule tab. Make sure that the Cover Page Schedule 24 box IS checked, AS WELL AS the Schedule E box.
- Click the Run button at the bottom right hand of the screen.
- After the program runs (this may take a few moments) a new window will appear.
- The pop-up window will indicate if if there were any errors. If you have errors open the validation file to see what went wrong. For example, in the above screenshot, it begins "File was generated successfully but did not pass FEC validation." By clicking to View my validation file, I'll be able to see what aspect failed to pass FEC validation.
- If there are no errors you can open the PDF version of the report by simply clicking on the link in the pop-up window.
- The PDF should list all of the Independent Expenditures during this time. Each transaction should have a candidate in the Name of Federal Candidate supported or opposed by expenditure field. The Office Sought information pulls directly from the candidate's legislator record.
- If everything is correct, file the report by clicking the File Now button.
45.2. How to Itemize Transactions From Only One State on Your Form 24 (Presidential Candidates Only)
Here is the process to itemize only transactions from a specific state on the Form 24:
1) On each transaction, click open the "User Defined Fields" section at the bottom
2) Click open the "Pres Prim IE State" dropdown and select the appropriate state
3) Click "Save" to save the transaction
4) Go to Reporting > Compliance Reports > FEC Form 24
5) On the parameters screen, click open the "Election Office" and select "President"
6) Click open the "Election State" dropdown and select the appropriate state
7) Enter the rest of the parameters fields correctly and click "Run" at the bottom
This will generate a report that has transactions from only the specified state.
46. FEC Form 99 Compliance
46.1. FEC Form 99
Go to Reporting > Compliance Reports and choose FEC Form 99 to file the free-form text message to the FEC, the Form 99.
Please uncheck everything on the Form3 Schedules Tab when filing a Form 99. When you click on the Form 99
button, a text box will appear for you to type in your message. When you are finished with your message, press OK. The program will then prompt you for a file name, with the default being "FEC_FORM_99". DO NOT CHANGE THIS FILE NAME. Simply press Save. If it asks you to overwrite the existing file, say yes. The file FEC_FORM_99 simply serves as a FEC Form 3placeholder that will then be incorporated into your actual report. After this, the filing is the same as any other FEC filing.
Committees Select the filing committee you would like to run the FEC Form 3 report for. Additionally, you will need to select the bank accounts whose transactions you would like to disclose in the report.
Form Information
Misc. Memo Check this box if you would like to submit this as a normal text memo. Text Box - Type the text directly into the box (do not copy and paste text from Microsoft Word, or other word processing applications except for Microsoft Notepad).
Form Actions
Previous Click on 'Previous' to go to the previous tab of the report, for instance, going from Form Information to Accounts.
Next Click on 'Next' to go to the next tab of the report, for instance, going from Accounts to Form Information. Run click on 'Run' to generate a report with the options and parameters selected in the different tabs of this particular compliance report.
FEC Form 99 is used to file free-entry text memos.
47. FEC Report Troubleshooting and FAQs
47.1. "BADFORMAT Inconsistent Report IDs" Error When Filing Amendments
Please confirm the following when you get a "BADFORMAT Inconsistent report IDs" error when filing an amendment:
1) Make sure the file name you are amending is listed like this: FEC-123456. Please take note of the capitaliztion & dash.
2) When you enter which amendment number this is, do not put leading zeros. Instead of "001", just enter "1".
47.2. Troubleshooting: Partnership Memos not Displaying
Partnership memos not displaying
If you create a Partnership - "Memo" and link it to each individual, you may wonder why it won't print out on a report. The reason is:
The Organization Type "Partnership/LLC" and "Association" are not supported by the Federal Reports. You must change the Organization Type to "Partnership" by opening the Organization record, choosing the new type, and clicking save.
48. Alabama Compliance Reporting
49. Alaska Compliance Reporting
50. Arkansas Compliance Reporting
51. Arizona Compliance Reporting
51.1. Calculating Limits and Designations for Arizona Reporting
Overall Issue: Arizona does not calculate limits or designations based on election period (like the norm in most states and federal compliance), it calculates based on active committee. Below are some data entry examples:
Normal Data Entry example when giving to a federal candidate would look something like this:
Daniel Nava For Congress; ID:C0000123
$1000 General 2016
$1000 General 2018
All in the same record.
Giving to an Arizona state legislative candidate, in contrast it would look like this:
Committee to Elect Daniel Nava 2016; AZ ID: 201600123
$1000 General 2016
Committee to Elect Daniel Nava 2018; AZ ID: 201800321
$1000 General 2018
Other Notes:
- In fact, the electronic file for AZ does not even have a column for "election period" it does not pull the information. While it's still a good idea to have the correct information in the dataset for internal purposes such as system reporting, the data itself is not pulled for compliance purposes.
- It is vitally important not to just "update" the committee ID field either! If for any reasona transaction is voided, the new ID of the committee will be pulled to the report, and display an error from the state. Transactions must be segregated into the proper committee that was active at the time the disbursement was cut. Voids / refunds must also be entered into the corresponding committee.
- If a federal campaign/organization is giving to an AZ state level candidate but is not required to file in AZ, it may be a good idea to still follow the above stated guidelines in case at any point they start having to file in AZ.
51.2. Voiding Transactions Not Originally Reported in 360
With Arizona compliance reporting, the situation can arise where you need to void a transaction that you did not report on a report generated from Aristotle 360. For instance, if you have been using 360 only since the beginning of 2016, and the transaction you need to void is from 2015, you will need to populate a specific "User Defined Field" on the disbursement transaction with the original transaction ID. The original transaction ID can be found on column A on the row of the original disbursement, on the originally filed TXT file (converted to xls).
To enter the transaction ID into the user defined field, just open the disbursement transaction and scroll to the bottom until you get to the "User Defined Fields" section. Click it open and paste the transaction ID into the "AZ Tran ID" field. Then click "Save" to save the disbursement and everything will itemize correctly on your AZ state report.
51.3. Entity Types
Valid Entity Types for the AZ report
The chart below includes the entity types as they pull to the report's efile, as well as how the type appears in 360.
| Entity Type on the AZ report efile | Entity Type in 360 |
| A | Candidate Committee types |
| B | Organizations |
| F | Candidate or Candidate Family (involves household linking) |
| I | Individual |
| L | Union |
| M | Unitemized Transactions |
| O | Corporation |
| P | Political Action Committee |
| R | Party Committee |
| S | Partnership |
52. California Compliance Reporting (Legacy)
52.1. Data Entry for "Contributions to Committees"
This is a multi-step process:
1) Create the Candidate
2) Add the District to the Candidate's Record
3) Add a Type: Contribution to Committee; Subtype: Memo Transaction to the Candidate's Record
4) Open the COMMITTEE record
5) Link the candidate as "candidate" in the Committee Staff section
6) Add a Type: Contribution to Committee; Subtype: {as appropriate, ie State/Local} to the COMMITTEE's Record
7) Link the candidate Memo Transaction to the COMMITTEE disbursement
Please make sure the dates & amounts for the transactions match.
52.2. California Mandatory E-filing Requirements - $25,000 Threshold
See attached file that lists new reporting requirements for the FPPC in 2011.
The most notable is that any committee is now required to efile if they have a cumulative total of $25,000 in transactions since 2000. This amount used to be $50,000.
53. Colorado Compliance Reporting
53.1. Colorado E-Filing & Skipped Transactions (i.e.: Why Are My Totals Wrong?)
Colorado is VERY specific when it comes to committees. A committee name AND address -must- match what is filed with the state or the transaction will be skipped, thereby throwing off your totals.
To confirm what is filed with the state, please use this website:
http://tracer.sos.colorado.gov/PublicSite/Search.aspx
54. Connecticut State Report
54.1. Schedule A - Itemized Contributions from Individuals
This help documentation will show the data entry required to populate all sections on Schedule A of the Connecticut State Report in 360.
The numbered items below are populated using fields on the Individual's record.
1 - Last Name
2 - First Name
3 - Middle Initial
4 - Residential Street Address
5 - Residential City
6 - Residential State
7 - Residential Zip Code
8 - Prinicipal Occupation
9 - Name of Employer
A - Contribution Associated with Fundraising Event Listed in Section L1?
B - Method of Contribution
C - Date Received
D - Amount of Contribution
54.2. Schedule C1 - Contributions from Other Committees
This help documentation will show the data entry required to populate all sections on the Schedule C1 of the Connecticut State Report in 360.
The numbered items below are populated using fields on the committee record. The lettered items are populated using fields on the specific receipt.
1 - Name of Committee
2 - Name of Treasurer
3 - Address
4 - City
5 - State
6 - Zip Code
A - Contribution Associated with Fundraising Event Listed in Section L1?
B - Date
C - Amount
54.3. Schedule C2 - Reimbursements or Surplus Distributions from other Committees
This help documentation will show the data entry required to populate all sections on Schedule C2 of the Connecticut State Report in 360.
The numbered items below are populated using fields on the Committee's record.
1 - Name of Committee
2 - Name of Treasurer
3 - Address
4 - City
5 - State
6 - Zip Code
7 - Date Received
8 - Transaction Type (determined by the transaction's type and subtype)
9 - Description
10 - Amount of Receipt
54.4. Schedule D - Loans Received This Period
This help documentation will show the data entry required to populate all sections on Schedule D of the Connecticut State Report in 360.
The numbered items below are populated using fields on the Lenders's record. The lettered items are populated from fields in the linked Cosigner/Guarantor's record.
1 - Name of Lender
2 - Source of Loan (determined by record type of Lender)
3 - Street Address
4 - City
5 - State
6 - Zip Code
7 - Date of Receipt
8 - Amount Received
A - Name of Cosigner/Guarantor
B - Street Address
C - City
D - State
E- Zip Code
* In order for Cosigner/Guarantor information to pull, the Lender's loan transaction will need to be linked to the Cosigner/Guarantor's Loan transaction.
54.5. Schedule K - Miscellaneous Monetary Receipts not Considered Contributions
This help documentation will show the data entry required to populate all sections on Schedule K of the Connecticut State Report in 360.
The numbered items below are populated using fields on the entity's record.
1 - Name of Entity
2 - Date of Transaction
3 - Street Address
4 - City
5 - State
6 - Zip Code
7 - Description
8 - Amount
54.6. Schedule L1 - Fundraising Event Information
This help documentation will show the data entry required to populate all sections on Schedule L1 of the Connecticut State Report in 360.
The numbered items below are populated using fields on the Event page.
1 - Fundraising Event #
2 - Description
3 - Was this a fundraising?
4 - Location: Street Address
5 - City
6 - State
7 - Zip Code
8 - Was this fundraising event held at a private residence?
9 - Did this fundraiser include items donated by a business entity of up to $200 or items donated by an individual of up to $100?
This will be calculated according to transactions linked to the event.
10 - Was this fundraiser a tag sale, auction, or other sale of donated items with purchase from an individual of up to $100?
11 - Subpart 2: (Town Committees and Municipal Candidate Committees ONLY) Were there purchases of advertising space in a program book or on a sign associated with this fundraiser?
This will be dependant on which Expenditure Codes are entered withing the transactions linked to the event.
12 - Subpart 3: (Town Committees ONLY) Did your committee sell food or beverage at a fair or similar mass gathering held withing the state with this fundraiser?
54.7. Schedule L3 - Purchases of Advertising in a Program Book or on a Sign (Municipal Candidate and Town Committees ONLY)
This help documentation will show the data entry required to populate all sections on Schedule L3 of the Connecticut State Report in 360.
The numbered items below are populated using fields on the Entity record page.
1 - Name of Donor
2 - Purchase Made By:
This designated by the record type.
3 - Street Address
4 - City
5 - State
6 - Zip Code
7 - Date Received
8 - Event #
This will be pulled from the event that the transaction is associated with.
9 - Aggregate Purchases for All Events
8 - Amount of Program Ad Purchase
This will pull according to the receipt code selected (ad purchase vs. sign purchase)
54.8. Schedule M - In-Kind Contributions
This help documentation will show the data entry required to populate all sections on Schedule M of the Connecticut State Report in 360.
The numbered items below are populated using fields on the Entity's page.
1 - Name
2 - Street Address
3 - City
4 - State
5 - Zip Code
6 - Type of Contributor
7 - Date Received
8 - Aggregate Contribution
9 - Description of In-Kind Contribution
10 - Is contributor a lobbyist, spouse, or dependent child of a lobbyist?
This will depend on who is linked as a spouse or dependent child of a lobbyist through the Household Membership tab.11 - Is this contribution associated with a fundraising event listed in Section L1?
This will pull depending on which event the transaction is associated with and whether that event is pulling to the Schedule L1.12 - Fair Market Value of this Contribution
54.9. Schedule P - Expenses Paid by Committee
This help documentation will show the data entry required to populate all sections on Schedule P of the Connecticut State Report in 360.
The numbered items below are populated using fields on the Entity record page.
1 - Name of Payee
2 - Date of Payment
3 - Method of Payment
4 - Street Address
5 - City
6 - State
7 - Zip Code
8 - Purpose of Expenditure (by code)
9 - Description
10 - Event #
11 - Expenditure #
12 - Type of Expenditure (if applicable) Itemization in Addendum P Required
13 - Amount
54.10. Schedule S - Expenses Incurred by Committee but Not Paid During this Period
This help documentation will show the data entry required to populate all sections on Schedule S of the Connecticut State Report in 360.
The numbered items below are populated using fields on the entity's record.
1 - Name of Payee
2 - Date Incurred
3 - Street Address
4 - City
5 - State
6 - Zip Code
7 - Purpose of Expenditure (by code)
Will pull based on the Expenditure Code selected.
8 - Description
9 - Event #
10 - Expenditure #
11 - Type of Expenditure (if applicable) Itemization in Addendum P Required
12 - Amount
54.11. Schedule T - Itemization of Reimbursements and Secondary Payees
This help documentation will show the data entry required to populate all sections on Schedule P of the Connecticut State Report in 360.
The numbered items below are populated using fields on the Entity record page.
1 - Last Name of Worker/Consultant
2 - First Name of Worker/Consultant
3 - Date of Payment
4 - Method of Payment
5 - Street Address
6 - Street Address
7 - City
8 - State
9 - Zip Code
10 - Purpose of Expenditure (by code)
11 - Description
12 - Event #
13 - Expenditure #
14 - Type of Expenditure (if applicable) Itemization in Addendum P Required
15 - Amount
55. Connecticut Compliance Reporting
56. Florida Compliance Reporting
56.1. Submitting Your E-file
This is a step by step guide to uploading and filing the electronic file generated by your software.
1. Generate your file, and make sure it generated with the appropriate name (I.E. 41234_Q1.txt)
2. Proceed to efs.dos.state.fl.us/Default.aspx
3. Enter your Florida Filer ID & Password
4. Selecting "Filings" from the menu bar, then "Open New Filing"
5. Upload the .txt file you generated from the software.
Continue the steps outlined by the state and your selected report will be filed!
If you have any questions or complications please contact technical support.
56.2. Filing Amendments for Florida State Reports
Filing Amendments for Florida State Reports
Florida amendments only include transactions that have been added, deleted or edited since the previous "Mark as Published" session. This is unlike FEC reports where amendments are complete reports that include all transactions, regardless of whether they have changed since the original filing.
1. The current process for FL amendments where you need to use a UDF to mark if transactions on amendments were Added or Removed remains in place.
2. The process for generating the new amendment has changed. To create the report, go into the saved reports list and load the report parameters that you are amending. This process loads the transaction IDs from the original filing for mandatory reuse on the amendment.
NOTE: FL works differently than the FEC in terms of amending reports. Where on the FEC you're always amending the first version of the report you filed, for FL you're always amending the latest version of the report you filed. Thus if you have amended a report once, for the second amendment you'd need to load the parameters for the amendment, not the original filing.
When you generate the report, any transactions that have been added for this amendment (and marked as such in the UDF) will appear sequentially at the end of each schedule. Any DEL transactions will remain in the same place on the report, marked properly so they get removed from FL's system. Once satisfied with the amendment, you can upload the report and mark the amendment as filed.
In order to only pull amended transactions to the FL amendment report, the system needs to take a snapshot of the transactions as they were originally filed. This is done by clicking the "Mark as Published" button when you are ready to file your original report. Then, when you run an amendment report, it only pulls transactions that differ from that "Mark as Published" snapshot.
The "Mark as Published" option appears after generating the Florida State Report. Be sure to click this option in the database/dataset immediately after filing your Florida State Report. This will accurately track any modification made to trabsactions, should an amendment need to be made at a later time.
For Florida, amendments and original files are uploaded to the state server in generally the same manner.
NOTE: This only applies to reports filed to the state and not to reports filed with individual counties.
57. Georgia Compliance Reporting
57.1. How Do I File My Georgia Report?
How Do I File My Georgia Report?
1. Generate a GA State Report in AI360.
2. Right click and save the file as an .xml. Note: the file extension must be .xml (all lowercase) to be accepted
3. Go to https://efile.ethics.ga.gov/#/index and login with your credentials
4. Click on “Import Manager” on the left-hand side of the screen
5. Click on “Import File”
6. Select both your .xml file and a description (if desired). Then, click “Import”
7. Your file will be uploaded by the Georgia System. NOTE: This does NOT mean that your report has been filed.
a. Check for errors by clicking on the “Review” option under Actions. This will show what errors need to be corrected before all transactions are accepted
8. Once all transactions have been uploaded successfully, you can continue with the filing process by clicking “Accept” under Actions. NOTE: This does NOT mean that your report has been filed. (If you would like to erase these transactions from your Import Manager, choose “Reject”)
9. Once you’ve selected “Accept”, you’ll see these transactions in the “Reports” section under the appropriate report name.
10. You can click “Preview” under Actions to see a sample draft of the report.
11. Once you are ready to file the report, you can select the “File” option under Actions.
12. Enter all necessary information and click “Agree”
13. Your report has now been filed with the Georgia Campaign Finance Commission! You will see this report in the “Filed” section of the “Reports” tab.
57.2. How to Change Your Filing Password for GA Reports
If you receive an error reading "Your Authorization Information is Incorrect. Access Denied." when trying to file your Georgia State ethics report, you will want to check the username and password that you have on file with the State of Georgia.
* If you have forgotten your username you can call the State at 404-463-1980.
* If you have forgotten your password you can reset it by visiting the following page (http://www.ethics.state.ga.us/EFiling/) and clicking on the "Forgot Password" link.
57.3. Investment Schedule - How to Pull Purchases, Interest, and Dividend Transactions
How To Enter a "Purchase" Transaction
You will need to create a new Disbursement transaction for this. See below screenshots for each required field, as well as how it will appear on the GA Investment Schedule. Fill in each of those fields, and you also must make sure you expand the "Expenditure Codes" section and add the "TRNS-P" Georgia expenditure code to the disbursement.
You can add multiple purchase transactions for the same investment by making sure to enter the exact same "Investment Name" into the "Purpose" field of the disbursement. For the example shown in the below screenshot, you could add an additional purchase transaction by creating a new disbursement and entering "Georgia Investment Name" into the "Purpose" field of that disbursement. 360 will see that the "Purpose" is the same for both disbursements and will include them both under the same investment.
NOTE: You must also always make sure you expand the "Add Transaction Links" section in the disbursement, and use the linking feature to link this purchase transaction to any other existing purchase, interest, or dividend transactions. They must all be linked together for them to pull properly to the Georgia Investment Schedule.
|
|
|
|---|
How To Enter an "Interest" Transaction
You will need to create a new Receipt transaction for this. Fill in each field shown in the below screenshots and that info will pull to your report as you need it to.
Make sure you enter the exact same text into the "Purpose" field of this receipt that you entered for the "Purchase" transaction you created above. You also must make sure you expand the "Receipt Code" section within the receipt and add the Georgia "INT" receipt code.
Lastly, you need to expand the "Add Transaction Links" section and use the linking feature to link this new receipt to the existing purchase transaction you created while following the above steps.
|
|
|
|---|
How To Enter a "Dividend" Transaction
You will need to enter a new Disbursement transaction for this. Fill in all the required fields and this info will show on your report as you need it to.
Make sure you enter the exact same text into the "Purpose" field of this disbursement that you entered for any "Purchase" or "Interest" transactions you created above. You must also make sure you expand the "Expenditure Codes" section within the disbursement and add the Georgia "DVND" expenditure code.
Lastly, you need to expand the "Add Transaction Links" section and use the linking feature to link this new disbursement to any existing "Purchase" and "Interest" transactions you created while following the above steps.
|
|
|
How To Enter a "Transactions Sold" Transaction
You will need to enter a new Receipt transaction for this. Unfortunately Georgia has not yet provided guidance on how to actually itemize a "Transactions Sold" transaction, so entering a "Transactions Sold" will only show up on your report in the summary totals in two places:
- It will be calculated in the "Value at end of reporting period" total on the Investment Schedule
- Value at end of reporting period = [Transactions Purchased] – [Transactions Sold] + [Interest]
- It will show on the main report summary page
See below for screenshots of the data entry, along with exactly where it will show up on your report. Make sure you enter the exact same text into the "Purpose" field of this disbursement that you entered for any "Purchase", "Interest", or "Dividend" transactions you created above. You also must make sure you expand the "Receipt Code" section within the receipt and add the Georgia "TRNS-S" receipt code.
Lastly, you need to expand the "Add Transaction Links" section and use the linking feature to link this new receipt to the existing purchase transaction you created while following the above steps.
57.4. Why don't my reattributions appear on my GA report?
GA state reports do not have the concept of re-attributing a contribution like FEC reports. If you want to show both the individual and the spouse you would have to report them as 2 separate contributions.
If you have further questions, you can call GA Ethics at 404-463-1980 to further explain your situation.
58. Indiana Compliance Reporting
58.1. How to Submit an Indiana E-file - CFA-4
In order to submit your report to Indiana:
1. Run the report in 360 and download the efile to your desktop.
2. Email the file to campaignfinance@iec.in.gov
3. Put the committee name and "CFA-4 efile" in the subject line of the email.
59. Iowa Compliance Reporting
60. Kansas Compliance Reporting
60.1. Kansas E-file Headers
|
SCHEDULE A HEADERS
SCHEDULE B HEADERS
SCHEDULE C HEADERS - CANDIDATE
SCHEDULE C HEADERS - PAC OR PARTY COMMITTEE
If Expenditure Amount is over $300.00 then some of the fields below are required
SCHEDULE D HEADERS
|
61. Maine Compliance Reporting
61.1. Types/Subtypes used in Maine State Reporting (LEGACY)
Here are all the types/subtypes supported by the Maine State Report:
Receipt:
TYPE: Contribution
SUBTYPE: Check, Credit Card, Payroll Deduction, Cash, Personal Funds
TYPE: In-kind
SUBTYPE: All Subtypes
TYPE: Loan
SUBTYPE: Received, Forgiveness
TYPE: Operating Expenditure
SUBTYPE: Campaign Property, Campaign Property (Current Value)
Disbursement:
TYPE: Contribution to Committee
SUBTYPE: Federal, State/Local, In-Kind Federal, In-Kind State/Local, Memo
TYPE: Operating Expenditure
SUBTYPE: Payment, Credit Card Payment, Reimbursement, Memo
TYPE: Loan
SUBTYPE: Repayment
TYPE: Debt
SUBTYPE: Owed By the Committee, Repayment
TYPE: Other Disbursement
SUBTYPE: Campaign Property, Campaign Property Donation
62. Massachusetts Compliance Reporting
63. Michigan Compliance Reporting
63.1. Linking Disbursements to Candidates for the PAC report
Michigan Candidate Linking for Schedule 2B
STEP ONE
Create Committee Record with the Candidate in the "Committee Staff" section. Be sure to select Staff Type "Candidate" and supply a date in the "Date Appointed" field.

STEP TWO
Create a disbursement on the Committee Record with TYPE: "Contribution to Committee"; SUBTYPE: "Federal" or "State/Local"

STEP THREE
Check the "Support" or "Oppose" fields as appropriate.
STEP FOUR
Link the Committee Disbursement to the Candidate. This can be done either by adding the appropriate candidate via the "Candidate Information" tab on the Disbursement Edit screen or by creating a new disbursement on the Candidate's Record of TYPE: "Contribution to Committee"; SUBTYPE: "Memo" and linking the Candidate Memo disbursement to the Committee Disbursement.

63.2. Update on the MI Reports, Version 2.1.1.19
The report has been updated also to use a headquarters address for schedule 2A, 2A1 and 2A2 when the address in the company location that is attached to the contributor is empty. This "Empty" status is determined by a blank address line 1 and zip5. The Headquarter flag is used to identify the alternate address that will be used.
It was reported that the committee numbers were not accurate in the electronic filings. This is a problem on the state side that requires that a "Check digit" be added to the committee number when it is created in the file. This digit is the last digit on the committee number that is saved into the Filing Registration ID number field of the committee. For example if your committee number is 000123 then the entry in this field should be 0001231. Notice the "1" at the end. This check digit is supplied by the state. This check digit is also NOT used when the upload is done. So the upload committee ID is only 6 digits long without the check digit.
The field on the screen called "Election Type" must be set correctly for the filing to have the proper election type codes. The screen below shows the fields. The Report schedule is set to "Triannual-July 25, Even Year", and the Election type is "July - Even Year". If you set the two of these in an inconsistent manner you will receive an error from the validator and upload engine of "doc_type_invalid".

63.3. Michigan State Report Schedule 1F - Fund Raiser Schedule
1.) Box 4 of Schedule 1F- Number of Individuals of Attending or Participating is populated by the number of Individuals marked "Confirmed" and linked to the event being reported.
2.) Name and Address box of Schedule 1F, Private Residence is checked when the reporting note "Private Residence Event" is included on the expense record.
63.4. How Do I Resolve a "Camp_ID" Error?
If your MI State Report is triggering an error stating that column 51 (Camp_ID) is required, you can take the following steps to resolve this:
- After the contacts file has been uploaded into the MI system, you'll need to create a 'campaign' for each candidate committee or ballot measure committee that your PAC is giving to. When you do so, the MI system generates a campaign ID. The format of that ID should be something like 12-123456.
- That ID then needs to be entered for each committee on the AI360 side that received a disbursement from your PAC. Specifically, if you go to a committee's profile and expand the User Defined Fields, you'll see a compliance field titled MiTN Campaign ID - that's where you'll need to enter the ID from the MI system into that field.
- Once you've entered that ID for each recipient committee, generate a new draft of the report, and it should begin pulling the camp_id field that was noted in the error messages. This report should then import without any issue.
64. Minnesota Compliance Reporting
65. Mississippi Compliance Reporting
66. Montana Compliance Reporting
67. New Jersey R1 Report
67.1. Completing the R1 Schedule A
This help documentation will show the data entry required to populate all sections of the NJ R1 report Schedule A. See below for screenshots showing where each of these fields is located.
Adding a Transaction
To get a contribution onto Schedule A you'll need to create a new receipt in 360. You can do this by going to File > New Receipt, or you can go to the donor's record and add the receipt from there. The transaction MUST have the below fields set appropriately:
"Type" = "Contribution"
"Subtype" = "Cash", "Check" or "Credit Card"
Contributor Name
This field is populated with whatever record you specify in the "Contributor" field of the receipt.
Contributor Address
These fields are populated with the address saved to the contributor's record in 360.
Employer Name and Occupation
These fields are populated with whatever data you've entered into the "Employer" and "Occupation" fields of the contributor's record in 360.
Employer Address
These fields are populated with the address saved to the EMPLOYER'S record in 360. This information does not come from the contributor's record but the employer's record.
Date(s) Received
This field is populated by the date saved in the "Date" field of the receipt.
Amount(s) Received This Period
This field is populated by the amount saved in the "Amount" field of the receipt.
The "Check If Currency" Box
To mark this box, set the "Subtype" on the receipt to "Cash". To leave this box unmarked, set the "Subtype" to either "Check" or "Credit Card".
68. New Mexico Compliance Reporting
69. New York Compliance Reporting
69.1. Contribution Type ID
What are the Contribution Type ID's for my NY State Report?
The following chart outlines each contribution type ID for the NY State Report, along with a description of each one.
| Contribution Type ID (cntrbn_type_id) | Contribution Type description (cntrbn_type_desc) |
| 1 | Services/Facilities Provided |
| 2 | Property Given |
| 3 | Campaign Expenses Paid |
69.2. Contribution Payment Types
Why is Column AG of my NY report populating a NULL value?
The contents of column AG depend on what is selected as a receipt's payment method, which is usually determined by the receipt's subtype. Subtype/payment method maps to the report on column AF, and if that payment method is Check, then the contents of the receipt's Check # field will then populate column AG.
If a receipt's payment method is anything other than 1, then column AG should pull a NULL value, since Check # wouldn't apply for receipts paid via other means.
The table below lists the various payment methods that can pull to an NY report:
| payment_type_id | payment_type_abbrev | payment_type_desc |
| 1 | CHK | Check |
| 2 | CRC | Credit Card |
| 3 | DC | Debit Card |
| 4 | OP | Online Processor |
| 5 | WT | Wire Transfer |
| 6 | CASH | Cash |
| 7 | OTHER | Other |
70. North Carolina State Report
70.1. Aggregated Contributions from Individuals (CRO-1205)
This help documentation will show the data entry required to populate the Aggregated Contributions from Individuals section of the North Carolina State Report in 360.
The numbered items below are populated using fields in an Individua's Receipt record.
1 - Account Code
2 - Form of Payment
3 - In-Kind Description
4 - Date
5 - Amount
70.2. Contributions from Individuals (CRO-1210)
This help documentation will show the data entry required to populate the Contributions from Individuals section of the North Carolina State Report in 360.
The numbered items below are populated using fields in an Individual's record.
1 - Full Name
2 - Mailing Address and Phone
3 - Job Title/Profession
4 - Account Code
5 - Form of Payment
6 - In Kind Description
7 - Date
8 - Amount
70.3. Contributions from Political Party Committees (CRO-1220)
This help documentation will show the data entry required to populate the Contributions from Individuals section of the North Carolina State Report in 360.
The numbered items below are populated using fields in an Committee's record.
1 - Full Name
2 - Mailing Address and Phone
3 - Account Code
4 - Form of Payment
5 - In Kind Description
6 - Date
7 - Amount
70.4. Contributions from Other Political Committees (CRO-1230)
This help documentation will show the data entry required to populate the Contributions from Other Political Committees section of the North Carolina State Report in 360.
The numbered items below are populated using fields in a Committee's record.
1 - Full Name
2 - Mailing Address and Phone
3 - Type of Committee
4 - Level Registered
5 - Account Code
6 - Form of Payment
7 - In Kind Description
8 - Date
9 - Amount
70.5. Refunds/Reimbursements to the Committee (CRO-1240)
This help documentation will show the data entry required to populate the Contributions from Individuals section of the North Carolina State Report in 360.
The numbered items below are populated using fields in an Entity's record.
1 - Full Name
2 - Mailing Address and Phone
3 - Type of Committee
4 - Level Registered
5 - Account Code
6 - Form of Payment
7 - In Kind Description
8 - Date
9 - Amount
70.6. Disbursements (CRO-1310)
This help documentation will show the data entry required to populate the Disbursements section of the North Carolina State Report in 360.
The numbered items below are populated using fields in an Entity's record.
1 - Type of Disbursement
2 - Full Name
3 - Mailing Address and Phone
4 - Account Code
5 - Form of Payment
6 - Purpose Code
7 - Date
8 - Amount
9 - Required Remarks
70.7. Aggregated Non-Media Expenditures (CRO-1315)
This help documentation will show the data entry required to populate the Aggregated Non-Media Expenditures section of the North Carolina State Report in 360.
The numbered items below are populated using fields in an Entity's record.
1 - Account Code
2 - Form of Payment
3 - Purpose Code
4 - Date
5 - Amount
6 - Required Remarks
71. Ohio Compliance Reporting
72. Oklahoma Compliance Reporting
72.1. How to Enter Oklahoma Contributor/Vendor IDs in 360
- Login to the state server at https://www.ok.gov/ethics/crs/login.php
- Manually add new contributor and vendor records.
- In the Committee Administration section, download a csv of all current contributor and vendor ID #'s.
- Send the csv and your request to Tech Services.
- On the record page of the organization/committee/individual in question, go to the "Custom Fields" tab.
- Under Group, choose "Compliance Fields"
- Under Fields, choose "OK contributor ID"
- Click edit and add the appropriate ID.
73. South Dakota Compliance Reporting
74. Texas State Report
74.1. Schedule A1 - Monetary Political Contributions
This help documentation will show the data entry required to populate all sections on Schedule A of the Texas State Report in 360.
The numbered items below are populated using fields on the Individual's record.
1 - Date
2 - Full Name of Contributor
3 - Contributor Address
4 - Amount of Contribution
5 - Principal occupation / Job title
6 - Employer
74.2. Schedule C1 - Monetary Contributions From Corporation or Labor Organization
This help documentation will show the data entry required to populate all sections on Schedule C1 of the Texas State Report in 360.
The numbered items below are populated using fields on the Entity's record.
1 - Date
2 - Corportation / Labor Organization Name
3 - Corportation / Labor Organization Address
4 - Amount of Contribution
74.3. Schedule F1: Political Expenditures Made From Political Contributions
This help documentation will show the data entry required to populate all sections on Schedule F1 of the Texas State Report in 360.
The numbered items below are populated using fields on the Entity's record.
1 - Date
2 - Payee Name
3 - Amount
4 - Payee Address
5 - Category
74.4. Schedule I - Non-Political Expenditures Made From Political Contributions
This help documentation will show the data entry required to populate all sections on Schedule I of the Texas State Report in 360.
The numbered items below are populated using fields on the Entity's record.
1 - Date
2 - Payee Name
3 - Amount
4 - Payee Address
5 - Category
6 - Description
75. Texas Compliance Reporting
75.1. Enter International Addresses
When it comes to International Addresses Texas has a specific format they require for entry. Place the city and state in the CITY data field. I.E. ON NGZ 2
Then, in that type "ZZ" and in zip type "99999". This will solve any errors with international addresses.
76. Utah Compliance Reporting
77. Virginia Compliance Reporting
78. Wisconsin Compliance Reporting
78.1. Why Do Refunded/Returned Contributions Pull to Schedule 3-E on My Report's PDF Instead of Schedule 2-A?
Why Do Refunded/Returned Contributions Pull to Schedule 3-E on My Report's PDF Instead of Schedule 2-A?
Refunded/returned contributions will pull to 2-A when entered into the state's system. The reason why they pull to 3-E on the PDF version of our report (and don't affect totals) is because WI doesn't provide any coding for them on the electronic version of the report. This is why the state requires that they be manually entered into their system. As such, 3-E is used so that users will be able to identify that there are transactions that will need to be manually entered. If the refunds didn't appear anywhere on the PDF, there is a chance that these types of transactions may get missed by some users.
Other Notes on the WI State Report:
- The electronic version of the report is actually just comprised of lists of transactions that get uploaded into the state's system, so it doesn't include totals like the PDF cover page does.
- As long as all your all your other transactions pull to the report and import into the state system properly, and the refunds are entered as well, your report totals should be good to go. The state's system will do all of those calculations once all of your data is entered, and also provide a PDF version for your final review before submitting.
78.2. How Do I Get Receipts to Pull to the Conduit File Report?
How Do I Get Receipts to Pull to the Conduit File Report?
In order to get a receipt entry to pull to this section of the WI State Report, its type and subtype will need to be set to Earmarked (Conduit) and Memo respectively. Selecting those options will get the entry to pull to that part of the report.
Note: while that type/subtype are all that is required for the entry to pull to that part of the report, please be aware that some fields pull from a parent transaction. If there are any fields that appear blank, then you may need to link the memo to a parent transaction.
79. Reporting - Custom/QRT Reports
79.1. Custom Reports
Queries are customized system reports. The Query Report Tool extends the options available in the REPORTING menu. Your sales representative facilitates the creation of custom queries as they would incur a cost to program. Examples of queries include: eligibility statistics for PACs, a custom call sheet for campaigns, or payroll information for an association.
Committee Duplicate Check Report: This QRT Report inspects the dataset for duplicate Committee records. Records are matched based on data in the Name, Address line 1, and the Zip (5 digit zip code) fields. The output of this report returns the committee name, address 1, address 2, city, and state. There are no parameters to set for this report; instead, it surveys the entire list of Committee Records in the dataset. The report cannot distinguish whether or not the data stored is, in fact, Committee data; it includes all data applied to a Committee record. If no duplicates are found, the resulting spreadsheet is empty
Company Duplicate Check Report: This QRT Report inspects the dataset for duplicate companies (Organization Records). Records are compared based on company / organization Name, Address line 1, and the Zip (5 digit zip code) fields. There are no parameters to set for this report as it surveys the entire list of Companies/Organization records in the dataset. The report cannot distinguish whether or not the data stored is, in fact, Company/Organization data; it includes all data applied to an Organization record. If no duplicates are found, the resulting spreadsheet is empty.
FEC Check Disbursement Report: This QRT report summarizes disbursements by Entity Type, Transaction Type, Transaction Subtype, Election Period, and Election Year fields for a specified period, and returns this information in a spreadsheet report. It is a useful tool for quickly identifying errors related to type/subtype, election, election period, or entity type data entry errors. The only parameter to set is the date range for the report. If the report finds no disbursements within the range of dates, the spreadsheet will be empty.
FEC Check Receipt Report: This QRT report summarizes receipts by Entity Type, Transaction Type, Transaction Subtype, Election Period, and Election Year fields for a specified period, and then returns this information in a spreadsheet report. It is a useful tool for quickly identifying errors related to type/subtype, election, election period, or entity type data entry errors. The only parameter to set is the date range for the report. If the report finds no receipts within the range of dates, the spreadsheet will be empty.
FEC Report Employer and Occupation Check Report: This QRT report itemizes those individuals who will be listed on an FEC filing and who are missing data points required by the FEC; specifically missing Employer and/or Occupation field information located on the Details panel of the Individual Record. It is a useful tool for quickly identifying errors in data entry that could cause a compliance report to fail validation. Before running the report, set the date range to match the date range of your compliance report you plan to file, and then enter the year of the election. If there are no individuals missing an employer or occupation, the resulting spreadsheet will be blank.
Individual Duplicate Check Report: This QRT report inspects the database for duplicate individuals. Individual Records are matched based on first name, last name, suffix, address line 1, the 5-digit zip code, and address type (home, work, mail, etc.). The output of this report returns a list of individuals with 2 or more records in the dataset based on the match criteria. The spreadsheet lists the first name, last name, suffix, address 1 entry, 5-digit zip, type of address matched (home, work, mail, etc.), and number of instances in the dataset. If there are no duplicates based on these criteria, the resulting spreadsheet will be empty.
79.2. Link All Transactions in a Batch QRT
To use the "Link All Transactions in a Batch" QRT you'll want to follow the instructions outlined below.
Go to Reporting > Custom Report List (QRTs)
Find the "Link All Transactions in a Batch" QRT and click the corresponding load icon just to the left of the QRT name
Select your conduit batch and indicate what transactions you want linked together (all receipts or all disbursements)
Run the report
These transactions will now all be linked. Please contact support@aristotle.com to add the "Link All Transactions in a Batch" QRT to your database if you do not already have it.
79.3. Election Period Update by Batch
This report allows the user to update the election period (any future period enabled in the database or prior periods within the past 3 years) for receipts or disbursements that are contained within a batch created within the last year.
For this report, there are four parameters:
- Report Type: Select which type of transaction you want to update the period for - either disbursements or receipts.
- Election Period: Select which period you want to apply.
- Receipt Batch: If you selected receipts for the report type, select the batch that contains the receipts you want to update.
- Disbursement Batch: Similar to the option above, ff you selected disbursements for the report type, select the batch that contains the disbursements you want to update.
Note: if you make a selection for both receipt batch and disbursement batch, the report will only apply the selected period to the transaction type selected in the first parameter. This report cannot mass update both receipts and disbursements at the same time. If you have a batch that includes transactions of both types, you'll need to run the report twice in order to apply the update to every transaction.
80. Bank Accounts / Accounting
80.1. Creating a Batch
- Go to File > Batches. This will bring you to the batches page. Here you will see all of the batches from the past month. To select an existing batch select it from the list.
- Click on the New Batch button to create a new batch.
- Enter the information for the batch in the Record Edit: Batch page.
- Select Save to save the batch
You have now created a batch. To attached transactions to the batch, open the transaction and select the Batch drop-down bar and select the batch.
80.2. Creating a New Filing Committee
To create a filing committee, Go to Settings > Filing Committees. Click on the Add New Filing Committee link on the right-hand side of the page.
80.3. Creating a Bank Account
To add a new bank account, go to Settings > Filing Committees. Chose the committee and click on Bank Accounts. Click on the "Add Account" button and enter the information about the new bank account. Enter the name of the bank or financial institution that issued the account in the Bank Name field. Enter the date that the account was established in the Open Date field. Enter the assigned account number in the Account Number field. The Running: field defaults with the message "Need to set Reconcile Start
Date". This field and the Reconciled: field will be updated when you perform the Edit Starting Balance in a few more steps. Enter the full contact address for the bank or financial institution in the address fields. Click the drop-down arrow of the Account Type field to select the type of account. The default type is Checking. Enter the name of the bank or financial institution representative in the Contact Person field. Use the Organization field to specify a parent organization for this account.
80.4. Selecting Filing Committee
You can have one or more filing committees in a dataset. You set up the info for the filing committee on the Filing Committees page by going to Settings > Filing Committees. Select the filing committee you wish to reveiw or edit by clicking on the magnifying glass next to the name of the filing committee.
80.5. About Filing Committees
A Filing Committee is just a Committee record with a special designation. You can even view the same record on the committee page that you see on the filing committee page. You will not have as many options, and things like bank accounts, bank reports, and linked orgs are not available on the basic committee page.
80.6. Filing Committee Basic Information
You will fill in the Basic Information with the same type of info that appears on your compliance report's cover page. Select the committee type, add a reg ID, and fill in the contact information. When done you need to click save at the top of the page to commit the information you have entered.
80.7. Bank Accounts
You can create multiple bank accounts for your filing committee. These are filing committee specific and multiple filing committees can not share a single bank account.
To add a new account, go to Settings > Filing Committees. Chose the committee and click on Bank Accounts. Click on the "Add Account" button and enter the information about the new bank account. Then click save changes and you will have created the new account.
When creating transactions, you will choose which bank account to assign the transaction to. Each transaction can only be assigned one bank account.
80.8. Types of Bank Accounts
Bank Accounts can represent physical accounts in a bank or they can also represent logical caches of money that you want to keep seperate from other monies. An example of this would be Levin funds, which you need to report seperately from other hard monies.
80.9. Bank Account Reports
The reports found on the filing committee page are reports that relate to the bank accounts associated with the filing committee.
There are 4 reports, they are:
- Bank Reconciliation
- Outstanding Receipts
- Outstanding Checks
- Disbursements
To run these reports, select the report you would like to run, enter the date range of the transactions, and choose the bank account you wish to filter on. You can select multiple bank accounts by ctrl+clicking multiple selections.
80.10. Reconciliation Report
The reconcilliation report shows cleared and uncleared transactions line by line so that you can evaluate the reconciled status of your data. This report information is driven by the data entry performed in the Reconcile panel of the Account page.
When running the report you will need to add the beginning bank balance and other adjustments, click recalculate, then click create report.
The report is a PDF
80.11. Outstanding Checks Report
The outstanding checks report will show you checks that have been posted but have not yet been marked reconciled on the Account page's Reconcile panel.
Only disbursments that have a check number will pull to this report.
80.12. Disbursements Report
The Disbursments report is a check register that will show you all the checks written in a date range, regardless of whether they have been marked reconciled on the Account page.
80.13. Outstanding Receipts Report
The Outstanding Receipts report will show you all the receipts you have entered into the selected bank accounts that have not yet been marked reconciled on the Account page's Reconcile panel.
80.14. Saving Committee Staff and Relationship Links
A linked record will not save until you save the filing committee record using the save button at the top of the page. Even though you see the new linked record in the panel, it will not commit until the save is processed.
80.15. Viewing Committee Staff and Relationship Links
Sometimes after saving a Committee Staff or Relationship Link you will not see the record you just linked in the repective panel. If this occurs DO NOT try adding the link again. Simply refresh the page in your browser using the refresh button (or F5) and you will see the linked record.
80.16. Using the Disbursement Budgeting Feature
Many times you have candidates or PAC disbursements for which you want to keep a budget. In other words, you want to keep track of the amount of money allocated to a PAC or Candidate, until it reaches a specified limit.
The Disbursement Budgeting feature allows you to keep a budget for the candidates (legislators) and PACs in your Aristotle 360 dataset. You see all contributions made to a legislator as well as the committees which he or she is associated as a Legislator or
Candidate Staff type.
Accessing the Disbursement Budgeting feature:
The Disbursement Budgeting feature is accessed by going to Settings > Disbursement Budgeting.
The Disbursement Budgeting Page:
The top portion of the Disbursement Budgeting page is where you can create, edit, or delete budget items. You see already created budgets, with name (of the legislator/candidate or PAC), amount budgeted to that committee or legislator, the starting and ending date of the budget, any notes on the budget, the balance of the budget to date, the period in which the budget exists, the category of budget, and whether the budget is active or inactive. You can edit the budget via the Edit link, or delete a budget item by clicking the
Delete icon.
You can page through multiples of 10 budget items (shown per page) using the Navigation tool located at the bottom of the budget list.
80.17. Creating a New Disbursement Budget
You can create a new disbursement budget at any time. You will specify the budget period, which indicates the timeframe to track financials for the chosen candidate or PAC.
1. Go to Settings > Disbursement Budgeting, click the Create New Entry button.
2. The Create New Budget Item window appears. Begin typing in the Legislator or PAC field and 360 begins searching for a match.
Note: When looking for a Legislator, enter either the first or last name, but not both. When looking for a PAC, start with the beginning of the committee name. Once the item you are searching for appears, click to select it.
3. Enter the budgeted amount in the Amount field.
4. Enter the date to begin tracking disbursements in the Start Date field.
5. Enter the date to end tracking disbursements in the End Date field.
6. Click the drop-down arrow to choose a category for the Category field. The category options are a way for you to organize your budgets, and are specific to this Disbursement Budgeting feature.
7. Click the drop-down arrow on the Period field to select the appropriate associated election or filing period.
8. The default for the Status field is Active. When want to make this budget item inactive and no longer tracked, edit the item and change the status to Inactive.
9. Use the Notes field to enter any description about this budget item. The first few characters of the Notes field display on the budget item list.
10. Click Save.
11. The Disbursement Budgeting page redisplays with your new budget item listed.
80.18. Viewing Budgeting Disbursements
Periodically you will want to review the disbursements contributing to your budget
balance. The All Budgeted Disbursements area, located at the bottom on the
Disbursement Budgeting page, is the display area for your associated disbursements.
Disbursements displayed here are those that are transactions to either the legislator or
his or her candidate committee (this is specified in the Committee record by assigning
the candidate as a Candidate Staff type on the Staff Panel) or the PAC.
Steps to View Disbursement Budgeting Disbursements
1. Go to Settings > Disbursement Budgeting. Note: you can press and hold the Ctrl key to select several budget items. You may need to use the Navigation tool to navigate through pages if you have many budget items (the lower right hand corner contains a page count). Remember to press and hold the Ctrl key to select items over several pages; otherwise, if you then just click to select an item, you lose your previous selections.
2. Click the Filter button located in the All Disbursement Budgeted Disbursements area.
3. Disbursements associated with your selected budget items display. Note: To return to viewing all budgeted disbursements, click the Display All button.
80.19. Exporting Disbursement Budgeting Data
You have the option to export all or part of your budgeted items into an Excel spreadsheet. You must have a licensed copy of Microsoft Excel® on your computer in order to view the report.
1. Go to Settings > Disbursement Budgeting, click or Ctrl + click to select budget items from the Disbursement Budgeting list that you want to display in your report.
2. Click the Export button located at the bottom right of the page.
3. When the report is ready, the Click here to download your file message appears on the bottom left of the page. Click the here link.
4. Excel opens and a spreadsheet displays all of the selected budget information, as well as the budgeted disbursements for those budget items.
80.20. Printing Checks
There are a few different methods to print checks from Aristotle 360 - the best one to use largely depends on how many you want to print.
For multiple checks, follow these steps:
- Go to Compliance > Filing Committees
- Click on the View icon or name of the proper committee (if you have more than one in your database).
- Click on the Bank Accounts section to expand it.
- Select the bank account from which you want to print checks.
- The Account Edit page appears. Click the Check Printing Panel Pane.
- Click on the Check Printing section. Search for the checks that you will want to print by either:
- Specifying a date range in the Date between fields
- Selecting a batch from the Batch drop-down.
- Click Search Transactions.
- A list of transactions that meet your search criteria will appear. Select checks for printing by clicking the checkbox in the Check column.
- Enter the starting check number as you want it to appear on the first check in the Start Check No. field. Note: If more than one check is selected, the check number will increase sequentially
- Click the drop-down arrow to select the check template for your checks. If you're not certain which one to use, we recommend starting by printing onto regular printer paper and comparing to your check stock to see which one lines up best.
- Check the desired options from the Select Fields To print section.
- Click the Create Checks button. This creates the file for printing.
- Click either the Create & Post Checks or Create Checks button. The latter will only give you a download link for the checks, while the former will also fill in the Posted Date field on the selection transactions. If you choose to use the Create Checks button, you can always come back and use the Post button if you want to fill in that field later.
For printing single checks, you can take these steps:
- Using any search method, navigate to the transaction you want to print a check for. You can either search for the record that the transaction is attributed to and navigate to its profile, or you can just search for the transaction itself.
- Open the transaction, and scroll to the bottom. You'll find the Print Check section.
- Once you expand the Print Check system, you can follow steps 9 through 13 above. The only difference here is that the file you are provided with will only include this specific transaction.
80.21. Bank Reconciliation Guide
- Obtain the bank statement you will be using to reconcile this account with.
- Fill out all pertinent information in your bank account's screen (I.E. address, contact person, etc...)
- Click on edit starting balance :
- Place a date/amount into the running balance field. *NOTE* the running balance field will subsequently populate the Balance Date on the account page. They share the same value. This will be the date and amount from the bank statement you are using to calculate the running balance total on the account page. *NOTE* this allows you to control the financial information being taken into account with the running balance, I.E. you may have missing historical data that will end up throwing your numbers off and you can choose a good place to start. The running total will take all of the following into account for a given transaction:
- That is entered into that bank account
- Falls between the running start date and the current date
- Regardless of reconcile status (for this balance it does not matter if the transaction has been reconciled or not)
- Place a date/amount into the reconciled balance field. The reconciled amount that displays on the main account page is identical to the running balance total, except that it takes into account only the transactions that have been marked as reconciled in the system. *NOTE* if a starting balance or starting date is not entered into the system, the reconciliation will not be able to derive an accurate running/reconciled balance.
- Place a date/amount into the running balance field. *NOTE* the running balance field will subsequently populate the Balance Date on the account page. They share the same value. This will be the date and amount from the bank statement you are using to calculate the running balance total on the account page. *NOTE* this allows you to control the financial information being taken into account with the running balance, I.E. you may have missing historical data that will end up throwing your numbers off and you can choose a good place to start. The running total will take all of the following into account for a given transaction:
- Click View to confirm the details of that transaction
- Click on the check box under R to confirm you have selected that transaction *Note* you can click on Select All or Unselect All to speed the process of choosing which transactions to reconcile.
- The Amount column shows disbursements/negative amounts in parentheses ( ) and receipt/positive amounts regularly.
- Bank Reconciliation Presents your bank reconciliation information in an easy to read PDF format
- Outstanding Receipts Will show you any un-reconciled receipts in the system
- Outstanding Checks Will show you any outstanding checks in the system
- Disbursements Will show you any outstanding disbursements in the system
81. Bank Accounts / Accounting - Checks
81.1. Adding Account and Routing Number to Two-Part-Bottom Check Templates
The 2 Part Bottom check template allows you to put your account and routing number on a check printed in Ai360. To do this you will put his information in the Account Number field on the Account Details section of a Bank Account (found under Filing Committees). Use the following format to print this information, "A1234A" for the account number and "C56789C" for the routing number. The "A" and "C" simply bring in the characters you normally see on a check around your account and routing numbers. If you do not have one or any of these symbols the information will still print to the check, but it might not be clear to the bank which is which if at least one of the numbers isn't distinguished.
82. Administration
82.1. Creating a New Filing Committee
To create a filing committee, Go to Settings > Filing Committees. Click on the Add New Filing Committee link on the right-hand side of the page.
82.2. Selecting Filing Committee
You can have one or more filing committees in a dataset. You set up the info for the filing committee on the Filing Committees page by going to Settings > Filing Committees. Select the filing committee you wish to reveiw or edit by clicking on the magnifying glass next to the name of the filing committee.
82.3. Account Settings
The "Account Settings" page is where information about your organization is stored. Go to Settings > My Account Settings to access this information.
- Basic Settings - Your organization's contact information should be recorded here.
- Address Information - Your organization's address should be recorded here.
- Email Information
- Unsubscribe Message - Set the message that people will see when they unsubscribe from your lists
- Re-Subscribe Message - Set the message that people will see when they re-subscribe to your lists
- Default Header Image - Pick the graphic that people will see on your external interface pages
82.4. My User Settings
Information regarding you and your Aristotle 360 user account are stored on the "My User Settings" page. Go to Settings > My User Settings to access your settings.
- Basic Information - Your contact information, password, and landing page can be changed.
- Linked Individual - A individual record with your information can be linked to your Aristotle 360 user account.
- Permission Groups - You can see your individual access permissions.
- Preferences - Your Aristotle 360 preferences can be changed here.
- Hotkeys - Aristotle 360's hotkeys can be enabled or disabled.
82.5. Add/Edit Users
The "Add/Edit Users" page is under the settings tab. If you have the appropriate permissions, the page allows you to:
- Search existing user accounts - Enter search terms in the search box, or group records by double clicking on a field name
- Modify existing user accounts - Click on an existing user account and edit the appropriate fields
- Create new user accounts - Click on the "Add New User" button and fill in the necessary fields
82.6. User Permissions
If you have sufficient permissions, you can modify the permissions of other users by going to Settings > User Permissions.
The permissions model in Aristotle 360 is based upon permission groups.
Each group has a modifiable list of permissions. User accounts that are linked to a group receive all the permissions associated with that specific group, and you can add or remove user accounts from groups as needed. If no existing group satisfies your list of desired permissions, you can create a new group that has the desired permissions and add users into that new group.
82.7. Edit Record Groups
Individual, Committee, Organization, and Legislators can be associated with groups. To access group management go to Settings > Add/Edit Groups. Here you can:
- Create and delete a Group Category, and edit the name of an existing Group Category.
- Create and delete a Group, edit the name of an existing Group, and change the Group Category that a Group belongs to.
82.8. Edit Election Periods
If you want to modify tracked Election Periods in Aristotle 360, go to Settings > Add/Edit Election Periods.
On the Add/Edit Election Periods page, you can add and delete election periods, in addition to changing the year, receipt limit, disbursement limit, name associated with each election period and set the period as the default throughout the product.
82.9. Edit Transaction Limits
Transaction limits are associated with a specific election and have certain default amounts.
How to Modify Limits
You can modify your database's limits by taking the following steps:
- Go to Settings > Add/Edit Election Periods.
- Click Edit Period Limits for the period you want to make adjustments to.
- Click Modify Limit for the record type you want the limit to apply to, enter the desired amount(s), and then click Update.
- Different record types can have different transaction limits, so you'll need to be aware of which type is being selected on a record's profile. For example, a Candidate Committee and an Political Party Committee may not be subject to the same limits, so you'll need to be sure to select the proper type on a record's profile to make sure the right limit is applied to that record.
- Alternatively, you can apply edits to multiple record types at once by checking off all of the desired record types, entering the desire amount(s) into the Reset fields at the bottom, and then clicking Reset Limits. Note that you can select all record types by checking the box to the left of "Entity" in the upper left hand corner.
Import Notes About Limits
- Transaction limits are automatically set to a default amount when a database is first created, so it may need to be edited based on your committee's requirements. If your committee doesn't have transaction limits for a certain record type, you can simply set it to a high amount.
- Limits are also set for specific record types, so make sure you're aware of your records' types when setting up your limits.
- Be aware that since committee/organization records have more specific committee/organization record types selected on their profiles, limits can affect certain records in different ways, i.e. a limit may not affect Committee A while it will affect Committee B because they don't have their committee type set to the same option.
- Once limits are set for a period, you should begin to get transaction limit warning messages when saving transactions that would push that particular record over the limit for the selected election period.
- Since limits are set for each election period, once you start using a new one, you'll have to set the limits for it (newly created periods will have its transaction limits set to the default amount).
82.10. Global Transaction Defaults
Global Transaction Defaults allow you to increase data-entry accuracy by configuring the initial values set on your new transactions. (Note: These settings are independent of your transaction defaults set on Batch data-entry)
82.11. Edit Receipt Sources
Go to Settings > Add/Edit Receipt Sources to add new receipt sources, edit the name of existing receipt sources, and delete existing receipt sources.
82.12. User-Defined / Custom Fields
Occasionally, you may want to systematically enter data that Aristotle 360 does not currently have fields for. If desired, you can create custom fields by going to Settings > User-Defined Fields.
1. Beginning on the User-Defined Fields page, create a field group by typing a name in the Add New Group field, then click the Add New Group button. For this example, you create a field group called Volunteers.
2. Click Select on the group you just added.
3. Type the name of a field in the Add New Field field, then click the Add New Field button. This will be the name of the fields that displays, so be sure your name is descriptive of what should be entered into it. For this example, you create the fields Daytime, Nighttime, Weekend, and Anytime.
4. Continue to add fields as necessary.
5. Open an Individual Record of a person to whom you wish to assign the User Defined Fields group. Expand the Custom Fields panel.
6. Scroll to the Custom Fields area at the bottom of the panel and click the Add New Group button.
7. The Select a user defined group to add window appears. You can select from a list of groups you have already created. For this example, click to select your Volunteers group.
8. Your user defined fields appear. Click the Save button on the Options Bar to save your changes.
You can now enter data for your user defined fields. Use the inputs "Yes" or "No", or "True" or "False" to indicate a status for a given field, although you are not restricted to this. Since these are text entry fields, be sure to be consistent with the data you input into these fields.
82.13. About Filing Committees
A Filing Committee is just a Committee record with a special designation. You can even view the same record on the committee page that you see on the filing committee page. You will not have as many options, and things like bank accounts, bank reports, and linked orgs are not available on the basic committee page.
82.14. Disbursement Budgeting
You can partially control the outflux of money from your campaign by going to Settings > Disbursement Budgeting.
On this page, you can create new buget items by clicking on the "Create New Budget Item" link and filling in the desired fields.
82.15. Check Status Settings
Placeholder
82.16. Email Template Editor
When you use the Mass Email Wizard, you have the option of importing a template when creating the content of your email. If you just want to edit templates without sending an e-mail, go to the main menu bar, go to Settings > Template Editor. You can either click on an existing template or "Add New Template" button to bring up the Template Editor.
The specific help for the editor is available here: http://docs.fckeditor.net/FCKeditor_2.x/Users_Guide.
82.17. Email Subscription Manager
Many times while sending out mass e-mails, a few of the recipients will wish to stop receiving further e-mails. By default, e-mails sent with the Mass Email Wizard have a link at the bottom, which the recipient can click to unsubscribe from further mailings. The link will direct them to another web page. The message on the web page will be what is under your Settings / Account Settings / Email Information / Unsubscribe Message box.
You can see a list of the unsubscribed people by going to Settings > Unsubscribe Manager. The unsubscribed e-mails will be listed, along with the day the email was unsubscribed.
If someone was unsubscribed accidentally, or someone wishes to resubscribe to the emailing list, you can resubscribe them by going to the Unsubscribe Manager and clicking in the subscribe column for that e-mail address. You will be prompted to send a resubscription e-mail with a special link, so do not change the existing text in blue. Once the recipient clicks on the link, they'll be linked to another web page. The message on the web page will be what is under your Settings > Account Settings / Email Information / Re-Subscribe Message box.
83. Groups
83.1. About Groups
Groups Categories and Groups are intended to keep track of regularly used lists/groups of individuals. It is not designed to carry a large volume of information because of its utility in highlighting key data. A Group can prevent you from having to do a routine search for the same individuals over and over; for example by including people with similar payroll deductions, large donors, or local/regional leaders. Groups are easily accessible on the home page and provide quick access to select records. They are also exportable to Excel type formats and PDF (displaying the first name, last name, home phone, gender, marital status, party, ethnicity and occupation).
Note: Group Category and Group counts are turned off by default. If you would like the counts turned on, please contact Technical Support to have that function enabled. You can go to Help - Ask a Question, email support@aristotle.com or call 899-212-9600.
83.2. Creating Groups
It is a good practice to develop a relationship structure before you start setting up groups and categories. Create a basic structure and then ensure that new categories and groups are added following that structure. Planning ahead will save you maintenance time down the road.
To create a Group and Group Categories, go to Settings > Add/Edit Groups. You can also edit or delete existing Groups and Group Categories.
83.3. Creating a Group from an Individual Record
Beginning in an Individual record, select the Groups Panel Pane. The Groups Panel Pane expands. Any existing groups associated with that individual record are listed. Groups created earlier can be selected by Category and Group name using the two drop down menus. Click the Add to Group button to create a new Group. The Group Add window appears. Select a Category by clicking the drop-down arrow on the Category: field. Select a Category from the list. Click the New button beside the Group: field. The Group Add window redisplays without the drop-down arrow and New button for the Group: field. Enter the new Group name in the Group: field. Click the Save button. The Groups Panel Pane redisplays with the new Group listed for the individual.
83.4. Adding New Members to the Group
In an Individual Record, click on the Manage Group Memberships link on the right of the screen. The Group Detail window displays. View current members by clicking the Show Members button. To add members to this Group, Type the last name of the person you would like to add in the Criteria field. A list of names appears that contains whatever name you entered. The selected name appears in the Show Members list box. Continue searching for and adding members to the Group list, and then click Save.
83.5. Assigning a List to a Group
1. List View also affords you the ability to assign multiple records to a group in one operation. To assign records to a group, first select to check all the records you want assigned in the Search Results window.
2. Then, click the Add Results to Existing Group link on the List Function Menu to open the Add to Group panel underneath the list.
3. Select the appropriate group and category from the drop-down menus, or create a new group by clicking the New buttons.
4. Then, click the Save button. Aristotle 360 adds the selected records on your list to the Group and Category you selected.
83.6. Using Group Management
The Group Management page allows you to add, edit, and delete groups and group categories to meet your needs. Use this page to establish, edit, and remove Groups and Categories from the system. You use searches and Quick Entry to add individuals to the
Groups and Categories.
Steps to Edit Group or Category Information
1. Begin by going to Settings > Add/Edit Groups.
2. The Group Management page appears. Click the Edit button next to the Group or Category you want to change.
3. The Group Management page refreshes with the Group or Category highlighted. For a Group, you can edit the name or click the drop-down arrow to change the Category it is associated with. For a Category, you can edit the Category name.
4. Click Save to save your changes.
Deleting Groups or Categories - Be aware that deleting a Group or Category will affect all records associated with that group. First be sure that you or others in your organization no longer use that group for communications or other tasks. Also, note that you can only delete a Category if it has no groups associated with it. You must either un-associate the category from the group, or delete the Groups associated with a Category before you can delete that Category. To delete a Group or Category, select the Delete button next to the item you want to delete.
83.7. When to Use Groups vs. Notes
Groups - Categories and Groups are intended to keep track of regularly used lists/groups of individuals. It is not designed to carry a large volume of information because of its utility in highlighting key data. A Group can prevent you from having to do a routine search for the same individuals over and over; for example by including people with similar payroll deductions, large donors, or local/regional leaders.
Groups are easily accessible on the home page and provide quick access to select records. They are also exportable to Excel type formats and PDF (displaying the first name, last name, home phone, gender, marital status, party, ethnicity and occupation).
Notes - Notes have definable fields (category, subcategory subject, date) that can be viewed without opening the individual Note details window. Within the Note details widow, the user can populate the note text with advanced record keeping and internal
organizations/clarification.
Notes are an excellent place for archival record keeping, including member communication. Notes also appear in the system report, titled "Briefing Book." It's easy to add multiple people to a single/multiple note through the linking feature (i.e. four people meeting with the same legislator). Essentially, more information can be stored at the individual level utilizing notes. There are a few of your existing categories that may be better stored as notes including: member invoices, Christmas cards, letters.
83.8. Assigning to Groups Using Webform Builder
Is there a way to have Supporters enter their own information(for volunteering, newletters, etc) and have it directly import into 360?
YES! There is a simple tool that would allow you to have people sign up to Groups in Aristotle 360. You can create the web form with the Web Form Builder (Under File).
84. Fundraising/Advocate Administration
84.1. Fundraising/Advocate Administration
Fundraising/Advocate Administration
The Advocate Management/Administration page allows you to view all enabled advocates within your database. Advocates in your dataset are your fundraisers for your campaign. Here you can add fundraisers, set goals, and view goal progress. You can even assign your fundraisers (your advocates) a private URL they can use to track their progress and have it automatically update in 360.
To use this:
-Go to Settings > Advocate Administration
-Click on a row to open the properties of each fundraiser. Here you can set goals and see the amount raised so far by each advocate.
85. Fundraiser/Bundler Management
85.1. Fundraiser and Bundler Management
For those of you who use a network of fundraisers to raise and collect contributions for your cause, the Fundraising feature is a true benefit to you. This feature allows you to designate your fundraisers, and their team of fundraisers, with the purpose of tracking their fundraising efforts against their goals.
Fundraisers can manage their own targets from a unique website that can be branded with your organization's logo. They can access this website without needing access to your Aristotle 360 dataset. Contact your Account Manager to discuss your branding options for this feature.
You can generate the Fundraising system reports to view and monitor your fundraising team's efforts anytime you need to.
Designating Fundraisers in Your Dataset
Since you designate the fundraising feature on the person's Individual Record, you first need to create Individual Records for all of your fundraisers. Also, you need to belong to a User Permissions group that allows you to enable the Fundraising Feature and to run the Fundraising Reports. Contact your dataset administrator to ensure you have these permissions associated with your login ID.
Steps to Designate a Fundraiser
1. Use Quick Search to locate and open the Individual Record of the person you want to designate as a fundraiser.
2. The Individual Record displays. In the Fundraiser Functions area of the right navigation panel, click the Enable Fundraiser Functions button.
3. The Fundraiser Functions fields display. The system automatically assigns a Fundraiser ID and displays it in the Fundraiser ID field. The system also automatically assigns a password, and displays it in the Fundraiser Passcode field. You can change the password, but you cannot modify the ID.
4. Enter a current fundraising goal for this fundraiser in the Current Goal field. You can leave this field blank and have the fundraiser enter this amount later.
5. Click the Update Bundler Settings button.
6. A dialog box appears confirming the settings have been saved. Click OK.
7. The Fundraiser Control Panel URL is a link to a website that allows the fundraiser to log in and manage their password, adjust their goal, and view their fundraising efforts. Click the View URL in New Window link to test the login ID and password.
8. A new browser window opens to your Fundraiser Control site. This fundraiser's ID should be populated into the Fundraiser ID field. Enter this fundraiser's passcode into the Passcode field, and then click Login.
9. The Fundraiser Control Panel page appears. On this site the fundraiser can modify their personal goal, as well as see an update on donations received through their network. Close this window and return to the Individual Record in Aristotle 360.
10. You now need to provide the URL link to the fundraiser. You can either:
- Right-click the link in the Fundraiser Control Panel URL: field and select Copy, and then create a new email and paste the link into the body of the email
- Click the Send URL to Primary Email link, which should open your default email program to a new message with the link copied into the body
Remember to also include the password and fundraiser's ID so they can log into the Fundraiser Control Panel site.
Creating Child Donors
You have the ability to create a fundraising structure where Parent fundraisers have one or more Child fundraisers associated with them. The totals of the contributions of the Child fundraisers adds to the goal totals of their Parent fundraiser. For example, Betsy Abel has two fundraisers, Jane and Janeen, that help collect contributions for her. Jane and Janeen collect contributions that count toward their personal goals. In addition, the money that Jane and Janeen collect count toward Betsy's personal goal.
Steps to Designate a Child Donor
1. Use Quick Search to locate and open the Individual Record of the person you want to designate as a fundraiser.
2. The Individual Record displays. In the Fundraiser Functions area of the right navigation panel, click the Enable Fundraiser Functions button.
3. The Fundraiser Functions fields display. If appropriate, change the password and enter the personal goal for this fundraiser.
4. Search for the Parent fundraiser to connect this Child fundraiser by clicking the Search icon.
5. A list of current designated fundraisers appear in the Fundraiser Search window. Locate and then double-click on the Parent fundraiser's name.
6. The fundraiser's ID appears in the Parent Fundraiser ID field. NOTE: if at a later time you wish to make this fundraiser a Parent, delete the ID from this field and save. Click the Update Bundler Settings button.
Assigning Contributions to a Fundraiser
You assign contributions to your fundraisers during data entry. When creating a receipt, click the Search icon on the Fundraiser ID field to locate and select the Fundraiser for that contribution. The Fundraiser's ID and name appear on the receipt record.
Managing Fundraisers
Someone in your organization will likely be in charge of managing the fundraising network and providing status reports to other staff. There is the Fundraiser Administration tool for managing fundraiser profiles, and the Fundraising Reports to view financials.
Steps to Use the Fundraiser Administration Tool
1. From anywhere in the system select the FUNDRAISING > Fundraiser Administration menu path.
2. The Fundraiser Management page appears. A list of current designated Parent Fundraisers appear.
3. Click the plus symbol next to the Parent fundraiser to expand the list of Child Fundraisers associated with that person.
4. Select the name of the fundraiser to open the Update Fundraiser Information window.
5. The Update Fundraiser Information appears. Make any changes, and then click the Update Bundler Settings button.
Fundraising Reports
There are several system reports that you can use to monitor your fundraising efforts. These reports are located on the REPORTING menu under the Fundraising category.
86. Super Voter
86.1. Super Voter
Super Voter is an Aristotle 360 exclusive feature that allows you to cross-reference Aristotle's voter history data, the most extensive and accurate enhanced nation-wide voter file in the nation. Often, information missing from your record is in the enhanced nation-wide voter file database. When you look-up and find an individual using Super Voter, you have the option to enhance your record with data pulled from the voter history file.
When you click the Super Voter button on the Options bar, you are presented with a screen displaying core information about the voter, including a ratio of times voted to number of elections.
- Beginning in the Individual record, click the Enhance with Super Voter Data function in the Record Functions area located in the right navigation panel.
- The Super Voter window displays any matches based on name and address information. To update your Aristotle 360 record, simply click the Select button next to the person's name in the Super Voter window.
- The Individual Record redisplays, and updated information, including the voting record, is added to the main record fields and the Contact Information and Additional Details panel fields. Voting record information will now appear on the District & Voting Information panel, and all other fields that were updated or verified will appear highlighted on your screen.
- Review all changes made, make any final edits to correct inaccurate changes, and then click Save.
NOTE: Don't be surprised if you see several people listed when you click the Super Voter button. The voter data lookup system uses the address, city, state, and zip code fields to determine a match. It is quite possible that other people at this same address are registered voters with voter history data on file. Because the search relies on the Address fields, it is important to make sure you have correct data entered for those fields. This feature is limited by the voter information maintained by each State. For example, some states record party affiliation, others do not. Therefore, if an individual resides in a state that does not record party affiliation, this field will not be updated.
For more information regarding Super Voter, please contact Aristotle Technical Support at 888-217-9600 or support@aristotle.com.
87. Fat Cats
87.1. Fat Cats
Another unique feature of Aristotle 360 is your ability to review the Federal Election Commission's (FEC) and State Donor Information to view the donor history for a given individual.
Fat Cats can be used for vetting and compliance purposes. It can be used to highlight relationships between members or donors and other committees. Donors are matched by their name and address, and all past history is displayed.
FEC Compliance Note: In addition to comprehensive state contribution disclosure filings, Aristotle products make a very limited subset of FEC information available for compliance purposes only, such as insuring against accepting excessive or illegal contributions. The data may also be used to refuse or reject contributions from donors who give to those with whom you may not wish to be associated. This information is not made available here in an interactive format or one where the information may be manipulated, and our software does not allow for the downloading or importing of any FEC contributor information into the client's database. Full searchable and downloadable databases of FEC data are available from www.fec.gov. By law, information copied from FEC reports "may not be sold or used by any person for the purpose of soliciting contributions or for commercial purposes...." (The names and addresses of political committees, however, may be used for solicitation purposes.)
For more information regarding Fat Cats, please contact Aristotle Technical Support at 800-243-4401 extension 1 or support@aristotle.com.
88. Importing Data
88.1. Walkthrough: Using the Import Wizard
The Import Manager, under the File tab, allows you to import a group of records into your database in a single operation. By mapping the columns of your import, you have great flexibility with the format of your import file, and you can save your import settings for use again and again. If you plan to import files using the same format and structure then it is to your advantage to save your settings so that you will not be required to go through the entire wizard with each import.
Starting the Import Wizard
Mouse over the File menu and choose Import Manager.
.jpg)
Click Start New Import.
.jpg)
Step 1: Select Your Data File
Click Browse to search for your data file for import.
Once you have selected your import file, choose the following:
- Import Type (what record type will be created for your import file)
- Import Title
- Description
Note the check box: be sure to un-select this if your first row contains data, rather than column headers.
.jpg)
Step 2: Confirm Your File
This step displays information about your import file, including some sample data. Review this to make sure you have chosen the correct import file and settings.
The File Options selection will allow you to begin on a line other than the first line.

Step 3: Map your Datapoints
In this step, you will select which fields you want to import and where that data should be imported.
- Source Column will display your column headers (if you indicated that your file contained column headers).
- Source Preview will show you sample data. You can choose the blue arrow at the top to select a different data line to view.
- Field Data Type will allow you to choose the type of data you are importing for each field. Your choice here will affect what shows up in theDestination Field drop-down.
- Destination Field will let you select exactly where the data should be mapped.

Step 4: Assign Default Values
Step 4 will change depending on what type of information you have mapped for your import. In this step, you will determine what the system will fill in for any missing information.
For example, when importing receipt information, you must set some receipt-specific defaults if you have not already mapped these fields in your import. You can also add these receipts to an existing batch or create a new batch for the import.

Once you have set all the defaults you need, click Next.
You will also have the option to import all records into a Group. If you check the "Import Groups" check-box, you can select a group by first choosing a Category, then selecting the correct Group.
If you need to add a Category or Group, you can also do so from this screen.

Step 5: Record Matching
In this step, you will select how Aristotle 360 will match your imported records to your pre-existing records. You will also determine what Aristotle 360 will do with matching and non-matching records.
Adding New: choose what you would like the system to do with records for which it cannot find a match the screen-shot shown is for an import of individuals.
- "Create Non-Existing Individuals" this will create new records for those that do not match others in the database.
- "Ignore Non-Existing Individuals" this will skip over all records that do not match other records in the database they will not be imported.
Updating Existing: choose what you would like the system to do with records that it is able to match.
- "Update Individual Info" this will insert your newly imported information into matching pre-existing records.
- "Do Not Update Individual Info" this will ignore all of your newly imported information for individuals who already exist in the database.
Matching Criteria: The options on this list will change based on what information you are importing and have mapped. For example, since we imported First Name, Last Name, and Address Line 1, the second option is available. Because we did not import a Voter ID, we cannot choose to match by Voter ID.

Final Step
Save Settings: This will allow you to save your import settings to use later. This is very helpful if you will be importing the exact same file structure repeatedly. If saving your import setting to use at a later date, be sure to click Save Settings before finishing your import otherwise your import settings will not be saved.
Email Notification: enter your email address. The Import Wizard will send you an email when the import is complete.
Click Finish to complete your import.

You should receive a confirmation email letting you know the results of your import. Please be aware that there may be some delay, depending on the size of your import.
.jpg)
Congratulations! You have successfully completed your import. We recommend that you spot check some of your imported records to make sure that all of your fields were mapped correctly if you have any questions, or if you need any assistance, please contact Support.
You will now notice that when navigating to File > Import Manager, your saved import settings will now appear.

Keep in mind that if you plan to use these same import setting again, you will click on the format name instead of Start New Import to begin your import. Your import file must be in the same format as your original import.
88.2. Importing Records with Import Manager
The Import Manager, under the File tab, allows you to import a group of records into your database in a single operation. While it is a valuable tool and a great timesaver, if done incorrectly, problems can result.
Before importing, you'll need to make sure the file is in .CSV format. Excel format files will work but you will not be allowed to have column headers in your file. To begin the import wizard, click File --> Import Manager.
The Import Manager page now gives you the opportunity to use previous saved settings or create new settings. If you plan to import files using the same format and structure then it is to your advantage to save your settings so that you will not be required to go through the entire wizard with each import.
Begin your new import by clicking Start New Import. This will launch the wizard. When you finish the wizard you will be given the opportunity to save your settings as well as designate the email address you wish to have the results of your import to be mailed to.
Step 1: Select Your Data File - browse to your data file and choose either to import Individuals or Organizations and give the file a title. Note: make sure your source file does not contain a mix of Individuals or Organizations, keep them in different source files.
Step 2: Confirm Your File - this is a quick preview of what your source file looks like.
Step 3: Map Your Data Points - this allows you to set where the source data point will go into 360. Select the Field Data Type of the source field. Depending on the data type, you are given a set of possible Detination Fields to choose from. Note: you must map both the First Name and Last Name or the Source ID or Voter ID in order to continue with the import.
Step 4: Assign Default Values (Groups) - this will allow you to import records into a specific group. This 360 Import Manager only allows for the import of 1 group and if you are to use this function during the import, it will add every record in the import file to the specified category/group selected.
Step 5: Record Matching - this is a key step in the import process so choose carefully. This step allows you to create new records where one doesn't exist or even update an existing record. You can also set your matching criteria for how you want to match the source field to the destination field. Source ID and or Voter ID is the best option because these fields are typically unique to the record. The other options could vary depending on your data entry. For example, William Smith may exist in the dataset but in the import source file, the name may be Bill Smith. If you match on First Name and Last Name, the import will treat both as different records thus causing a duplicate record to be inserted. If you are confident in your data entry, either matching option will work.
Step 6: Final Step - this step is where you should save your import settings and assign an e-mail address for the confirmation to be sent to.
88.3. Is There a Way When You are Uploading to Use More Than One Group?
Thank you for your question.
Question:
-------------------
Is there a way when you are uploading to use more than one group? We have a lot of people that are in multiple groups. Right now we have to upload it once for every different group.
-------------------
Answer:
-------------------
Currently the import wizard only supports one group per import. Re-running the same file (with appropriate matching options) is the best way for you to import multiple groups per file. Be sure to use the save setting feature of the import wizard to make it a faster process for the subsequent runs of the import.
If you are importing transactions in your initial import, be sure to remove those from the additional imports as that will cause duplicate transactions to be imported.
-------------------
--
Aristotle Support
mailto:support@aristotle.com
88.4. How to Use the "Import Groups From Source" Feature
For general instructions on using the Import Manager, please reference this help doc: Walkthrough: Using the Import Wizard
Step 4A of import process allows you to map import records to existing groups within your database. Prior to import, your csv file should include columns with the names of the groups you wish to map the records to and "Yes" in the column indicating which groups the records should be mapped to:
During Step 4A of the import, follow these steps to map the records to their respective groups:
1) Click the check box "Import Groups From Source".
2) Map the Source Column to the Destination Group.
3) Add and map additional groups by clicking "Select another group".
4) When finished, click "Next" and proceed with import as normal.
88.5. Importing Errors
Errors when Importing
When importing data, fields that include money should not include the dollar sign($).
88.6. Importing Conduit Contributions
Steps to Importing:
1. Import all of the individual transactions using the Import Manager. You can find more info on using this tool by going to our help file, found here.
Select a specific batch that you will import these transactions into. You can either create one prior to running the import by going to File > Batches > New Batch, and then select it during step 4, or you can create one directly from that screen.
Also in step 4, select the proper type and sub-type, which are determined based on your compliance reporting needs. Use type: Earmarked and Subtype: Directed or Non-directed.
2. Create the conduit transaction in the 360 database. Use Type: Earmarked and Subtype: Conduit Memo. Make sure you assign it to the same batch that you created above for the individual transactions.
3. Once all the contributions are imported and in a batch and the conduit memo has been entered, you'll need to go to Reporting > Custom Reports (QRT's) > Link All Transactions In a Batch. Choose Receipts and then choose the batch you created. Click on Run Report.
Running that report will link all of the individual contributions to the parent/conduit contribution.
89. Batches
89.1. Creating Batches
For the batch function to be truly useful, you should establish a standard method of naming batches. As the number of batch operations grows, standard naming conventions make it much easier to find and review data. For example, you may use "Deposit 09-01-07" to show the deposit made on 9/1/07, or "PR 03-31-07" to indicate the payroll that was deposited on 3/31/07. Both examples clearly identify what the deposit was so that you can reconcile more easily.
Steps to Create a Batch
You create or define the batch before you begin data entry.
1. Beginning on the Batches page, use the Search feature at the top of the page to ensure the batch you want to create does not already exist. You can narrow the search by Filing Committee, batch name, system generated ID, date range, and open or closed status. By default, the system displays batches for the last 30 days for the default Filing Committee.
2. If no batches were found, click the New Batch button to create a new batch.
3. The Record Edit: Batch page appears. Enter a descriptive name for the batch in the Batch Name field.
4. Today's date defaults in the Open Date field. Modify if necessary.
5. Leave the Close date field blank for now. Certain functions automatically update this field, or you can manually update when you have finished with the batch.
6. The Receipt Target and Disburs. Target fields allow you to enter the anticipated totals for the batch. For example, if you're entering receipts, you might enter the amount recorded on the deposit ticket in the Receipts Target field. Aristotle 360 will update the Receipt Entered and Disburs. Entered fields as you assign transactions to the batch, and will display a warning message on the batch if these field amounts do not match.
7. Click the Save changes option on the Options Bar.
Transaction Defaults Panel Pane Options
The Transaction Defaults Panel Pane allows you to set default values for the batch, so you don't have to repeatedly enter this information as you process the batch.
Receipts and Disbursements Panel Panes
After you enter the batch, you can see the record of your work by clicking the Receipts or Disbursements buttons on the Panel Pane. You could also add transactions to the batch from these panel panes, as well as through Quick Entry.
Searching for a Batch
Unless you delete a batch, all batch records remain in the system and can be accessed and reviewed from the Batches Panel. You can search for a batch by name and/or range of dates, and you can filter the results to show all batches or just Open or Closed batches.
After entering your search criteria, click the Search button and Aristotle 360 will display a list of batches that meets your search criteria.
Opening / Closing a Batch
When you create and save a batch it is considered Open by Aristotle 360 until you mark it Closed. As long as a batch is open, you can add transactions to it. So it's important to close the batch as soon as you have finished entering data. To close the batch, click the View button next to the appropriate batch on the Batches list page. In the field labeled Close date enter the appropriate date, typically the day you last entered a transaction for the batch.
Printing a List of Batches
If you need a hard copy of your search results, you can click the Print button in the upper right corner of the Batch page. This will open a new window with your list in a printable format.
90. Notes
90.1. Definition of Notes
Notes have definable fields (category, subcategory subject, date) that can be viewed without opening the individual Note details window. Within the Note details widow, the user can populate the note text with advanced record keeping and internal organizations/clarification. Notes are an excellent place for archival record keeping, including member communication. Notes also appear in the system report, titled "Briefing Book." It's easy to add multiple people to a single/multiple note through the linking feature (i.e. four people meeting with the same legislator). Essentially, more information can be stored at the individual level utilizing notes. There are a few of your existing categories that may be better stored as notes including: member invoices, Christmas cards, letters.
90.2. When to Use Groups vs. Notes
Groups - Categories and Groups are intended to keep track of regularly used lists/groups of individuals. It is not designed to carry a large volume of information because of its utility in highlighting key data. A Group can prevent you from having to do a routine search for the same individuals over and over; for example by including people with similar payroll deductions, large donors, or local/regional leaders.
Groups are easily accessible on the home page and provide quick access to select records. They are also exportable to Excel type formats and PDF (displaying the first name, last name, home phone, gender, marital status, party, ethnicity and occupation).
Notes - Notes have definable fields (category, subcategory subject, date) that can be viewed without opening the individual Note details window. Within the Note details widow, the user can populate the note text with advanced record keeping and internal
organizations/clarification.
Notes are an excellent place for archival record keeping, including member communication. Notes also appear in the system report, titled "Briefing Book." It's easy to add multiple people to a single/multiple note through the linking feature (i.e. four people meeting with the same legislator). Essentially, more information can be stored at the individual level utilizing notes. There are a few of your existing categories that may be better stored as notes including: member invoices, Christmas cards, letters.
91. Release Notes
91.1. Aristotle 360 Release Notes - June 2012
Please see attached PDF file.
91.2. Aristotle 360 Release Notes - May 2012
Please see attached PDF file.
91.3. Aristotle 360 Release Notes - March 2012
Please see attached PDF file.
91.4. Aristotle 360 Release Notes - February 2012
Please see attached PDF file.
91.5. Aristotle 360 Release Notes - November 2011
Please see attached PDF file.
91.6. Aristotle 360 Release Notes - September 2011
Please see attached PDF file.
91.7. Aristotle 360 Release Notes - August 2011
Please see attached PDF file.
91.8. Aristotle 360 Release Notes - June 2011
Please see attached PDF file.
91.9. Aristotle 360 Release Notes - May 2011
Please see attached PDF file.
92. Compliance Q&A
92.1. Why are Repayment and/or Forgiveness Transactions Itemizing on an Outstanding Loan/Debt/Obligation Schedule?
If there is a schedule for outstanding loans or liabilities, you might notice an itemized transaction that is either negative or represents a child transaction of the outstanding obligation. You might be wondering why these transactions are showing up when you should only be seeing unpaid bills or outstanding loans.
This is the result of incomplete data entry. In these cases, the itemized child transaction is not properly linked to the parent obligation. Without a linked parent obligation, the child itemizes by default.
For example: If you received a bank loan and made a single repayment on that loan, both transactions will appear on an outstanding loan schedule unless they are linked. If they are linked, then the loan repayment will not itemize and it will be counted toward the outstanding balance of the bank loan. Which is what you most likely want to see.
What are parent/child transactions? Let's consider a loan as an example parent transaction. You receive a bank loan for $1000. Child transactions are any transactions that affect the status of the parent, in this case the $1000 loan. Loan repayment and loan forgiveness transactions change the outstanding balance of the parent and are thus child transactions.
92.2. Troubleshooting: Partnership Memos not Displaying
Partnership memos not displaying
If you create a Partnership - "Memo" and link it to each individual, you may wonder why it won't print out on a report. The reason is:
The Organization Type "Partnership/LLC" and "Association" are not supported by the Federal Reports. You must change the Organization Type to "Partnership" by opening the Organization record, choosing the new type, and clicking save.
92.3. 1099 Form
1099 in Aristotle 360
Unfortunately, the 1099 is not supported in 360. Clients will have to file that form themselves.
93. Aristotle 360 API
93.1. User Permissions/Setup Required for API Usage
1. User and password must be for a valid and active 360 user.
2. Database must have the '360 API' Database Setting enabled.
3. Database must have the '360 API' Permission Access Area present in 360 User Permissions.
4. The User must belong to a Permission Group that has either View or Edit permission in the '360 API' Permission Access Area.
93.2. Getting Started with the Aristotle 360 API
- getDetail
- getFECTransaction
- getIndividualDetailByGroup
- getList
- getVoterList
- listVoter
- searchKeyword
- setDetail
- getCompanyByList
- getDetail
- getFECTransaction
- getList
- searchKeyword
- setDetail
- getDetail
- getFECTransaction
- getList
- getPoliticalCommitteeByList
- listFilingCommittee
- searchKeyword
- setDetail
- getDetail
- getLegislativeCommitteeByLegislator
- getLegislativeOffice
- getLegislativeOfficeStaffByLegislator
- getLegislatorDisbursement
- getLegislatorGroup
- getLegislatorNote
- getLegislatorReceipt
- getList
- getPoliticalCommittee
- searchKeyword
- setDetail
- getDisbursementDetail
- getList
- getNoteDetail
- getReceiptDetail
- setDisbursementDetail
- setReceiptDetail
- getDetail
- getEventListByCriteria
- getList
93.3. Creating Entities and Transactions Using the API
All "set web services" take the same data structure that the "get web service" uses. Also, when you pass in a Random GUID to the get web service, it will return you an empty data set with all the structure you need to save a new record.
The other part that is missing is that there is a parameter on the getReceiptInfo called: strReceiptFromType. This parameter accepts the following values: "INDIVIDUAL", "LEGISLATOR", "COMPANY", "POLITICALCOMMITTEE". Note that casing does not matter but politicalcommittee has to be spelled without a space between political and committee.
Let's say you want to save a new Receipt to an Existing individual, the code would look like the following:
|
//Get All Individuals With "Williams in their Name" getIndivdiualInfoWS.getIndividualInformationWebService getIndindividual = new getIndivdiualInfoWS.getIndividualInformationWebService();
DataSet dsResult = getIndindividual.searchKeyword("Williams", UserName, Password) ;
//Take GUID from First Individual From Result List:
DataRow drwFirst = dsResult.Tables["std_Individual"].Rows[0] ;
String strFirstIndividualGUID = drwFirst["ind_GUID"].toString();
//ADD New Receipt to Individual Above String strRandomReceiptGUID = System.Guid.NewGUID().toString(); DataSet dsNewReceipt = getTransactionInfoWS.getReceiptDetail(strRandomReceiptGUID, strFirstIndividualGUID, "INDIVIDUAL");
//Create New Receipt Row: DataRow drwNewReceipt = dsNewReceipt.Tables["std_Receipt"].newRow();
//Edit your receipt: drwNewReceipt["rcp_GUID"] = System.Guid.NewGUID().toString(); drwNewReceipt["rcp_Amount"] = 200.00 ; drwNewReceipt["rcp_Date"] = "01/01/2010"; drwNewReceipt["rcp_Deleted"] = 0; drwNewReceipt["rcp_CreatedOn"] = "01/01/2010"; drwNewReceipt["rcp_CreatedBy"] = System.Guid.NewGUID().toString();
//Add New Row back to Receipt Dataset: dsNewReceipt.Tables["std_Receipt"].Rows.Add(drwNewReceipt);
//Call SetReceiptDetail Web Service to save new Receipt to Database: setTransactionInfoWS.setReceiptDetail(dsNewReceipt); |
For review:
To Update an Existing Entity:
1. Call get Web Service with known Entity's GUID
2. Edit the Returned Dataset
3. Call set Web Service
To Create a new Entity:
1. Call get Web Service with Random New GUID
2. Add New Row to Dataset Returned by Web Service
3. Call set Web Service
93.4. Example Web Application Using the 360 API
Using the Aristotle 360 api, we have developed a sample web application that demonstrates how to search, select, and update individual records within 360, as well as add a new receipt (contribution) record to an individual. This sample application was developed using ASP.NET 3.5 (C#).
ASPX code (Individual.aspx):
<%@ Page Language="C#" AutoEventWireup="true" CodeBehind="Individual.aspx.cs" Inherits="APIDEMO.Individual" %>
<!DOCTYPE html PUBLIC "-//W3C//DTD XHTML 1.0 Transitional//EN" "http://www.w3.org/TR/xhtml1/DTD/xhtml1-transitional.dtd">
<html xmlns="http://www.w3.org/1999/xhtml" >
<head runat="server">
<title>Working with the 360 Individual API</title>
</head>
<body>
<form id="form1" runat="server">
<div id="divSearch">
<table>
<tr>
<td>
Search:
</td>
<td>
<asp:TextBox ID="txtSearchString" runat="server"></asp:TextBox>
</td>
<td>
<asp:Button ID="btnSearch" runat="server" Text="Search"
onclick="btnSearch_Click" />
</td>
</tr>
</table>
</div>
<div id="divResults" runat="server" style="max-height:300px; width:450px; overflow:scroll" >
<asp:DataList ID="dtlIndividual" runat="server" >
<ItemTemplate>
<table style="background-color:#FFFFCC">
<tr>
<td style="width:50px">
<asp:LinkButton runat="server" Text="View" OnCommand="dtlIndividual_SelectedIndexChanged" CommandName="Select" CommandArgument='<%# DataBinder.Eval(Container.DataItem, "ind_GUID")%>'></asp:LinkButton>
</td>
<td style="width:250px">
<%# DataBinder.Eval(Container.DataItem, "ind_FirstName")%>
<%# DataBinder.Eval(Container.DataItem, "ind_LastName")%>
</td>
<td style="width:100px">
<%# DataBinder.Eval(Container.DataItem, "iad_City")%>
</td>
<td style="width:100px">
<%# DataBinder.Eval(Container.DataItem, "iad_State")%>
</td>
<td style="width:50px">
<%# DataBinder.Eval(Container.DataItem, "iad_Zip5")%>
</td>
</tr>
</table>
</ItemTemplate>
</asp:DataList>
</div>
<div id="divDetail" runat="server" style="max-height:300px; width:450px;display:none" >
<p>
<h3>Edit Individual Information:</h3>
</p>
<input type="hidden" runat="server" id="hiddenIndividualGUID" />
<input type="hidden" runat="server" id="hiddenAddressGUID" />
<table>
<tr>
<td align="right" style="width:120px">
First Name:
</td>
<td align="left">
<asp:TextBox ID="txtFirstName" runat="server"></asp:TextBox>
</td>
</tr>
<tr>
<td align="right" style="width:120px">
Middle Name:
</td>
<td align="left">
<asp:TextBox ID="txtMiddleName" runat="server"></asp:TextBox>
</td>
</tr>
<tr>
<td align="right" style="width:120px">
Last Name:
</td>
<td align="left">
<asp:TextBox ID="txtLastName" runat="server"></asp:TextBox>
</td>
</tr>
<tr>
<td align="right" style="width:120px">
Address 1:
</td>
<td align="left">
<asp:TextBox ID="txtAddress1" runat="server"></asp:TextBox>
</td>
</tr>
<tr>
<td align="right" style="width:120px">
City:
</td>
<td align="left">
<asp:TextBox ID="txtCity" runat="server"></asp:TextBox>
</td>
</tr>
<tr>
<td align="right" style="width:120px">
State:
</td>
<td align="left">
<asp:TextBox ID="txtState" runat="server"></asp:TextBox>
</td>
</tr>
<tr>
<td align="right" style="width:120px">
Zip:
</td>
<td align="left">
<asp:TextBox ID="txtZip" runat="server"></asp:TextBox>
</td>
</tr>
<tr>
<td>
</td>
<td align="right">
<asp:Button ID="btnSave" runat="server" Text="Save" onclick="btnSave_Click" />
</td>
<label id="lblError" runat="server"></label>
</tr>
</table>
</div>
</form>
</body>
</html>
|
C# code (Individual.aspx.cs):
using System;
using System.Collections.Generic;
using System.Linq;
using System.Web;
using System.Web.UI;
using System.Web.UI.WebControls;
using System.Data;
using System.Configuration;

namespace APIDEMO
{
    public partial class Individual : System.Web.UI.Page
    {
        string strUserName = "";
        string strPassword = "";

        protected void Page_Load(object sender, EventArgs e)
        {

            strUserName = ConfigurationSettings.AppSettings["UserName"].ToString();
            strPassword = ConfigurationSettings.AppSettings["Password"].ToString(); ;

        }

        protected void btnSearch_Click(object sender, EventArgs e)
        {
            //SHOW RESULTS PANEL:
            divDetail.Style.Add("display", "none");
            divResults.Style.Add("display", "block");

            string strSearch = txtSearchString.Text;

            //CALL GET INDIVIDUAL WEB SERVICE:
            getIndivdiualInfoWS.getIndividualInformationWebService getIndindividual = new getIndivdiualInfoWS.getIndividualInformationWebService();
            DataSet dsResult = getIndindividual.searchKeyword(strSearch, strUserName, strPassword);

            //BIND DATA LIST:
            dtlIndividual.DataSource = dsResult.Tables["std_Individual"];
            dtlIndividual.DataBind();

        }//end of Search button event handler


        protected void dtlIndividual_SelectedIndexChanged(object sender, CommandEventArgs e)
        {
            //SHOW DETAIL PANEL:
            divDetail.Style.Add("display", "block");
            divResults.Style.Add("display", "none");

            //Clear Text Boxes:
            txtFirstName.Text = "";
            txtMiddleName.Text = "";
            txtLastName.Text = "";
            txtAddress1.Text = "";
            txtCity.Text = "";
            txtState.Text = "";
            txtZip.Text = "";
            lblError.InnerHtml = "";

            string strIndividualGUID = e.CommandArgument.ToString();
            hiddenIndividualGUID.Value = strIndividualGUID;

            //CALL GET INDIVIDUAL WEBSERVICE:
            getIndivdiualInfoWS.getIndividualInformationWebService getIndindividual = new getIndivdiualInfoWS.getIndividualInformationWebService();
            DataSet dsResult = getIndindividual.getDetail(strIndividualGUID,strUserName,strPassword);

            //POPULATE INDIVIDUAL DETAIL TEXTBOXES:
            if (dsResult.Tables["std_Individual"] != null && dsResult.Tables["std_Individual"].Rows.Count > 0)
            {
                DataRow drwInd = dsResult.Tables["std_Individual"].Rows[0]; //GETDETAIL SHOULD ALWAYS RETURN Zero or 1 Rows for std_Individual Table


                txtFirstName.Text  = drwInd["ind_FirstName"].ToString();
                txtMiddleName.Text = drwInd["ind_MiddleName"].ToString();
                txtLastName.Text   = drwInd["ind_LastName"].ToString();

                if (dsResult.Tables["rtb_IndividualAddress"] != null && dsResult.Tables["rtb_IndividualAddress"].Rows.Count > 0)
                {
                    DataRow drwAddr = dsResult.Tables["rtb_IndividualAddress"].Rows[0]; //Individual Address Could Return Multiple Rows. Select 1st for simplcity.
                    hiddenAddressGUID.Value = drwAddr["iad_GUID"].ToString();
                    txtAddress1.Text = drwAddr["iad_Line1"].ToString();
                    txtCity.Text = drwAddr["iad_City"].ToString();
                    txtState.Text = drwAddr["iad_State"].ToString();
                    txtZip.Text = drwAddr["iad_Zip5"].ToString();
                }

            }


        }

        protected void btnSave_Click(object sender, EventArgs e)
        {
            //GET SELECTED INDIVIDUAL:
            string strIndGUID   = hiddenIndividualGUID.Value;
            string strAddrGUID  = hiddenAddressGUID.Value;
            getIndivdiualInfoWS.getIndividualInformationWebService getIndindividual = new getIndivdiualInfoWS.getIndividualInformationWebService();
            DataSet dsResult = getIndindividual.getDetail(strIndGUID, strUserName, strPassword);

            //SET INDIVIDUAL INFO:
            DataRow drwInd = dsResult.Tables["std_Individual"].Rows[0];
            drwInd["ind_FirstName"] = txtFirstName.Text;
            drwInd["ind_MiddleName"] = txtMiddleName.Text;
            drwInd["ind_LastName"] = txtLastName.Text;


            //SET INDIVIDUAL ADDRESS INFO:
            if (hiddenAddressGUID.Value.Length > 0)
            {
                //Update Existing Address:
                foreach (DataRow drw in dsResult.Tables["rtb_IndividualAddress"].Rows)
                {
                    if (drw["iad_GUID"].ToString() == hiddenAddressGUID.Value)
                    {
                        drw["iad_Line1"]    = txtAddress1.Text;
                        drw["iad_City"]     = txtCity.Text;
                        drw["iad_State"]    = txtState.Text;
                        drw["iad_Zip5"]     = txtZip.Text;
                    }

                }//end of loop

            }
            else if (txtAddress1.Text.Length > 0)
            {
                //Address did not exist, Create New Address:
                DataRow drwAddr = dsResult.Tables["rtb_IndividualAddress"].NewRow();

                drwAddr["iad_GUID"]     = System.Guid.NewGuid();
                drwAddr["iad_ind_GUID"] = hiddenIndividualGUID.Value;
                drwAddr["iad_Line1"]    = txtAddress1.Text;
                drwAddr["iad_City"]     = txtCity.Text;
                drwAddr["iad_State"]    = txtState.Text;
                drwAddr["iad_Zip5"]     = txtZip.Text;

                drwAddr["iad_iat_GUID"] = getDefaultAddressType();

                drwAddr["iad_Default"]      = true;
                drwAddr["iad_Deleted"]      = false;
                drwAddr["iad_CreatedOn"]    = System.DateTime.Today;
                drwAddr["iad_CreatedBy"]    = System.Guid.NewGuid();

                dsResult.Tables["rtb_IndividualAddress"].Rows.Add(drwAddr);

            }


            //SAVE INDIVIDUAL INFORMATION:
            setIndividualInfoWS.setIndividualInformationWebService setIndividual = new APIDEMO.setIndividualInfoWS.setIndividualInformationWebService();
            DataSet dsReturn = setIndividual.setDetail(dsResult,strUserName,strPassword);

            //IF ERROR, DISPLAY MESSAGE:
            if (dsReturn.Tables["Error"] != null && dsReturn.Tables["Error"].Rows.Count > 0 )
            {
               lblError.InnerHtml = dsReturn.Tables["Error"].Rows[0]["Message"].ToString();
            }
            else
            {
                lblError.InnerHtml = "";

                ScriptManager.RegisterStartupScript(this, this.GetType(), System.Guid.NewGuid().ToString(), "alert('Individual Information has been saved!');", true);

                //HIDE PANELS:
                divDetail.Style.Add("display", "none");
                divResults.Style.Add("display", "none");
            }

        }//end of View button even Handler

        protected void btnAddReceipt_Click(object sender, EventArgs e)
        {
            //JUST A HARD CODED SAMPLE TO SHOW HOW TO ADD RECEIPTS:
                //Always $100 on 01/01/2010

            //Get Return DataSet with Empty Receipt Table
            getTransactionInfoWebService.getTransactionInfoWebService transWS = new getTransactionInfoWebService.getTransactionInfoWebService();
            DataSet dsReturn = transWS.getReceiptDetail(System.Guid.NewGuid().ToString(), hiddenIndividualGUID.Value.ToString(), "INDIVIDUAL", strUserName, strPassword);

            //Create Row for new Receipt:
            DataRow drwNewReceipt = dsReturn.Tables["std_Receipt"].NewRow();

            drwNewReceipt["rcp_GUID"]       = System.Guid.NewGuid();
            drwNewReceipt["rcp_Date"]       = "01/01/2010";
            drwNewReceipt["rcp_Amount"]     = "100.00";


            drwNewReceipt["rcp_Purpose"]    = "";
            drwNewReceipt["rcp_Check_No"]    = "";
            drwNewReceipt["rcp_Note"]       = "";
            drwNewReceipt["rcp_State"]      = "";
            drwNewReceipt["rcp_FecId"]      = "";
            drwNewReceipt["rcp_TransID"]    = "";
            drwNewReceipt["rcp_SourceID"]   = "";
            drwNewReceipt["rcp_ReceivedYear"] = "";

            drwNewReceipt["rcp_Deposited"] = "01/01/2010";
            drwNewReceipt["rcp_Statement"] = "01/01/2010";

            drwNewReceipt["rcp_Reconciled"]     = false;
            drwNewReceipt["rcp_ForceItemize"]   = false;
            drwNewReceipt["rcp_ForceUnItemize"] = false;
            drwNewReceipt["rcp_Locked"]         = false;


            drwNewReceipt["rcp_acc_GUID"]   = getDefaultAccount("Edison Electric Institute");
            drwNewReceipt["rcp_per_GUID"]   = getDefaultValue("std_ElectionPeriod","per");
            drwNewReceipt["rcp_bat_GUID"]   = getDefaultValue("std_Batch", "bat");
            drwNewReceipt["rcp_sou_GUID"]   = getDefaultValue("std_Source", "sou");

            drwNewReceipt["rcp_rcs_GUID"]   = getReceiptSubType("Contribution", "Check");

            drwNewReceipt["rcp_Deleted"]    =  false;
            drwNewReceipt["rcp_CreatedOn"]  = System.DateTime.Now;
            drwNewReceipt["rcp_CreatedBy"]  = System.Guid.NewGuid();


            //Set Receipt Status:
            drwNewReceipt["rst_GUID"]   = getDefaultValue("std_ReceiptStatus","rst");


            //ADD new Receipt to Database:
            dsReturn.Tables["std_Receipt"].Rows.Add(drwNewReceipt);
            setTransactionInfoWebService.setTransactionInfoWebService setTransWS = new APIDEMO.setTransactionInfoWebService.setTransactionInfoWebService();
            DataSet dsSetReturn = setTransWS.setReceiptDetail(dsReturn, strUserName, strPassword);


            //Check For Errors returned by web service:
            if (dsSetReturn.Tables["Error"].Rows.Count > 0)
            {
                string strError = dsSetReturn.Tables["Error"].Rows[0]["Message"].ToString();
                lblError.InnerHtml = strError;

            }
            else
            {
                ScriptManager.RegisterStartupScript(this, this.GetType(), System.Guid.NewGuid().ToString(), "alert('Receipt for $100 has been added!');", true);

            }

        }//end of btnSave_Click method

        private Guid getDefaultValue(string strTableName, string strTablePrefix)
        {
            Guid returnGUID = System.Guid.NewGuid();

            getIndivdiualInfoWS.getIndividualInformationWebService getIndindividual = new getIndivdiualInfoWS.getIndividualInformationWebService();
            DataSet dsResult = getIndindividual.getList(strTableName, strUserName, strPassword);

            foreach (DataRow drw in dsResult.Tables[strTableName].Rows)
            {
                if ((bool)drw[strTablePrefix+"_Default"])
                    returnGUID = (Guid)drw[strTablePrefix+"_GUID"];
            }

            return returnGUID;

        }//end of getDefaultElectionPeriod method

        private Guid getReceiptSubType(string strReceiptType, string strReceiptSubType)
        {
            Guid returnGUID     = System.Guid.NewGuid();
            strReceiptType      = strReceiptType.ToUpper().Trim();
            strReceiptSubType   = strReceiptSubType.ToUpper().Trim();

            getIndivdiualInfoWS.getIndividualInformationWebService getIndindividual = new getIndivdiualInfoWS.getIndividualInformationWebService();
            DataSet dsResult = getIndindividual.getList("std_ReceiptType", strUserName, strPassword);

            //GET GUID FROM the Receipt Type passed in as parameter:
            Guid rctGUID = System.Guid.NewGuid();
            foreach (DataRow drw in dsResult.Tables["std_ReceiptType"].Rows)
            {
                if (drw["rct_Text"].ToString().ToUpper().Trim() == strReceiptType)
                    rctGUID = (Guid)drw["rct_GUID"];    //Save Receipt Type GUID
            }

            //GET GUID FROM the ReceiptSubtype passed and the Receipt Type above:
            dsResult = getIndindividual.getList("std_ReceiptSubType", strUserName, strPassword);

            foreach (DataRow drw in dsResult.Tables["std_ReceiptSubType"].Rows)
            {
                if (drw["rcs_Text"].ToString().ToUpper().Trim() == strReceiptSubType)
                {
                    if (((Guid)drw["rcs_rct_GUID"]) == rctGUID)
                        returnGUID = (Guid)drw["rcs_GUID"];
                }
            }

            return returnGUID;

        }//end of getReceiptSubType

        private Guid getDefaultAccount(string strFilingCommitteeName)
        {
            //Every Filing Committee has multiple accounts but only one default Account

            Guid returnGUID = System.Guid.NewGuid();
            strFilingCommitteeName = strFilingCommitteeName.ToUpper().Trim();

            getIndivdiualInfoWS.getIndividualInformationWebService getIndindividual = new getIndivdiualInfoWS.getIndividualInformationWebService();
            DataSet dsResult = getIndindividual.getList("std_PoliticalCommittee", strUserName, strPassword);

            //GET GUID FROM the Filing Committee passed in as parameter:
            Guid pcmGUID = System.Guid.NewGuid();
            foreach (DataRow drw in dsResult.Tables["std_PoliticalCommittee"].Rows)
            {
                if (drw["pcm_Name"].ToString().ToUpper().Trim() == strFilingCommitteeName)
                    pcmGUID = (Guid)drw["pcm_GUID"];    //Save Committee ID
            }

            //GET Default Account for Filing Committee above:
            dsResult = getIndindividual.getList("std_Account", strUserName, strPassword);
            foreach (DataRow drw in dsResult.Tables["std_Account"].Rows)
            {
                if ((Guid)drw["acc_pcm_GUID"] == pcmGUID)
                {
                    if (((bool)drw["acc_Default"])) //Found Default Account for give Committee:
                        returnGUID = (Guid)drw["acc_GUID"];
                }
            }


            return returnGUID;

        }//getDefaultAccount method


        private Guid getDefaultAddressType()
        {
            Guid returnGUID = System.Guid.NewGuid();

            getIndivdiualInfoWS.getIndividualInformationWebService getIndindividual = new getIndivdiualInfoWS.getIndividualInformationWebService();
            DataSet dsResult = getIndindividual.getList("std_IndividualAddressType", strUserName, strPassword);

            foreach(DataRow drw in dsResult.Tables["std_IndividualAddressType"].Rows)
            {
                if ((bool)drw["iat_Default"])
                    returnGUID = (Guid)drw["iat_GUID"];
            }

            return returnGUID;

        }//end of getDefaultAddressType


    }
}
|
93.5. Creating New Individual With Email Information (Sample)
getIndividualInfoWebService.getIndividualInformationWebService wsIndInfo = new API_Test.getIndividualInfoWebService.getIndividualInformationWebService();
string newIndGUID = Guid.NewGuid().ToString();
DataSet dsInd = wsIndInfo.getDetail(newIndGUID, username, password);
// check if it passed authentication/authorization stage
if (dsInd.Tables["Credentials"] != null)
{
if (dsInd.Tables["Credentials"].Rows[0]["isvalid"].ToString().ToUpper() == "FALSE")
{
lblMsg.Text = dsInd.Tables["Credentials"].Rows[0][3].ToString();
return;
}
}
// make sure there were no errors that occured
// you should do the same thing after setDetail method gets called
if (dsInd.Tables["Error"].Rows.Count > 0)
{
lblMsg.Text = dsInd.Tables["Error"].Rows[0][0].ToString();
return;
}
// insert a new row and modify the basic information
DataRow drNewInd = dsInd.Tables["std_Individual"].NewRow();
drNewInd["ind_GUID"] = newIndGUID;
dsInd.Tables["std_Individual"].Rows.Add(drNewInd);
dsInd.Tables["std_Individual"].Rows[0]["ind_SourceID"] = "123";
dsInd.Tables["std_Individual"].Rows[0]["ind_Salutation1"] = "";
dsInd.Tables["std_Individual"].Rows[0]["ind_FirstName"] = "James";
dsInd.Tables["std_Individual"].Rows[0]["ind_LastName"] = "Test";
dsInd.Tables["std_Individual"].Rows[0]["ind_MiddleName"] = "";
dsInd.Tables["std_Individual"].Rows[0]["ind_Title"] = "";
dsInd.Tables["std_Individual"].Rows[0]["ind_VoterId"] = "";
dsInd.Tables["std_Individual"].Rows[0]["ind_MailName"] = "James Test";
// get email type - this will get a default one
DataSet dsEmailType = wsIndInfo.getList("std_IndividualEmailType", username, password);
DataRow[] defaultEmail = dsEmailType.Tables["std_IndividualEmailType"].Select("emt_Default=1");
string defaultEmailType = defaultEmail[0]["emt_Text"].ToString();
string defaultEmailTypeGUID = defaultEmail[0]["emt_GUID"].ToString();
// add email record
DataRow drEmail = dsInd.Tables["rtb_IndividualeMail"].NewRow();
drEmail["ema_GUID"] = System.Guid.NewGuid().ToString(); //add new GuID
drEmail["ema_ind_GUID"] = drNewInd["ind_GUID"].ToString(); //set Individual GUID
drEmail["ema_Email"] = "something@aristotle.com"; //set email address text
drEmail["ema_emt_GUID"] = defaultEmailTypeGUID; //set emailtype guid to default
drEmail["emt_Text"] = defaultEmailType; //set emailtype to default
drEmail["ema_Deleted"] = 0;
drEmail["ema_Default"] = 1;
dsInd.Tables["rtb_IndividualeMail"].Rows.Add(drEmail);
// same as above - you should check for the error table
// set individual data webservice
setIndividualInfoWebService.setIndividualInformationWebService wsSetInd = new API_Test.setIndividualInfoWebService.setIndividualInformationWebService();
wsSetInd.setDetail(dsInd, username, password);
93.6. getList() Method
The getList() method can be used for number of things, but the most frequently you will want to use this function in order to retrieve a list of options for a foreign key in the parent table.
input parameter is a table name that you are trying to query. Output is a dataset that if everything went well returns a datatable that has a name of the table that was passed in. If an error occured, the error table will be returned with the dataset.
The method can be used on a pretty much any table in the system, but you will use it the most frequently on those tables that contain options for foreign keys.
93.7. API XML String Return Value
All the new SET web services calls do not return a dataset (like our older calls do), but an XML string that might look something like this:
<?xml version="1.0"?>
<result>
<status>OK</status>
<ID>ID of a record that got added or updated. It will depend on the context</ID>
<message></message>
</result>
OR
<?xml version="1.0"?>
<result>
<status>Error</status>
<ID></ID>
<message>Error Message Here</message>
</result>
93.8. Add/Update Individual Employer
To add a new individual employer record the following function should be used. Note: if an individual already has an employer it will add this employer as a secondary employer record. If you want just to replace (update) an employer please see below for an example on UpdateIndividualEmployer.
Adding new employer:
setIndividualInfoWebService.setIndividualInformationWebService wsSetInd = new API_Test.setIndividualInfoWebService.setIndividualInformationWebService();
string result = wsSetInd.AddIndividualEmployer(new Guid(indGUID), "Company 1", username, password);
To replace an individual employer:
setIndividualInfoWebService.setIndividualInformationWebService wsIndEmp = new API_Test.setIndividualInfoWebService.setIndividualInformationWebService();
string result = wsIndEmp.UpdateIndividualEmployer(new Guid(indGUID), "Company 2", cloGUID, username, password);
where cloGUID is a company location GUID of the current employer (return by the getIndividualInformationWebService webservice).
Both calls retun an XML string. For more information on the return value please see: http://support.aristotle.com/kb/entry/1047/
93.9. Adding Individual to a Group
| Service: | https://ai360.aristotle.com/API2/setIndividualInfoAPI/setIndividualInformationWebService.asmx |
| Method: | AddIndividualToGroupByGroupGUID |
| Parameters: | 1. individual ID (GUID); 2. group ID (GUID) - egp_GUID |
| Returns: | An XML string (see http://support.aristotle.com/kb/entry/1047 for more detail) |
| Note: | Status of "ERROR" is returned if the action doesn't complete successfully. Status "OK" is returned either if an individual gets added to a group or if that record is already a member of that group. In that case the message would say: "Individual is already a member of this group.". Group ID parameter that needs to be passed can be found in the std_EntityGroup table. The field is egp_GUID. |
| Example: | setIndividualInfoWebService.setIndividualInformationWebService wsInd = new API_Test.setIndividualInfoWebService.setIndividualInformationWebService(); string res = wsInd.AddIndividualToGroupByGroupGUID(new Guid(indGUID), egpGUID, username, password); |
93.10. Add Individual to a Group by Specifying Group and Category Names
| Service: | https://ai360.aristotle.com/API2/setIndividualInfoAPI/setIndividualInformationWebService.asmx |
| Method: | AddIndividualToGroupByGroupAndCategoryName |
| Parameters: | 1. individual ID (GUID); 2. group name, 3 category name, 4. username, 5 password |
| Returns: | An XML string (see http://support.aristotle.com/kb/entry/1047 for more detail) |
| Note: | Status of "ERROR" is returned if the action doesn't complete successfully. Status "OK" is returned either if an individual gets added to a group or if that record is already a member of that group. In that case the message would say: "Individual is already a member of this group.". Group ID parameter that needs to be passed can be found in the std_EntityGroup table. The field is egp_GUID. |
| Note: |
AddIndividualToGroupByGroupAndCategoryName method will allow you to add an individual to a group by passing group and category names. This call is very similar to AddIndividualToGroupByGroupGUID, but the advantage of this method is that you can pass a non-existing group or category name and the information would get created prior to adding the individual to this newly created group (and category). |
93.11. Add Individual and Receipt Info
Currently there are two web service calls that will allow you to accomplish this easily. The first one is used if you do not have an individual id (ind_GUID) value. In that case the individual matching will be done based on first name + last name + email address. If no individual record is found we will try to match it on first name + last name + beginning of the street line. If no match is found even after that a new record will be inserted. The web service call can be found at:
The second web service call should be used if you already have the individual id of the record that you would like to create a contribution for:
Note: receipts/contributions will be created with default receipt type/subtype information and for the default account and election period.
If you would like just to add a receipt record without updating/adding any individual information refer to:
https://ai360.aristotle.com/API2/setTransactionInfoAPI/setTransactionInfoWebService.asmx
and the two methods called AddIndividualReceipt that accept slightly different parameters.
94. Aristotle 360 API - Fields/Field Mapping
95. Webform Builder
95.1. Webform Builder
Webform Builder
With the Webform Builder, you are able to configure externally facing forms allowing visitors to:
Contribute
Make Pledges
Create new Individual Records
Add Notes
Join Groups
- Go to File > Webform Builder > Create a New Form
- The Webform Wizard will pop up, allowing you to easily customize the Webform to your needs.
The Webform help files in this section will help you use the wizard to create your Webform.
1. Components
Customize the purpose of your form and the information you will collect.
2. Form Options
Send notifications to a staff member or the visitor submitting the Webform.
3. User Options
Set matching criteria, cause records to be added to a Group, Campaign, or Event, and enable Authentication.
4. Themes
Use HTML to cause your Webform to match the look/feel of your website.
Online Donation Setup
Use your CampaignContribution.com account to enable online donations via your Webform.
95.2. Webform Components Tab (1)
1. Components Tab
This section contains elements which you enable on the Webform. Click on and drag the element from the Disabled Components section to the Build Your Form section above to enable it.
.png)
Basic Info (default element that is required)
.png)
Form Field column: The available fields for selection for the form.
Visible column: Activates the field to be displayed on the form.
Required column: Enables a red asterisk next to the field, requiring the field to be filled in.
Default Donation column: Locks the field so it cannot be edited.
Label Name column: The field name that appears on the form. These can be edited if the field needs to be renamed.
Group Options
.png)
Add A Group Category

Select the category name that the group belongs to.
From the Group Category to Add drop-down select the category you wish to use. Note you can select more than one category.
Selected Categories
Lists the categories chosen from the category selection above.

There are 4 columns for these category listings:
Label: The name of the category (can be edited)
Description: Text that can be entered and will appear below the Label on the Webform.
Selection: Controls how the group names will be displayed on the Webform. Choose from either Multi-Select (selections appear with check boxes) or Single-Select (selections appear as a dropdown).
Type: Controls the display of group names in Multi-Select or Single-Select format. Single-Select has the additional option of Radio Buttons type.
Also, the red 'X' button will remove a group category from this section.
Credit Card Donation
This allows for the option to process credit card transactions through the Webform.

Section Title: Allows for a custom name to be entered in the field to be used instead of the default Credit Card Donation.
Instructions: Enter text into this field to provide information that will appear below the Section Title.

Account: Select the Bank Account to be used that is associated with a Filing Committee.
Type: Allows for choosing the contribution type for the transaction (ie. Credit Card, Check, Cash, etc.)

Period: Allows for choosing the election period for the transaction. Checking the box next to Automatic Year Change will update the period to current election period.
Recurrence: Allows for a One-Time or Recurring donation or Both. Note if Recurring or Both are selected a Contribution Duration option will be enabled which will allow for 1 Year, 2 Years, Forever or a Specific Date to be selected.

Source: Allows for selection of a Receipt Source (Found under Settings > Global Transaction Defaults > Receipt Source)
Advocate: Allows for the selection of an Activated Advocate (Found under Settings > Advocate Administration)

Default Donation: Allows for a specific donation amount to set as the default. Checking the Read Only checkbox will lock the Amount field for the donor so they cannot change the amount that is set as the Default Donation.
Donation Limit: Allows for an amount to be set as the donation limit . If a donor enters an amount over that limit a message will appear that states the donation will put it over the limit by 'x' amount.
Pledge Program

Basic Options

Section Title: Allows for a custom name to be entered in the field to be used instead of the default Pledge Program.
Instructions: Enter text into this field to provide information that will appear below the Section Title.
Select Pledge Program: Choose a pledge program from the drop-down which are pulled from File > Pledge Programs. The pledge program's pledge template is what is displayed on the form.
Display Other Options (Can be enabled or disabled)

Label: The name of the alternate option to a pledge program (can be edited)
Description: Text that can be entered which will appear below the Label on the Webform.
Pledge Program Confirmation and Group Assignment (Can be enabled or disabled)

Category: Drop-down selection for Group Category.
Group: Drop-down selection for Groups based on the Category that is selected.
Label Text: The name of the group an individual would be assigned to which will appear on the form with a check box.
Description: Text that can be entered which will appear above the Label text on the Webform.
I Do Not Wish To Contribute At This Time (Can be enabled or disabled)

Text To Display: Field name that can be edited.
Category: Drop-down selection for Group Category.
Group: Drop-down selection for Groups based on the Category that is selected.
Enable 'Previous Pledge' Message (Can be enabled or disabled)

Previous Pledge Text: Field for entering text to display with the previous pledge amount, which can be edited.
Offline Donation
A printable form option for offline donors.

Offline Donation
Section Title: The name of the Offline Donation (can be edited)
Donation Instructions: Text that can be entered that will appear below the Section Title.

Donation Form
Section where the offline donation form is created or uploaded. It will appear with a Print button on the form.
Notes
Allows for the notes section to appear at the bottom of the Basic Info fields.

Additional Notes
Label Name: Allows for a custom name to be entered in the field to be used instead of the default Additional Notes.
Note Category: Drop-down selection of note categories available in individual records.
Note Sub-category: Drop-down selection of note sub-categories available in individual records.
95.3. Webform Options Tab (2)
2. Form Options Tab
Click on the Form Options tab to enable and configure the response you receive when a form has been submitted as well as the response you send to the submitter.
If you would like to receive a notification when a form has been submitted, click on the DISABLED button next to Email Notifications. This will enable that option.

To format the email you receive when a form is submitted, click on the DISABLED button next to Internal Notification. This will allow an email to be sent to you when the form is submitted.
1. Enter the email address you want the message to go to in the Email Address field.
2. Enter the subject the email should contain in the Subject Field.
3. Enter the body of the text in the Owner Email Text box. You can use the formatting icons to format the contents of this message.

To send the submitter a confirmation message, click on the DISABLED button next to Form Submitter Confirmation Message.
1. Enter the subject of the confirmation message in the Subject field.
2. Enter the email you'd like the message to appear from in the from email field.
3. Enter the name of the person you want the email to appear from in the from name field.
4. Enter the text of the message in the text box below.

In the OTHER INFORMATION section, you may create custom text for the form's Submit button.

In the DISCLAIMER section you may enter your disclaimer message and format it with the icons above the text area.
95.4. Webform User Options Tab (3)
3. User Options Tab
This section allows you to match already existing records in the database by using the following fields as matching criteria. Fields that can be used for matching:
First Name, Last Name, Line 1 (Address Line 1), Line 2 (Address Line 2), City, State, Zip, Email, Source ID.

To enable a field for matching, first select Use To Match. Once selected, determine how to match this information. Information can be Exact Match, First Word Match, or Match First # of Characters.
First Word Match: Matches the first word used in the field this is applied to if multiple words are in the field.
Match First # of Characters: Requires you to enter a number value in the text box to the right of this area. Match occurs against the characters up to the number value entered.
Other Information
Other Information determines what happens when a match is not found in the database.
When this feature is enabled, it will add a new record to the database if a match is not found.

When this is disabled, an error message will be displayed to the Webform visitor when a record is not found. The error message can be customized via a text box that appears when DISABLED is selected.

User Assignments
User Assignments will allow you to automatically filter submissions into Categories, Campaigns, and Events.
Categories, Campaigns, and Events must already exist in 360 in order to appear in the select dropdowns.
Assign to Category: To use this drop down you must have Group Categories created first. This is done in Settings > Add/Edit Groups.
Assign to Campaign/Event: Create your Campaign or Event by going to Activities > New Activities Campaign or Events > New Event. In order for these dropdowns to populate with your campaigns and events they must not have passed the end date. If the end date has already passed, they will not appear in the dropdown.

Authentication
Authentication allows you to limit access to only users that have a current record in the database.
Turning on this feature will prompt users to log in with a Username and Password.
Available options for Username are: firstname.lastname, Source ID, Voter ID, Email (Home/Work).
Password options are: Source ID, Voter ID, Password, Home Zip(5).
You also have the ability to make basic information fields read only and to provide login instructions.

95.5. Webform Themes Tab (4)
4. Themes Tab
This section allows you to add your own Custom Header and Footer to your web form via HTML. Most users will use this function to make the web form look like their website.
If you need assistance with your HTML, Support can provide you with a quote from our graphics department.


![]()

To enter the HTML code for either the header or footer of your web form, click on Click Here to Add Custom Header/Footer and type in or paste the HTML code you wish to use.
When you are finished, click Ok.


![]()
![]()

You can manually change and/or view the CSS code by clicking on the Customize CSS. Please note again that Support does not handle CSS or HTML coding.
![]()

The Confirm Options section will allow you to customize a Thank You/Confirmation page that will appear after a user has successfully submitted a form using your Webform.
![]()

Clicking on the Embed button will produce a window that will allow you to copy your Webform's URL, IFrame, and Embed code. You can then use these to link the webform to any external site you wish (you could place a button on your campaign or committee site, for example, and have that button direct straight to the Webform).
95.6. Accepting Online Donations Using Your Webforms
The Setup Process
You have the ability to accept and process online credit card donations using your webforms. To set this up, the following must be done:
1) Log into your database and go to Settings > Credit Card Processing Settings
2) In the CampaignContribution.com Settings section, enter your CampaignContribution account login ID (the account number) and your account password
3) Click Save Account Information

If you do not already have a CampaignContribution.com account you can create a new one by clicking the Register a New Account hyperlink.
Once you have updated your 360 Credit Card Processing Settings, you can open your webform and begin setting up the credit card donation component.
How Are These Receipts Saved in 360?
When a donor clicks the 'Submit' button on one of your webforms, that new receipt will automatically be created and saved to the donors' 360 record.
You should always be sure to set up the internal email notification feature in the Form Options tab to notify you when a contribution has been submitted. This will tell you which record the receipt was saved to and will allow you to review all donations that come in to ensure you want to keep them.

Section Title: Allows for a custom name to be entered in the field to be used instead of the default 'Credit Card Donation'
Instructions: Enter text into this field to provide information that will appear below the Section Title.
Account: Select the Bank Account to be used that is associated with a Filing Committee.
Type: Allows for choosing the contribution type for the transaction (ie. Credit Card, Check, Cash, etc.)
Period: Allows for choosing the election period for the transaction. Checking the box next to 'Automatic Year Change' will update the period to current election period.
Source: Allows for selection of a Receipt Source (Found under Settings > Global Transaction Defaults > Receipt Source)
Advocate: Allows for the selection of an Activated Advocate (Found under Settings > Advocate Administration)
Recurrence: Allows for a One-Time or Recurring donation or Both. Note if Recurring or Both are selected a Contribution Duration option will be enabled which will allow for 1 Year, 2 Years, Forever or a Specific Date to be selected.
Default Donation: Allows for a specific donation amount to set as the default. Checking the 'Read Only' checkbox will lock the Amount field for the donor so they cannot change the amount that is set as the Default Donation.
Donation Limit: Allows for an amount to be set as the donation limit. If a donor enters an amount over that limit a message will appear that states the donation will put it over the limit by 'x' amount.
95.7. How to create a Webform for a second Filing Committee
To create a webform for a new filing committee, please use the following steps:
1) Go to File > Web-form Builder
2) Select Create New Form
3) In the pop up window, click and drag the Credit Card Donation component up to below where it says Basic Info. That will move the Pledge Program and Offline Donation components with it. Move the Pledge Program component back down to Disabled Components.
When finished, the screen should look like this:
4) Click the Credit Card Donation Component to bring up the options screen. Click the account field and select the target account for donations. Also, click the Offline Doantion component and fill in the field detailed the steps for how to donate offline. When finished, select the green Next button in the upper right corner.
5) In the Form Options screen, click the button under Publish/Unpublish to make sure it shows "Published". Select any other options you would like and make sure the disclaimer towards the bottom is filled out the way you would like it. When finished click Next.
6) Fill out the User Options the way you would like them, including setting the record matching settings and if you would like the donations made through the form to be assigned to a particular category. When finished, click Next.
7) In the Themes screen, enter options for a Custom Header, Form Title, etc. and then click the save button in the upper right. The Header area is where you can add banners and photos if you would like. Click the Preview button to see a preview of what the component form wil look like. To view what the actual web page will look like, click the embed button and then the link. At this point, if everything looks the way you would like it to, you can click the embed button to link to the webform or embed it directly within your website.
8) You can also access your saved webform by going into File > Webform Builder
96. Bills and Votes
96.1. Bills and Votes Dashboard
The Bills and Votes dashboard page shows a list of the bills and votes you have chosen to track.
To get to the dashboard page, click on Bills and Votes tab and choose Dashboard. The Bills and Votes Dashboard layout is divided into two main sections. The top section is a summary of bills you are tracking. The lower section is a summary of the votes you are tracking. A brief description of each piece of information shown on the dashboard is below:
Bills You Are Tracking
Number: The bill number.
Title: The title of the bill.
Sponsor: The legislator who introduced the bill and is chief advocate for its passage.
Is Public: This will always be either 'Yes' or 'No'. It tells you if the bill is viewable on your website if you are using Aristotle's web-posting feature (contact your sales rep for more information about this feature).
Votes You Are Tracking
Session: The session of Congress in which the vote took or will be taking place.
Bill: The title of the bill that was or will be voted on.
Date: The date the vote took place.
Yeas: The number of votes for the bill.
Nays: The number of votes against the bill.
Is Public: This will always be either 'Yes' or 'No'. It tells you if the vote is viewable on your website if you are using Aristotle's web-posting feature (contact your sales rep for more information about this feature).
Adding bills and vote entries
There are links on the Bills and Votes dashboard that will take you to the pages to add bills and votes you want to track either manually or from the feed. Once you have searched for and saved bills and votes you would like to track, they will be listed on the Bills and Votes dashboard page.
Customizing the list
You can choose the number of tracked bills/votes shown per page by clicking on the dropdown box in that section. This can be updated in both the 'Bills You Are Tracking' and the 'Votes You Are Tracking' sections. The choices available to you are 10, 25, 50 and 100 entries per page and you can flip through multiple pages using the right and left arrows in the bottom-right corner of each section.

Searching the list
By entering text or numbers in the search field you can narrow the number of entries shown for each section. The search will look for matches in the number and title fields of the bills and votes you are currently tracking.

Viewing and printing
To open the specific Bill or Vote for editing, click on the pencil edit icon to the left of the entry. To print the specifics of the entry, click on the printer icon to the left of the entry.
96.2. Track Bill Manually


Sponsors & Co-Sponsors


96.3. Track Vote Manually
The 'Track Vote Manually' feature allows you to manually keep track of information about a specific Congressional bill or amendment (bolded fields are required).
Using the buttons at the very top, you can save the vote, delete it, or publish it to make it viewable on your website if you are using Aristotle's web-posting feature (contact your sales rep for more information about this feature). To print the vote you'll need to go back to the 'Bills and Votes' dashboard, look down to the 'Votes You Are Tracking Section' and click the printer icon next to the vote you'd like to print.
Bill Information


.png)
96.4. Bills and Votes Data
Bills and Votes Data Explained


97. Fly-In
97.1. Fly-In Overview

- This section provides an overview of a Fly-in and its information can be quickly seen under View Congressional Fly-ins.
- Name: The name of the Fly-in event.
- Start Date: The day the Fly-in event begins.
- End Date: The day the Fly-in event will finish.
- Status: Indicate whether this Fly-in event is open or closed.
- Description: Details regarding the Fly-in event.
- Address Line 1: The street address of the Fly-in event.
- City: The city the Fly-in is located in.
- State/Zip Code: The state and zip code of the Fly-in event's location.
- Participants
- Appointments
- Survey
- View Congressional Fly-Ins
- Meeting Summary
97.2. Fly-In Participants
Congressional Fly-in
Organizations usually facilitate constituent in-person visits by flying in their champion advocates to Capitol Hill or to district offices.


97.3. Fly-In Appointments
97.4. Fly-In Survey
The purpose behind this section is to collect vital data regarding the Fly-In itself and its attendees.
Within this area users are able to attach an existing survey, create a new survey, and View/Manage existing surveys.
.jpg)
.jpg)
Create a section
Once the survey is saved a new area will appear labeled sections. User creates a section by naming and entering a description.
Save and close. The section is now available for edit and adding/removing questions.


Sections available options
Selecting to edit will allow the changing of the sections name and description. Delete will remove the section completely.
Creating Questions
Select questions icon. A new area will appear labeled "Questions for section: (section name).
Select to "Add Question".
Add a name and description to the question in the box that appears. (The name that is added is the question itself.)


The questions section has the same option for edit and delete as listed above and they function the same.
Answers
To add answers select the radio button labeled Answers. (Marking this radio button will open a small pop up window where you create your answers.)
Select "Add Answer". (You can create multiple answers per question.)

(As shown below we have added multiple sections and answers)
Select to Save or Save and Close once finished adding answers.
The survey has now been created and can be managed within the survey section of any Fly-in, as well attached survey to an already existing Fly-in without a survey attached to it already.
2. Print Participant Handouts
This area prints a sheet that lists participants with appointments. The details of their appointment time will be listed, as well as any survey questions that have been created. Survey questions will be listed underneath appointment details. The name of the survey will appear at the top of the printout.

97.5. View Congressional Fly-Ins
Provides a quick overview of all scheduled "Congressional Fly-Ins" events.
From The Menu Tab select: Fly-Ins > View Congressional Fly-Ins

All "Fly-Ins" will be listed and you may view all relevant information for the particular "Fly-Ins" such as:
You may also Add a new "Fly-In" by clicking the "New Fly-in" button:

By clicking the name of the "Fly-Ins" you will have a more detailed view as well as edit, delete, save, save and
close, and close/cancel options. There are four sections for each "Fly-Ins" record:
Click to Expand/Hide any of these four sections to view and/or edit information in these sections.

97.6. Fly-In Meeting Summary Report
Click 'Run Report'


98. Sharepoint Sites
99. Release Notes Links
99.1. 360 Release Notes - January 2017
Overview:
The January Release will go live January 20th. This Sprint represents continued development efforts focused on Agency Advocacy (Regulatory Comments Submission)
This multi-Sprint effort commenced in November and will be completed in February. Again, items related to the Agency Advocacy work will not be released until all interdependent parts have been developed and tested during our Quality Assurance phase.
In addition to these efforts we have picked up a few items relating to email reputation/Whitelisting and the creation of a new Disbursement Summary Report with Budget Report.
Agency Advocacy
- Regulation Search Search for Regulations that have been stored locally in 360
- Regulation Detail View
- Agency Search & Results List View
- Agency Page Agency will be created based on Regulation API call to Regulations.Gov. Currently, we do not support Ad Hoc or Data Import load
o Contact Information
o Contact List Page
o Activities Page - Action Center Regulations List Display list within dedicated tab on Action Center Page
- Advocate Submit Comment
- Regulation Activity View Permit user to click and review comment submitted by advocate
- Comment Document Save to 360 DB When attachment is submit to Regulations.Gov it will be recorded to the 360 Database
Miscellaneous
- Disbursement Summary Report with Budget- This is a new stand-alone report that is a duplicate of the previous Disbursement Summary Report with the addition of two additional columns that include Disbursement Budget & Remaining Budget Amount when Budget is associated to political committee.
- Webform Security Lock down webform to prevent the introduction of malicious code
- Mass Email Modify Unsubscribe methodology and universal email blacklist to insure service maintains reputation and whitelist status.
Details:
Regulation Comment Workflow - User will access the Regulatory Comment section via a dedicated Regulatory Tab on the Action Center.
Disbursement Summary Report with Budget - This is a new stand-alone report that is a duplicate of the previous Disbursement Summary Report with the addition of two additional columns that include Disbursement Budget & Remaining Budget Amount when Budget is associated to political committee.
99.2. 360 Release Notes - February 2017
Overview:
The February Release will go live February 22nd. This Sprint represents the culmination of our development efforts focused on Agency Advocacy (Regulatory Comments Submission).
This multi-Sprint effort commenced in November. In addition to these efforts we have picked additional items relating to blacklisting of emails and other items.
- Update Mass Email Activity to Include Link to Regulatory Comment
- Update Mass Email Activity to include Link to Regulatory List Page
- Auto-login and link tracking for Mass Email Activity for regulation alerts
Agency Advocacy
- Regulatory Tab A new tab has been added to the Aristotle 360 Menu Bar.
- Agency Search Nested within the Regulatory Tab
- Regulations Nested within the Regulatory Tab
o Add Regulation(s) Permits you to automatically add one or more regulations that may be acted on by a Regulatory Comment alert. All online activities are automatically attributed to the configured Regulation.
o Search Regulations Ability to search and Open Regulations within Aristotle 360
- Advocacy Within the Advocacy Menu Tab you will find Regulatory Advocacy related elements that are analogous to our existing Legislative Advocacy functionality.
o Add Regulatory Alert Opens Wizard to setup your Regulatory Comment alert
o Regulatory Alert List Provides a list of Regulatory Alerts.
- List of Regulatory Alerts and their status
- Users may open Alert
- Activity Metrics Click icon to access metrics relating to your action alert
o Order Published Regulatory Alerts User may modify the order in which Regulatory Alerts are displayed on the Regulatory Alerts List page.
- Action Center Website You will notice a new tab labeled Regulatory Comments with a highlighted numeric detailing the number of available Regulatory Comment opportunities. If none are available this menu will not appear to your advocates.
o Regulatory Comment Page Alert Page where users may submit comment
- Via Text Comment
- Via Document Upload
- Regulation Detail View
- Agency Search & Results List View
- Agency Page Agency will be created based on Regulation API call to Regulations.Gov. Currently, we do not support Ad Hoc or Data Import load
o Contact Information
o Contact List Page
o Activities Page
- Action Center Regulations List Display list within dedicated tab on Action Center Page
- Regulation Activity View Permit user to click and review comment submitted by advocate
- Regulation Metrics Report
- Comment Document Save to 360 DB When attachment is submit to Regulations.Gov it will be recorded to the 360 Database
Miscellaneous
- Email Blacklisting Emails will show in UI if they have been blacklisted by Email reputation agencies.
99.3. 360 Release Notes - March 2017
Overview:
The April Release went live on March 24th. This Sprint adds some enhancements and fixes in a variety areas that impact Credit Card processing, Optimization of Action Center page loads, reporting and other areas.
Action Center
- Optimize Action Center Page load at login We have taken steps to improve the performance of the Action Center login process
- Remove email Carousel and Thank you message workflow for alerts that are Twitter only
- Program Support for Legislative Alert Users may now link a Program to alerts within in the Admin page during Alert creation (Program Report Support Coming Soon).
- Modify Updating Personal Information Control Enabling advocates to update their information on the Action Center will be controlled only using Action Center Settings
o Enable using Action Center Settings under the setting menu
o Remove permission from Alert Setup
o If permission is set to disallow Update of Personal Information the site will still permit advocates to update information that is a required field (Prefix, Address, etc.)
- Move Position of Subject to above Legislator Salutation
Agency Advocacy/Regulations
- Regulatory Wizard Show correct URL link and Iframe Link after save
- Support search of Regulation using full title
- Program Support for Regulatory Alert Users may now link a Program to alerts within in the Admin page during Alert creation (Program Report Support coming soon).
- Update CKEditor in Regulatory Alert Wizard
- Regulatory Metrics Report
o Correct Date entry of report so that beginning date is never greater than end date
o Correct calculation in Report when identifying new and legacy advocates
o Permit showing of all states / not restrict to top 10
o Report should respect Time Zones
Credit Card Processing
- Make CVV Mandatory for Credit Card Processing To properly authorize and process credit card payment CVV is now required and supported within 360.
Search
- Query Builder Correct behavior when tabbing within Query Builder with visual cue on location of View Results button
- Support for Committee Representation by Home/Work address
- Support for search of Member of Congress constituents by Home/Work address
Reports
- Receipt Source Report Support selecting multiple Receipt Types
o All Sub-Types will be enforced when Multiple Receipt Types are selected
o Memo transactions will not show as report does/hasn't support this option historically
PCS Political Contribution System
- Support Multi-level Check Request Processing flag Provide an option for client Admin user to keep Enable/Disable 'Multi-Level Check Request System' flag while budgeting and using base 360 check request system.
Miscellaneous
- Research New Fax Appliance
- SPC Tracking (Client Specific)
- Show Message for link available for 14 days on exports before link is invalid
- Check Deluxe DLT147 will show Chamber/District on Memo line
- Change Mass Email Activity to use template and merge fields
- Fix Record Delete
99.4. 360 Release Notes - April 2017
Overview:
The April Release went live on April 25th. This Sprint adds some enhancements and fixes in a variety areas that govern Action Center Login process, Support for Custom Image (Infographic Type) in Legislative and Regulatory Alerts, the sharing of custom image via social media, ability to Merge Receipt Sources and linked data, Support Staff search based on Legislator Bills sponsorship status, make webform mobile responsive (will release in May) and support for New Hot-Keys for saving actions. We also worked on a variety of internal project associated with Security and hardware improvements.
Action Center/Agency Advocacy
- Support Custom Image, such as Infographics, in Legislative and Regulatory Alerts
o Images should reflect an Aspect Ratio of 2:1 with minimum dimension of 280x200 to properly display when shared on Twitter & Facebook.
o Images are stored in Repository
- Support sharing of Custom Image from Action Alert to Facebook & Social Media
- Optimize Login Process to eliminate duplicate records when advocates try to create new record when they currently are present in 360 Database
o When creating a New Record system will automatically look for records that maintain entered email and ZIP Code. System will match based on Work/Home Email and Work/Home ZIP or any combination.
- Login Screen User Interface Changes
o Add transparency to Login Screen so that when accessing on Mobile Device the alert image may be seen through Login area
o Move Action Buttons in line with Alert Title
o Increase Height of Window to prevent submit button from being cut off
Search
- Support Ability to conduct a Staff Search based on Legislator's bill sponsorship status
o Support searching for Bills based on Primary Title (not Bill No.)
Reports
- Update Program Activities Report to show Actions related to Action Alerts and Regulatory Alerts
- Client specific Transaction Details Report
- Client Specific Program Activity Report
Miscellaneous
- Committee Search
o Update Committee Search to support wild card search within COSMOS (Federal Committee Search)
o COSMOS Open COSMOS suggested Federal Committees by default to better show users potential matches
- Hot-Keys
o Support New Global Hot-Keys for Individual, Organization or Committee Entities
- Save Cntrl+Alt+Enter
o Save and Close Receipt or Disbursement
- Cntrl+Alt+Backspace
- Receipt Source Support ability to Merge Receipt Sources
o Support merging one or more secondary receipts sources to an existing Primary Receipt Source
o Receipt Source Merge will also update webform and recurring transactions
- E Fax Implementation Update fax hardware and server to insure continued performance
- Optimize Mass Activity Email Send
- Fix Printing of Profile from Entity Page
- Setup technical infrastructure of Business Analytics Proof of Concept for next Sprint
99.5. 360 Release Notes - May 2017
Overview:
The May Release went live on May 25th. This development sprint was focused on two primary initiatives; enhance Aristotle Webforms so they are mobile responsive and test a new business analytics feature within the Aristotle 360 application. We also had a variety of other projects that you may review below.
Aristotle Webforms
Aristotle webforms will respect web and mobile views by design. Legacy webforms, created prior to the Sprint 83 (May 25th) release will remain in their current state as some clients have incorporated custom CSS programming that was predicated on the old webform. The new format may alter the look and feel of the old form and we did not want to have live forms negatively impacted.
- Mobile Responsive Webforms All new webforms will be Mobile Responsive.
o When "Create a New Form" is selected the resulting new form will be mobile responsive
o Legacy webforms (created prior to May 25th) will remain in their current state
- Copying of Webforms (PLEASE READ!) The copy feature will continue to work as supported but it will respect the version of the webform being copied. For example: If an old Form is copied the new duplicated form will reflect the old webform format. We urge you to take advantage of the new format by recreating your form(s) by selecting "Create a New Form" button.
- New User Design The forms will look modern
- Login Screen User Interface Changes will be applied to webforms that incorporate both the Old format and New Format
o New Mobile Responsive Design
o Modern look and feel
- Confirmation Page User interface Changes will be applied to webforms that incorporate both the Old format and New Format
o New Mobile Responsive Design
o Modern look and feel
- Missing Required Field If field was omitted focus page on missing field
Aristotle Analytics
The development team has been working on a demonstration project where we will soon be adding business analytics support to Aristotle 360. Upon completion we anticipate supporting a new client dashboard, new reports and other data visualizations. We also expect to increase the speed in which we develop reports.
Miscellaneous
- Quick Entry Work to enhance date handling and Employer support
o Refine date entry handling
- Respect user entry of "Hash" so that adding hash advances to next logical point in date.
- User may also enter numerical values to advance with hashes added automatically as would be found when entering 05252017 to show as 05/25/2017.
o Employer Support Will work in similar fashion as adding an Employer within the Individual Entity
- New Employer added within Quick Entry will be marked as Default Employer
- User will tab to field and type a few characters and suggested list of employers will display
- User may add new employer directly from interface
- Hot-Keys Support new Hot-Keys for Individual Entity
o Submit/Save Receipt or Disbursement and close panel
- Save Cntrl+Alt+U
o Submit/Save Receipt or Disbursement and create an additional transaction
- Cntrl+Alt+T
Note: Hotkeys for adding Receipt & Disbursements to Organization and Committee are available please see full list of Hotkeys by visiting https://ai360.aristotle.com/help/hotkeys.aspx
- Advanced Search
o Support UDF Fields to allow comparative searching for date/time
- CKEditor Replace Html editor in various areas within Aristotle 360
- Security Initiatives
Reports
- Client Specific Receipt Report
99.6. 360 Release Notes - June 2017
Overview:
The June Release went live on June 27th. This development sprint delivers enhanced security, Export and display of State Legislators, support of AuthO Single Sign-On for Webforms and PCS improvements.
Security
The majority of this development Sprint was focused on providing greater level of security to our clients. Aristotle performs planned 3rd party Penetration Testing on all of our applications. This development work was focused on addressing vulnerabilities described as "non-critical". Currently, no critical vulnerabilities are known to exist.
Export of State Legislators
You may now export state legislator data fields. If there are multiple state house or senate members for an individual's district, then the individual will appear multiple times.
- Current Result set supports State Senate and State Congressman data
- Exportable Fields will be analogous to currently supported Legislator Fields.
Single Sign-On (SSO) Authentication for Webforms
To enhance your donor experience we have added a new Authentication Option for Webform called "Single Sign-On (SSO)". The client has to support AuthO to leverage this sign-on option. When enabled your donor's credentials will pass automatically into the webform identifying the user to the system to facilitate action.
Minimum Requirements:
- Client must have support for AuthO
- Client must provide Aristotle Account Manager with AuthO metadata
- Currently we only support Open ID Connect Protocol which requires following parameters:
- Client ID
- Client Secret
- Domain
- Currently we only support Open ID Connect Protocol which requires following parameters:
Clients wishing to use this login protocol will contact their account manager with requested information and they will setup the SSO login.
Pledge Programs
To facilitate tracking pledges and recurring payment we have added an optional setting to Pledge Program to write filing committee to the Pledge/Payment when Pledge is set within Webform.
- User Interface Change
- Webform Pledge Checkbox & Filing Committee Selection
- When checked the Filing Committee drop down box is active and will permit selection of Filing Committee to be associated to all pledges captured from the associated Webform
- Webform Pledge Checkbox & Filing Committee Selection
- Logic All pledges will be associated to selected filing committee when configured in Pledge Program and Pledge is enabled with in Webform.
PCS (Political Contribution System)
Work was performed to streamline business processes to manage Check Void/Re-Issue process.
Aristotle Analytics
The development team has been working on a demonstration project where we will soon be adding business analytics support to Aristotle 360. Upon completion we anticipate supporting a new client dashboard, new reports and other data visualizations. We also expect to increase the speed in which we develop reports.
99.7. 360 Release Notes - July 2017
Overview:
The July Release went live on July 28th. This development sprint delivers Forgot Username functionality, enhancement of the Relationship Viewer, Legislator Search by Bill Sponsorship, Action Center improvements, additional enhanced security, and PCS related items.
Forgot Username Functionality
Some users, especially after being Mid-Year filings, may have been away from 360 for a while and have forgotten their Aristotle 360 Username. We have added to the Aristotle 360 Login Screen a Forgot Username link to assist users in recovering their Username. User will add the email associated to their account and an email will be sent that will identify any account (Active and Inactive) to which the email is associated. This email will include a link to return to the Aristotle 360 Login Page.
Relationship Viewer
A unique capability found only in Aristotle 360 is a discovery tool called Relationship Viewer. The Relationship Viewer provides rich insights (Relationships and Political Donor data) into your advocates present in your Aristotle 360 database. The individual's giving history is not solely dependent on data resident within your internal database but also includes data mined from Aristotle 360 FatCats database. The Relationship Viewer provides an efficient way to quickly identify politically active advocates.
Please remember when using FEC sourced data the standard FEC usage restrictions remain in place in respect to solicitations.
The Relationship Viewer shows your advocate as a central "Node" and maps out Relationships (Friends, Neighbors, Coworkers, etc.) and Political Committees to which the individual has contributed. Additional Nodes are presented showing commonality between Advocate and other individuals and committees.
Legislator Search by Bill Sponsorship
Aristotle 360 makes it easy for users to search for Legislators by their status of Sponsors/Cosponsors of a particular bill.
- Query Builder Select Main Search Record = Legislator
- New Clause Type = ANDREL
- Field = Legislator Bill Sponsored
- Select Bill(s)
Order Talking Points for Phone Advocacy Alerts
Aristotle's Product Management has received feedback from our Advocacy Users where they would like the ability to Order talking Points for their Phone Advocacy Alerts. You will now find a dedicated User Interface that will permit you to set the order in which your talking points will appear within your Phone Advocacy alerts.
Using the Up/Down control you can easily change the order in which the talking points appear on the advocate facing alert page. The alert must be in an unpublished state. Once changes have been made save and publish.
Regulatory Alert Metrics Report
We have added support for accessing regulatory comments made by your advocates directly from the Regulatory Alert Metrics Report. Click on Comments Submitted Count to view activities within the Current Selection.
PCS System Enhancements
A variety of enhancements have been provided to increase the usability when managing the void/reissue scenario.
99.8. 360 Release Notes - August 2017
Overview:
The August Release went live on August 29th. This development sprint focused on enhancing our Pledge functionality, Action Center/Alert Soft-Login Process and Export enhancement.
Pledge Functionality
Aristotle 360 supports the capture of Pledges through a variety of means that include data upload, hand-entry and webforms. Pledges reflect a donor's financial commitment to the PAC or campaign within a defined period of time. During this Sprint we have made it easier to manage the process and evaluate progress to your donors' pledge goal.
- Apply Federated Access to Pledge Program's Filing Committee - When Creating a New Pledge Program users will only be presented with Filing Committees associated with their Federated Access Group insuring user does not assign pledge to an incorrect Filing Committee.
- Automatically Create Pledges from Total Payment Recurring Payments made via Webform Option whereby Admin may set a webform to automatically create pledges for Total Payment option. Automatic Pledges is set to OFF by default
- Click Check Box next to Total Payment option for recurring payment webforms
- Pledge will automatically set to Open
- Information from Webform will be associated to the Pledge
- Filing Committee
- Account
- Program
- Event
- Due Date
- Option, when set to ON, will link ALL receipts created from webform to Pledge.
- Individual Export Supports Pledge Fields For users looking for greater insight into their Pledge Programs you can now include in your current selection and export files more than 25 pledge related fields associated to your Individuals. In the edit columns list, look below Legislator related fields and above the UDF section, for Pledge related fields.
Action Center Soft Login
Aristotle 360 provides an integrated blast email service that provides the option to include one-click login to Action Alerts using a unique link that will authenticate your users without requiring them to add their Username/Password. This one click process drives enhanced conversions for action alerts and simplifies the take action process.
One concern using this feature is a scenario where a user would forward an email to a friend who would then change the sender's data. We have addressed this scenario, and locked down personal information, by requiring a user verification prior to viewing or changing personal information.
To Add Auto-Login Link:
In Email body select link Button
Soft Login Continued Below
When advocate clicks link they will be automatically logged in to the Action Alert indicated by Green Box with Advocate's first name showing. To view personal information or change information (when configured by Admin) they will click Green Box and receive the authentication challenge.
When advocate clicks link they will be automatically logged in to Action Alert indicated by Green Box with Advocate's first name showing. To view personal information or change information (when configured by Admin) they click Green Box and receive authentication challenge.
User enters credentials and may view their Personal Information
Query Builder
Append Unique Text to Column Headers for Groups and UDF for Delimited Export Method Aristotle addressed an issue where clients named Group category and UDF with the same name. When selecting Group Categories and UDF for export, the system will, by default, add information to the column header to distinguish between Group Category and UDF.
99.9. 360 Release Notes - September/October 2017
Overview:
The October Release went live on October 10th. There was no September Release based on the scheduling of our yearly Penetration Testing.
This development sprint focused on adding Federal Legislator Ratings to Legislator Page, State Bill & Vote Tracking, and the addition of "My Legislators" page within the Action Center.
The State Bills and Votes tracking enhancement is one of many further planned. We will, in future development efforts, fully integrate this functionality within Aristotle 360. This effort is the first of multiple enhancements planned
Bills & Votes Enhancement
A new feature is to provide our clients the ability to track State Bills & Vote in Aristotle 360. To add greater utility to our customers we have added the ability for your organization to add the organization's position and custom comments to provide better support for the Organization's take on specific Bills and Votes at the Federal and State level.
In the case of Federal Votes, your custom comments will be published within the My Legislator section on the Action Center. Federal Vote position and the Legislator's vote will be used to calculate a Lifetime Legislator Rating that will display on the Legislator's Record and The My Legislator section on the Action Center.
- State Bill &Vote Tracking We have integrated a data call between Aristotle 360 and the OpenStates Project. Open States provides access to State Bills & Votes data under their Creative Commons Attribution License. We have taken their data and integrated within the Aristotle 360 data structure. We provide this data as part of our Bills and Vote service though no additional fees are demanded for the State Bill and Vote data integration.
- Show Cosponsors and Votes within Bills and Votes Section
- Future Planned Enhancements
- We will add Cosponsors and Votes to Legislator page in future sprint.
- Integrate Legislator Lifetime Rating to State Legislator Entity Page
- Integrate State Legislators within the My Legislators page in Aristotle Advocacy Center
- Bill User Interface Update (Search/Create) - The State Bills integration is dependent on a distinct feed that requires specific data from the user. We have added a Federal/State toggle and Bills may be retrieved after detailing State, Chamber and Bill ID or Bill Name.
- Create a New Bill To create a new State Bill select:
- Select "Track Bill From Feed"
- Select State From Toggle
- Select State
- Select Chamber
- Select bill ID or Bill Name
- Select Search
- Check Bill from Result Set and Click Save or Save/Close
- Create a New Bill To create a new State Bill select:
- Bills and Vote Custom Details (Federal & State) - We have added new fields to add relevant context and functionality pertaining to your organization's Bills & Votes data using Custom fields. We anticipate expanding this functionality in the future within Reports, My Legislator page functions and other expressions.
- Bills
- Bill Name You may add a custom Bill Name to be associated with your Bill. Example: The Patient Protection and Affordable Care Act may be entered in Bill Name as "Obamacare or AHA".
- Position - Position would reflect your organization's stance on a specific Bill. Importantly, this Position value would carry over into an associated Vote which is used to calculate the Legislator Rating score. In the future this would drive Bills sponsorship functionality within the My Legislator page.
- Comments This is a brief narrative that describes your Organization's take on a Bill.
- Votes
- Custom Vote Name
- Position Organization Position on specific vote
- Key Vote Toggle Toggle "On" to have vote applied to Legislator's Lifetime Rating
- Comment Narrative to be include on My Legislator page
- Bills
Legislator Lifetime Rating
Based on Key Vote you track Aristotle 360 will automatically calculate a Legislator Lifetime Rating within the Legislator page. This rating detail may be express to your advocate on a new "My Legislator" page as well. The rating is calculated on how a legislator votes against your organization's state Position (See above). When "Key Vote" is selected, the vote will be used to calculated how each legislator voted in alignment to your position.
Calculation:
- A Vote (Yea/Nay) will be included in the Legislator Lifetime Rating calculation
- A Missed Vote, Not Voting etc. will not count for our against a Legislator Lifetime rating
- If not Key Votes have been calculated against a Legislator his/her Lifetime Rating will show "N/A".
- Custom Lifetime Ratings (calculations) are not currently supported but is currently being discussed as a future enhancement.
My Legislator Page
A new section that may be published on the Aristotle Action Center is a page called "My Legislator". This is new functionality that will add a new section to the Aristotle Action Center to publish information relating to your advocate's Legislators based on their Home and Business address(es).
Product Development has a number of future enhancements planned for this section including support for State Legislators, adding Bill Sponsorship support and full Legislative Scorecard by Bill.
The Page will list in card form all Federal legislators associated with the advocates home and business address. An advocate may click on a card to open a detailed page
My Legislator Page Details:
- Card
- Legislator Photo
- Legislator Name
- State and District
- Lifetime Rating N/A Indicates no Key Vote taken and rating is not available
- Detailed Record
- Legislator Photo
- Title
- External Social Media Links
- Committee Assignments
- Key Votes
- Date of Vote
- Custom Vote Name
- Custom Vote Comments
- Our Position (Organization's Position)
- Rep's Position (in relationship to Organization Position)
- Enabling My Legislators Page
- Go to Settings -> Action Center Settings -> Check box for "My Legislators".
- If My Legislator tab does not appear clear cache
99.10. 360 Release Notes - November 2017
Overview:
The November Release went live on November 9th.
This development sprint focused on enhancements to Action Center, State Bills & Votes and the introduction of a dedicated Aristotle 360 version for Canada.
Action Center
Enhanced Confirmation Page
We know Advocacy professionals are looking for additional ways to encourage their advocates to participate in their alerts. We have introduced new functionality where an advocate can take additional actions on an alert from the confirmation page. For Example: If an advocate sends an email to a legislator; they will have the ability to send a Twitter Advocacy message from the confirmation page.
- Green Check Indicates action has been taken on Legislator via contact method illustrated by icon at top of column.
- Gray Icon - Indicates no more action are available via contact method
- Blue Icon Advocate may take further action by clicking available icon to open related delivery option. Example above indicates Phone and Twitter are available to contact Legislators on current alert
- Advocate may click Blue Icon to be directed to the take action workflow for that method.
- Additionally If a user, by way of example, only sent one email out of the two available Legislators, the Blue Email Icon will remain available. And only a single Green Check icon would be displayed.
Custom Signature Support
We have received feedback from our users that they would like their advocates to always have the ability to customize their signatures. We have seen particular interest on behalf of organizations advocating for patients and professional organizations.
- Custom Signature Set as always editable by your advocates
- Added to User Interface green "Editable" tag to make clear user can impact signature.
- Formal Close / Sincerely Displayed To help advocates visualize letter we have highlighted "Sincerely" as present and non-editable.
Bills & Votes Enhancement
A new feature is the ability to track State Bills & Vote in Aristotle 360. To add greater utility to our customers, you may add the organization's position on the Bills and Votes, and custom comments to highlight why they are important to your members and indicate Key Vote status.
This release will support State Legislator Ratings based on Key state Votes, within the new My Legislator section on the Action Center. State Vote position and the Legislator's vote will be used to calculate a Lifetime Legislator Rating that will display on the Legislator's Record and The My Legislator section on the Action Center.
- State Bill & Vote Tracking We have integrated a data call between Aristotle 360 and the OpenStates Project. Open States provides access to State Bills & Votes data under their Creative Commons Attribution License. We have taken their data and integrated it within the Aristotle360 data structure. We provide this data as part of our Bills and Vote service though no additional fees are required for the State Bill and Vote data integration.
- Show Cosponsors and Votes within Bills and Votes Section
- Show Bill Sponsor status within State Legislator page
- Show Votes within State Legislator Page
- Support Legislator Lifetime Rating to State Legislator Entity Page
- Integrate State Legislators within the My Legislators page in Aristotle Advocacy Center
State Legislator Lifetime Rating
Based on tracked Votes, marked as a Key Vote, Aristotle 360 will automatically calculate a Legislator Lifetime Rating within the Legislator entity page and on the My Legislator page, if so desired, found on the Action Center. The rating is calculated on how a legislator votes compares to your organization's Position (See above). When "Key Vote" is selected, the vote will be used to calculate Lifetime Rating based on how the legislator vote aligns to your position.
Calculation:
- A Vote (Yea/Nay) will be included in the Legislator Lifetime Rating calculation
- A Missed Vote, Not Voting, Other etc. will not count for our against a Legislator Lifetime rating
- If no Key Vote have been calculated against a Legislator his/her Lifetime Rating will show "N/A".
- Custom Lifetime Ratings (calculations) are not currently supported but is currently being discussed as a future enhancement.
My Legislator Page State Legislators
A new section that may be published on the Aristotle Action Center is a page called "My Legislator". This functionality will add a new section to the Aristotle Action Center displaying your advocate's Legislators.
The Page will list in card form all State legislators associated with the advocates home and business address. An advocate may click on a card to open a detailed page that shows the following.
My Legislator Page Details:
- Card
- Legislator Photo
- Legislator Name
- State and District
- Lifetime Rating
- N/A - Indicates no Key Vote taken and/or rating is not available
- 0 Indicates Legislator has voted against your position on ALL available key votes
- Detailed Record
- Legislator Photo
- Title
- External Social Media Links
- Committee Assignments
- Key Votes Coming Soon!
- Date of Vote
- Custom Vote Name
- Custom Vote Comments
- Our Position (Organization's Position)
- Rep's Position (in relationship to Organization Position)
- Enabling My Legislators Page
- Go to Settings -> Action Center Settings -> Check box for "My Legislators".
- If My Legislator tab does not appear clear cache
Aristotle 360 Canada
Aristotle is pleased to extend to Canadian Advocacy Professionals the same great functionality our US clients enjoy. This will be a multi-Sprint effort but we have made tremendous progress in supporting Parliamentary Advocacy capabilities within 360. Some of the functionality included in this development include:
Canadian Legislator Matching
- Serialize appropriate Localization based on User Login Provides Aristotle 360 to manage appropriate US or Canadian experience and localization based on User Credentials.
- Postal Code to District Matching for Canada -The most important foundation for supporting parliamentary advocacy is matching advocates to their Legislators.
- Canadian Legislator Database Add Canadian Legislator Database to Aristotle 360 Canada database.
- Canadian Address Correction and Standardization To insure accurate legislator matching we support Canadian Address Correction.
Aristotle Advocacy Canada
To support Canadian Advocacy users, modifications where made to the Advocacy Administration Wizard and Action Center.
- Action Center Admin Wizard
- Eliminate Issue Categorization No concept of Webform Issues present in Canada
- Jurisdiction Localization Show Federal and Provincial targeting values
- Support Canadian Provinces
- Committee and Bill Support is not present as targeting values at this time.
- Aristotle Advocacy Canada We have enhanced the Action Center to handle Canadian Addresses in the Registration and Login Page
- Take Action on Alerts Ability to send Alert emails to Canadian Legislators
- All Standard Alert Functionality is enabled
- Automatic Legislator Target Matching
- Sample Message Presentation
- Edit Sample Message based on controls defined in Admin section
- Multiple Communications Capability
- Custom Email Signature is Always On
- Enhanced Confirmation Page
- Confirmation Email(s) Sent to Advocate
- Activity Capture
- All Standard Alert Functionality is enabled
This development sprint focused on enhancements to Action Center, State Bills & Votes and the introduction of a dedicated Aristotle 360 version for Canada.